


Can you even imagine the joy when these pita’s puff up like this? It’s a wondrous sight.
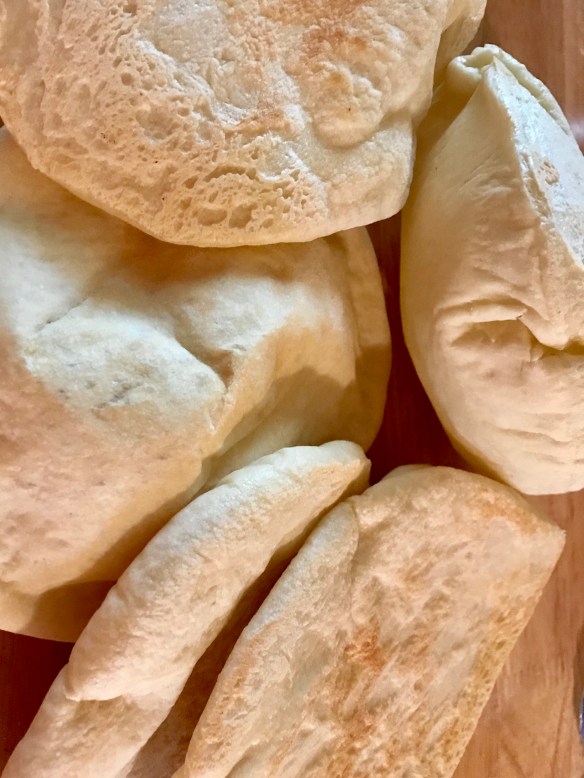
Puffed, tender and delicious. Make some hummus to enjoy or serve with dinner as a flatbread, or stuff with your own fixings. You will be really happy you tried this.
Before you even read this recipe I have to give you full disclosure that it is copied, completely, from Deb at Smitten Kitchen. She has some amazing recipes, all created in her tiny New York kitchen, and if you haven’t visited her website yet, you must. This is one of those recipes that I didn’t even have to tweak, we loved it.
- 3 cups plus a scant 1/4 cup (455 grams) all-purpose or bread flour
- 2 teaspoons (13 grams) fine sea or table salt
- 2 teaspoons (6 to 7 grams) instant yeast
- 2 tablespoons (30 grams) olive oil
- 1 1/4 cups (295 grams) water, at room temperature
Let the dough rise: Scrape the dough into a large oiled bowl. Press it down and coat the top with a little oil too. Cover the container with a lid or plastic wrap. With a piece of tape, mark the side of the container at approximately where double the height of the dough would be. Let the dough rise at room temperature for 1 1/2 hours, or in the fridge overnight (or up to 3 days), until doubled.

This little ball of dough doesn’t look like much now, but just let it sit for a while ….
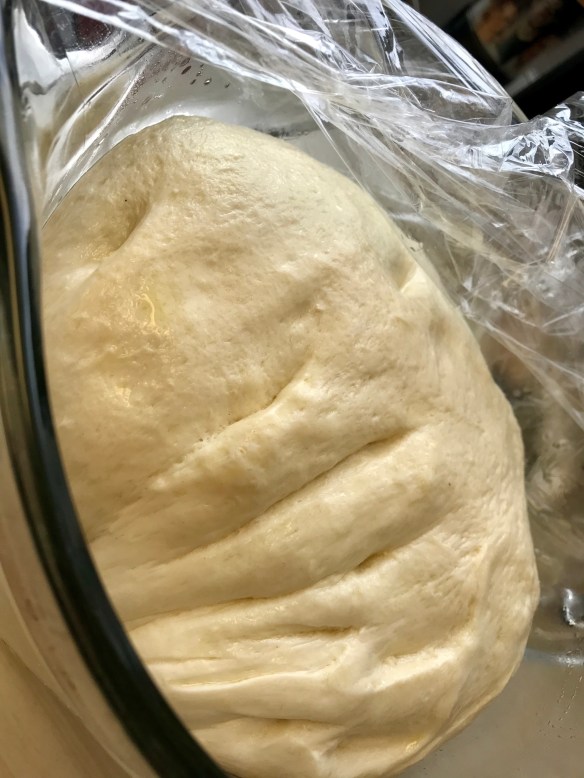
LOOK! After sitting on the counter for a few hours (you can use it after an hour or so) the dough has more than doubled and ready to be turned into rounds.
To bake pitas in the oven: Preheat your oven to 475°F 20 minutes before baking. Have an oven shelf at the lowest level and place a baking stone, cast-iron skillet, or baking sheet on it before preheating. Do not oil the skillet or baking sheet.
Shape the dough: Cut the dough into 8 or 12 pieces. Work with one piece at a time, on a lightly floured counter, with lightly floured hands, shape each piece into a ball and then flatten it into a disk. Cover the dough with oiled plastic and allow it to rest for 20 minutes at room temperature.

If you’ve got a 5 year old around, put them to work. Stella did a great job forming balls and flattening them for their 20 minute rest.
Roll each disk into a circle a little under 1/4 inch thick. Allow them to rest, uncovered, for 10 minutes before baking. Spritz lightly with water while resting.

I don’t have a spritz bottle, so just brushed them lightly with a water moistened pastry brush.
Bake the pita: Quickly place 1 piece of dough directly on the stone or in the skillet or on the baking sheet, and bake for 3 to 4 minutes (less for small ones, longer for big ones). The pita should be completely puffed but not beginning to brown. The dough will not puff well if it is not moist enough. See how the pita puffs, then, if necessary, spray each remaining piece with additional water before baking.
Proceed with the remaining dough, baking 3 or 4 pieces at a time if using a stone or baking sheet. using a pancake turner, transfer the pita breads to a clean towel, to stay soft and warm. Allow the oven to reheat for 5 minutes between batches. The pitas can be reheated for about 30 seconds in a hot oven before serving.
To cook the pitas on the stove top: Heat a griddle or cast-iron skillet over medium heat. Lightly, very thinly, grease the surface and cook the pitas one at a time. Cook for about 30 seconds, then rotate the dough slightly (about a quarter-turn) and continue cooking for 1 to 2 minutes more. Small surface bubbles slowly grow to larger ones, and then eventually “find each other” merge and that becomes your big balloon pocket. Make additional small rotations if the process stagnates. The entire cooking process for each pita should be about 3 minutes.
Whole wheat variation: For a whole wheat version, use half whole wheat and half white flour, or you can make these entirely with white whole wheat flour — for this last option, you’ll need 1/4 cup extra water.
