Vietnamese Salt & Pepper Squid

That dipping sauce might look a little muddy, it was doubling up but trust me, it was delicious!

One of the dishes (among many) that we loved on our travels through Vietnam and Cambodia was Salt & Pepper squid.  Naturally, that squid was ultra fresh, and so very tender it literally melted in your mouth.  Typically served with a bowl of rice, and a pile of greens it is the perfect light dinner.  I love the combination of flavours found in most Vietnamese dishes – fish sauce, lime juice and pepper.  Those show up in so many tasty dishes – makes my mouth water just thinking about it!

SALT & PEPPER SQUID

  • 400 gr squid **
  • 1 tbsp coarse salt
  • 1 tbsp whole black peppercorns
  • 1/4 cup all purpose flour
  • 1/4 cup rice flour (you can substitute corn starch)

OIL – to use for frying – make sure you use a high smoke point oil such as peanut, canola or vegetable. – heat to 350 degrees.  If you don’t have a thermometer, stick a chopstick in there …. once it bubbles all around the chopstick it is ready.

SALAD OR GREENS TO SERVE

Prep whatever fresh vegetables or salad you want to serve.

DRESSING

  • 1 clove garlic, minced
  • 1 tsp ginger, minced
  • 1-2 tbsp fresh red chili, seeded and finely chopped (or chili flakes to taste)
  • 2 spring onions, thinly sliced
  • 2 tbsp freshly squeezed lime juice
  • 1-2 tbsp sugar (I usually stick with 1)
  • 4 tbsp fish sauce
  • 4 tbsp water

If you try anything – make it this dressing! I use it for salads all the time and it is so light and refreshing while adding so much flavour to a simple salad.

** Squid – if you can get it fresh then clean it and slice into rings – leaving tentacles whole.  I’ve only used frozen at this point but you know I will be sourcing some fresh squid!!

Once your squid is prepped, bash up the salt and pepper in a mortar and pestle – bash until cracked and broken but don’t turn it in to a fine grind.  Sprinkle a little directly onto the prepared squid.  Pour the rest into a bowl with the flours and stir until combined.

When oil is hot enough,  put a handful of the squid into the salt/pepper/flour mix and toss to coat lightly and cook in batches in the hot oil.  Do not overcrowd your oil or it will cool down and your squid will absorb more of the oil. 

Remove from oil and sprinkle lightly with salt and pepper.  

If you like a dipping sauce – just bash up a bit more salt and pepper, mixing it with fresh lime juice.

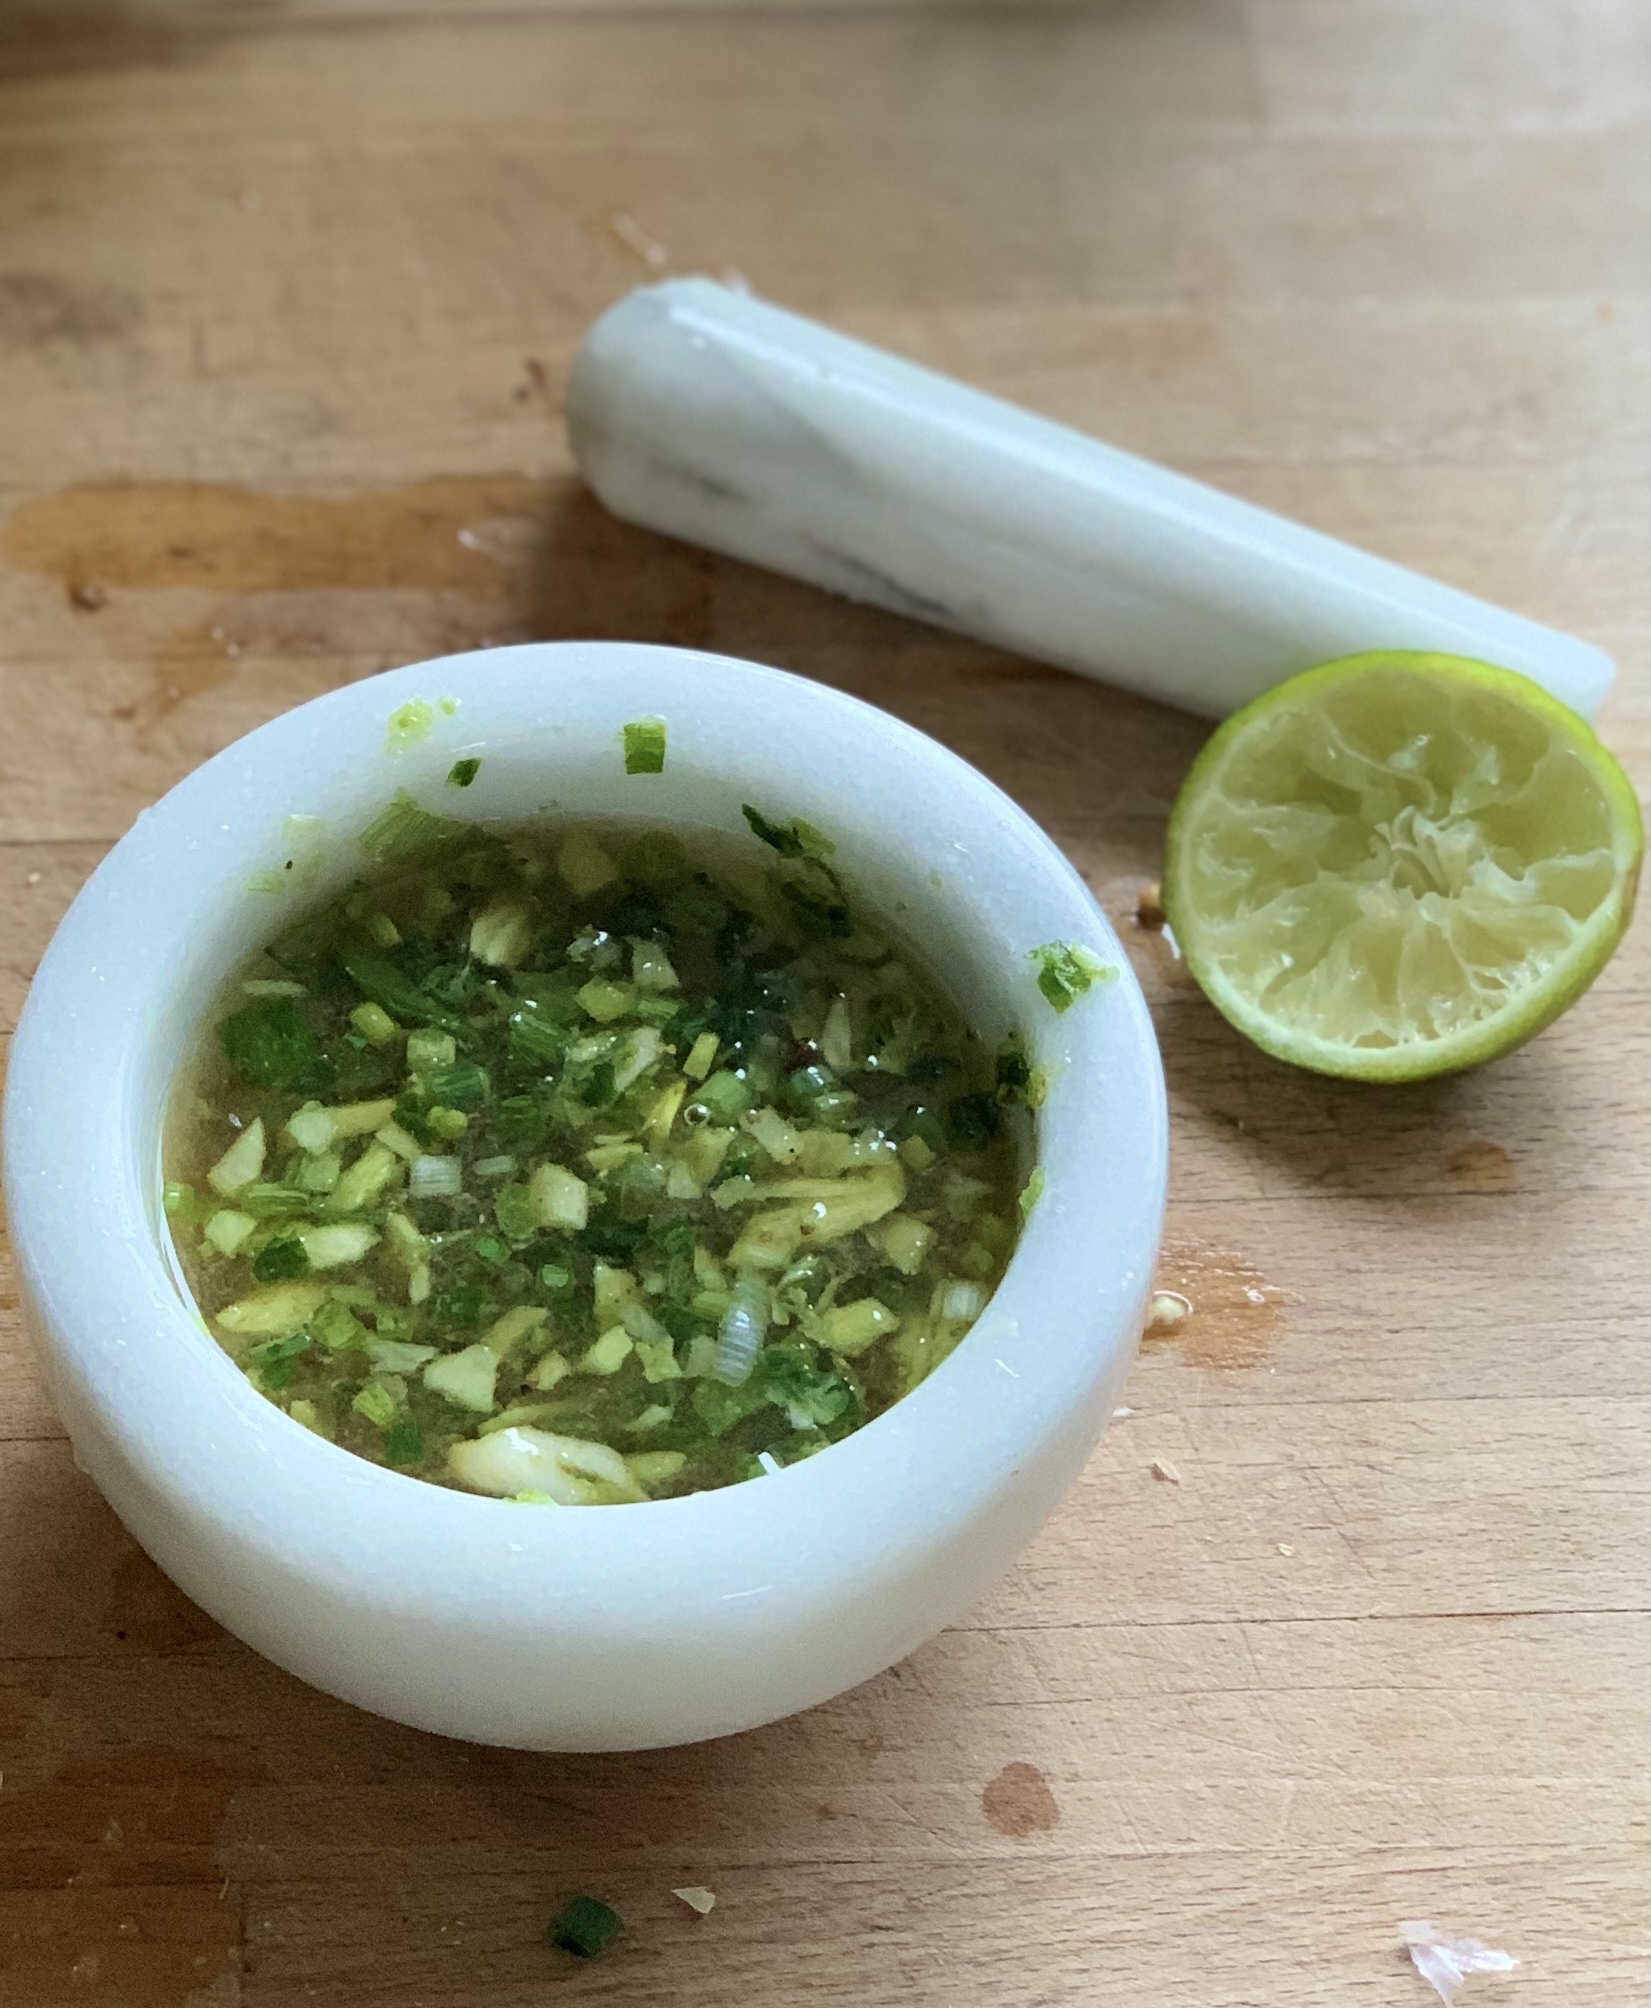
The dressing couldn’t be easier!  Again, the mortar and pestle comes into action so I hope you didn’t clean it after bashing salt and pepper …… Drop in garlic, ginger, spring onion and chili …give it a good bit of action until you have created a paste.  Add lime juice, sugar, fish sauce and water.  TASTE.  TASTE IT AGAIN.  Every single item can be a slightly different taste profile from what I am using and for your individual tastes.  Adjust if necessary.  It should be slightly sweet, slightly salty, slightly hot and slightly tangy.  

If you don’t have a mortar and pestle then just chop everything quite fine and add in the other ingredients … I have about 3 of them so I love using them but don’t run out and buy one if you don’t love the process!

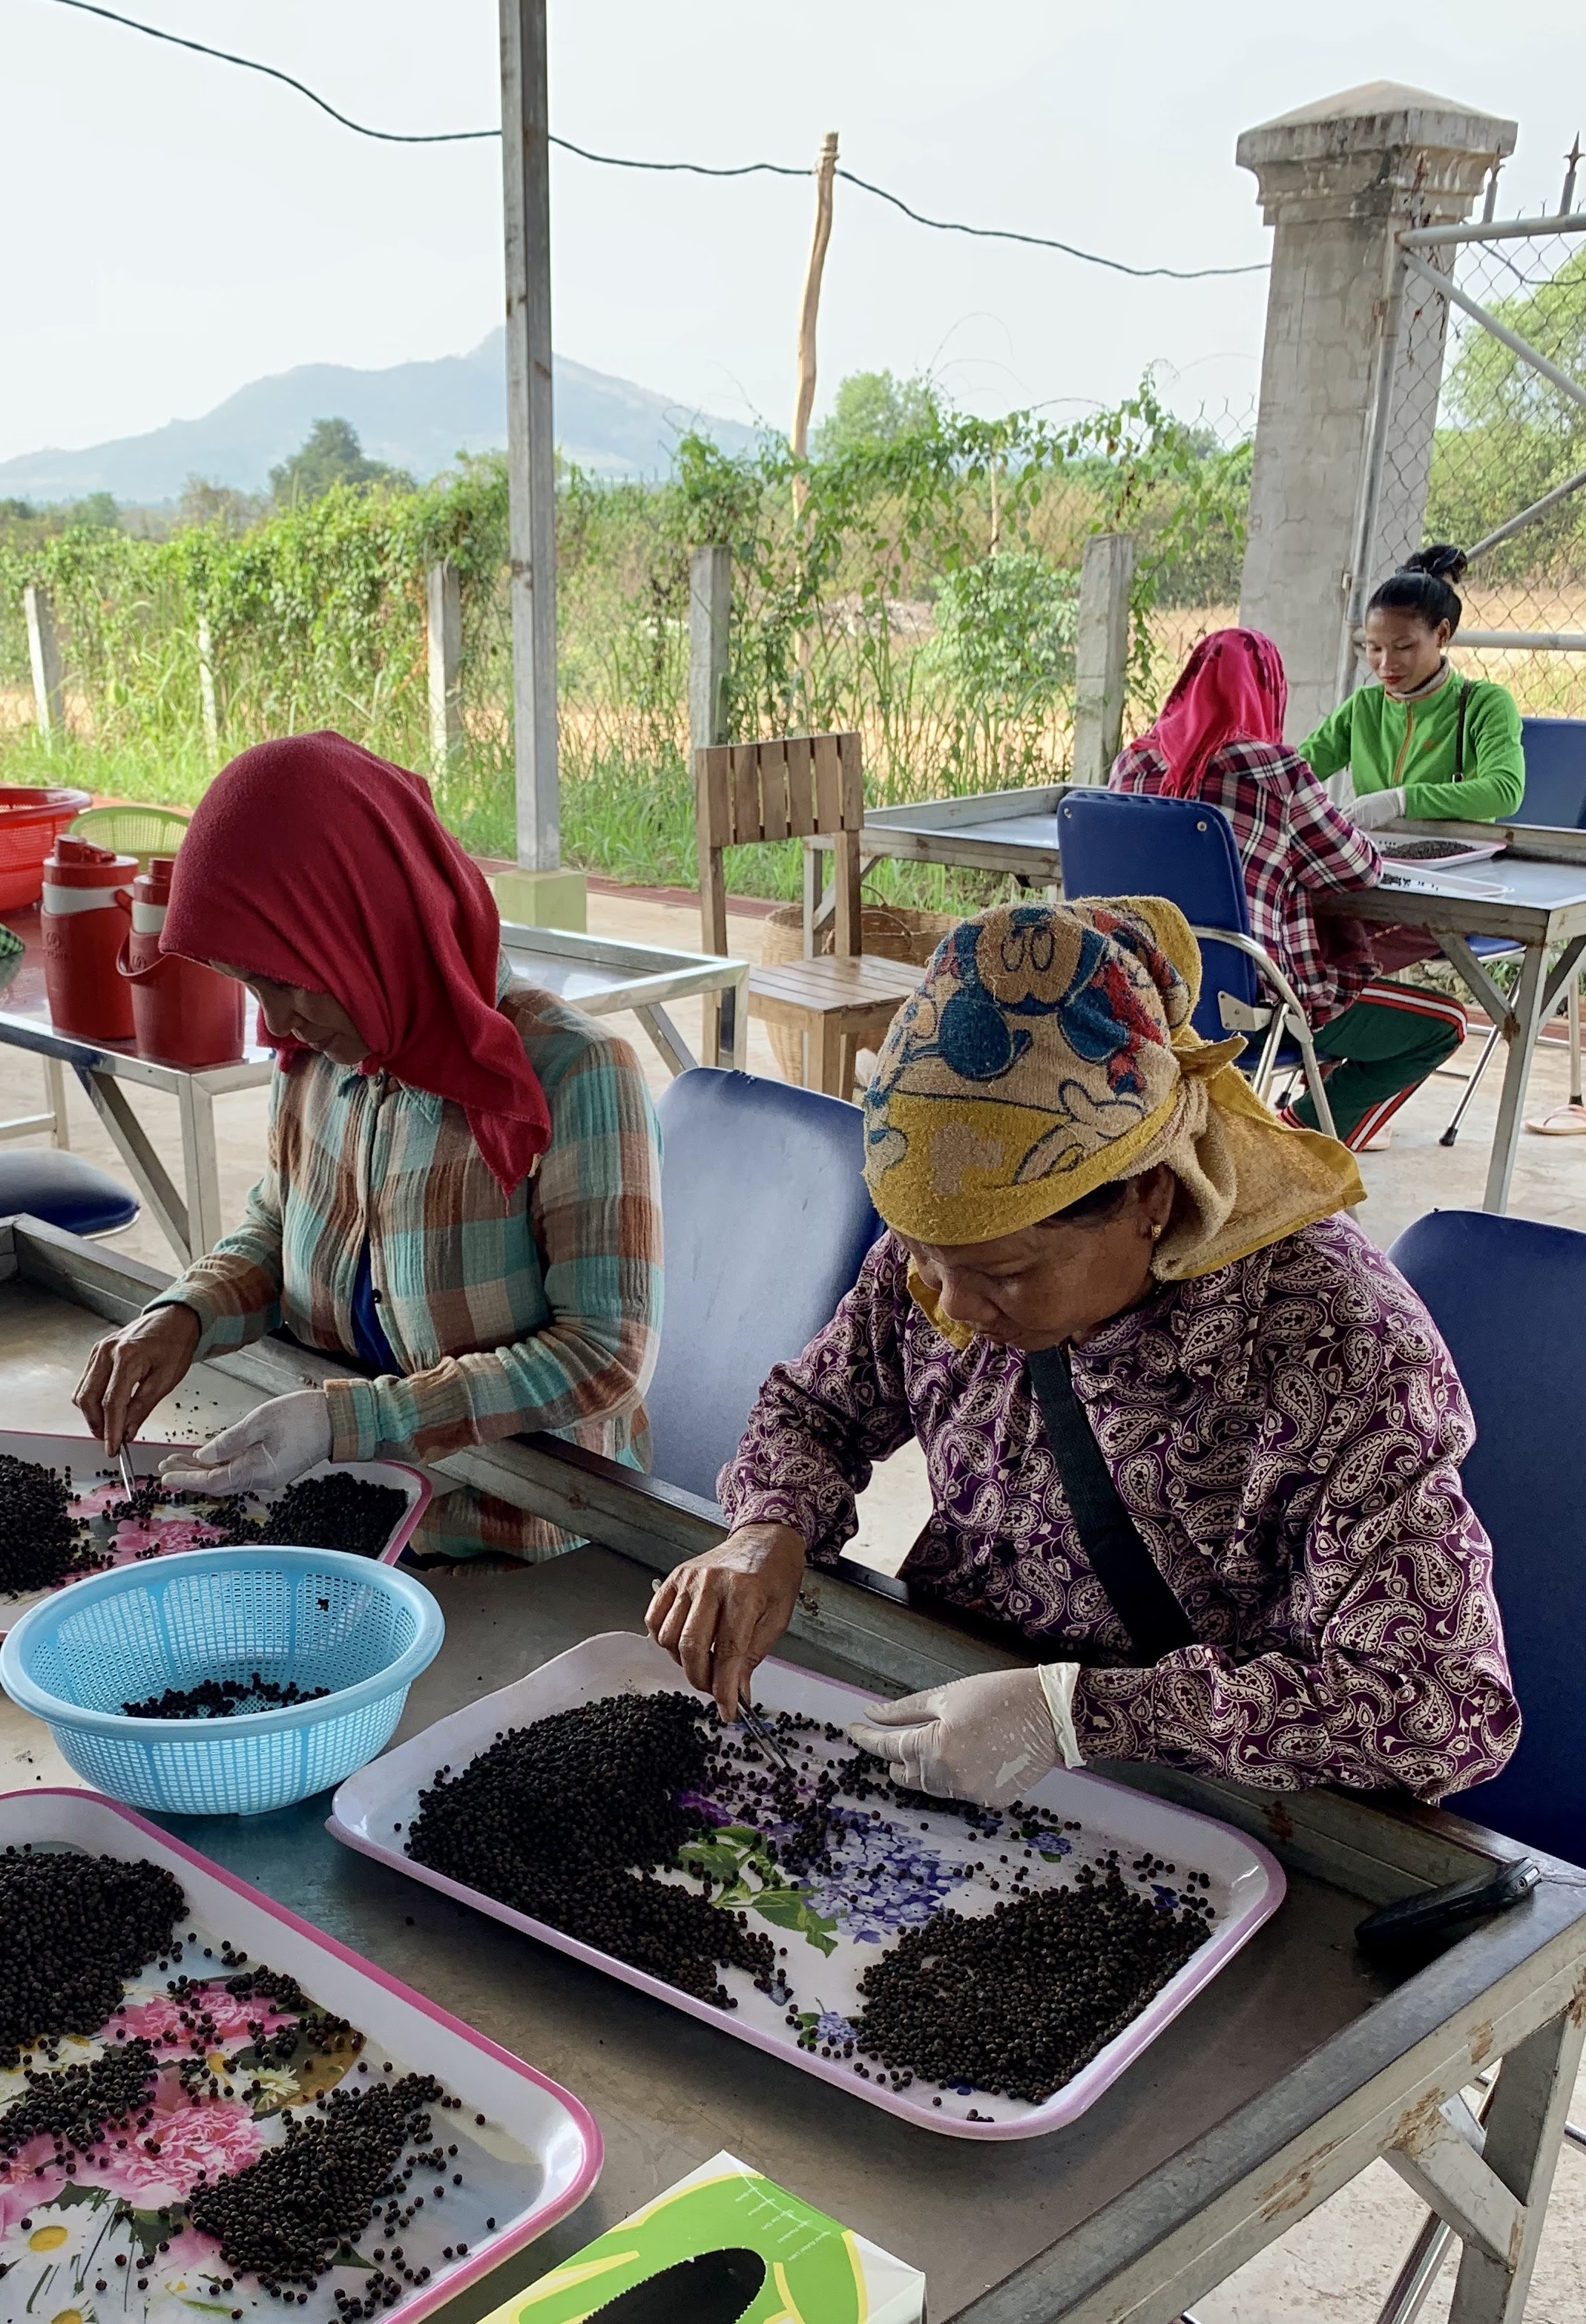
To serve lightly dress your salad with the dressing, pile the squid on and serve with a side of rice if you like, just the way it is served in Cambodia & Vietnam ….. oh take me back! We bought our pepper from the Kampot Pepper Plantation in Cambodia. Touted as the best pepper in the world we had no choice. It really does make a difference when the pepper is that fresh.

Give that salt and pepper a good bash up, but stop before it is all pulverized, a little texture is perfect.
I wish you could smell this! (even though fish sauce tastes a lot better than it smells)
Ready to be dressed at the last moment – this is so light, partially due to the lack of oil.
At the Kampot Pepper Plantation …. yes, those ladies are hand selecting black peppercorns with tweezers!

Korean Pancakes

OMG – so good. This and a salad was perfect for dinner.

I love making scallion pancakes, really wanted something that could be a whole meal deal, and ended up with this – a bit of mash up between Korean Pajeon pancakes, Japanese Okonomiyaki and Chinese scallion pancakes. This gojuchang dipping sauce makes it slightly more Korean influenced, but if you don’t have gojuchang in your fridge then you could easily make a dipping sauce of soy sauce and rice vinegar. (or buy something!)

PANCAKE BATTER

  • 1 1/2 cup all purpose flour
  • 1/3 cup potato starch (could sub corn starch if this isn’t one of your staples)
  • 1 1/2 tsp sugar
  • 1 1/2 tsp baking powder
  • 1/4 tsp baking soda
  • 1/2 tsp freshly ground pepper
  • 1/4 tsp salt
  • 1 1/2 cups ice water
  • 2 garlic cloves, minced

Oil for cooking

VEGETABLE SUGGESTIONS

  • shredded cabbage
  • slivers of spinach
  • very thinly sliced cauliflower
  • minced red onion
  • very thinly sliced red pepper
  • lots of thinly sliced scallions (spring onions)

Prepare all your vegetables and set aside

If you are inclined to do so, go ahead and add shrimp or cooked shredded chicken to make it a heartier pancake. If you do – I’d add it as soon as the batter is spread out in the pan so you can distribute evenly.

DIPPING SAUCE

  • 1/4 cup light soy sauce (I use reduced sodium)
  • 1 tbsp rice vinegar
  • 2 tsp toasted sesame oil
  • 1 tsp sugar
  • 2 tsp gojuchang
  • 1/2 tsp finely slivered ginger
  • 1 minced garlic clove
  • 1 finely sliced spring onion
  • 1 tbsp toasted sesame seeds

Mix well and taste. NO REALLY, SERIOUSLY, TASTE!!! Every different product has a slightly different flavour profile, and you have your own taste preferences so make sure this dipping sauce hits all the notes you are looking for and adjust as needed. Of course, if you aren’t a cooking nut like myself, you may not have all that in your pantry so just buy a jar of dumpling/gyoza dipping sauce! ha ha

METHOD

Whisk together dry ingredients until well combined. Make a well in the centre of the flour mixture and stir in the ice water and minced garlic. Stir just until combined, then add in the vegetables.

I haven’t specified any amounts for the vegetables, so feel free to experiment with how you like the pancakes. This amount of batter will make 4 good size pancakes with a generous serving of vegetables in each one – feel free to pack in as many veg as you like – you literally only need enough batter to hold it all together in the fry pan.

In a non stick pan, heat about 3 tbsp oil until quite hot – stick a wooden chopstick in, and if it sizzles you are ready!

Scoop in about 1 cup of batter and quickly spread it out so it resembles a pancake. Gently swirl the pan allowing the oil to circulate so the pancake gets crispy bits and nicely browned. Like any pancake, only flip it once you start to see bubbles popping on the surface.

Flip, drizzle another tablespoon or so of oil around the edges and swirl so this second side also gets crispy around the edges.

When nicely browned on both sides, remove to paper towel lined plate and keep warm. As soon as you remove it from the heat sprinkle with toasted sesame seeds, and a fresh grate of salt.

This is what I had in the fridge today, so this is what the pancake had! Go ahead and find your own favourites, I really wanted bean sprouts but couldn’t find any decent ones at the store.
You could easily get more vegetables in there, and also create a thinner batter with just a bit more ice water. Whisk an egg into the batter if you are looking for extra protein but want to omit any seafood or meat, and keep it vegetarian.
Todays version included some raw shrimp, which I quickly placed as soon as the batter was down in the pan, and then sprinkled with sesame seeds. I wouldn’t use cooked shrimp as they might toughen up.
What a beauty!
Sprinkle with seasoning as soon as you take them off the pan and keep warm until ready to serve. I also sprinkled with a little bit of Furikake today.

If you have never tried gojuchang, then do so! I love it. My first foray into cooking with it was for KFC, Korean Fried Cauliflower and was immediately hooked. It is a Korean chili paste that has so much flavour – slightly tangy and not too spicy.

Fruit Pizza for Dessert!

Spring is here!  This fruit may not be in season here yet, and I can’t wait to make this when it is, but berries and mango are often available and you can use whatever fruit you like to make this refreshing dessert.  

The perfect cookie crust is tender but firm and a little crunchy – top that with the best of seasonal fruit on a creamy pudding bed and you’ve got a fabulous dessert.

COOKIE CRUST

  • 1 1/2 cup all-purpose flour
  •  1 tsp baking soda
  •  1/2 tsp baking powder
  •  1/4 tsp salt
  •  3/4 cup sugar
  • 1/2 cup butter unsalted, softened
  • 1 large egg
  • 1 tsp vanilla extract


INSTRUCTIONS

  • Preheat oven to 375 F degrees. Line a cookie sheet with parchment paper.
  • In a bowl mix together the all purpose flour, baking soda, baking powder and salt. Set aside.
  • In the bowl of your mixer add the sugar and butter and beat for a couple minutes until light and fluffy. Add egg and vanilla extract and continue mixing until the egg is fully incorporated. Add the flour and mix for an additional 2 minutes. Take the cookie dough and form it into a ball. Place it over the prepared baking sheet. Roll the ball into a round large cookie or any shape you prefer. You might need to add some more flour over your roll or over the cookie so that it doesn’t stick.The cookie should be at least 1/4 of an inch in thickness.
  • Bake the cookie for about 12 to 15 minutes or until edges are golden. Let it cool completely.

Make this cookie crust ahead of time – even a day ahead is fine, but be sure to let it cool down.

CREAMY CUSTARD

  • 3 tbsp corn starch
  • 1/4 cup white sugar
  • 1/4 tsp salt
  • 2 egg yolks, beaten
  • 2 cups whole milk
  • 1 tsp vanilla bean extract

In heavy bottom saucepan stir corn starch, sugar and salt together. Slowly add the beaten egg yolks and milk. Stir until thickened, remove from heat and add in the vanilla. Cover the top wth plastic wrap to avoid a skin forming and allow to cool completely.

(You can also do this in the microwave, but watch it! I’ve had it spill up and over more than a few times …..)

ASSEMBLY

Spread the cooled custard on the cold cookie crust. Arrange fruit of your choice to cover the custard and allow to set completely before serving.

Creamy Garlicky Shrimp Tagliatelle

I don’t know about you, but an advertised 20 minute recipe NEVER takes me 20 minutes.  This one was close tho ….. and very easy.  Not only easy, but delicious and I’m more than happy to spend a few more minutes to achieve delicious.

img_4909

  • 8 ounces dried tagliatelle pasta (or really, any pasta you like!)
  • 2 tbsp butter (separated, see below)
  • olive oil
  • 10 ounces small, peeled and cleaned shrimp
  • 3 garlic cloves (yes, really)
  • 1/4 cup dry white wine (I like sauvignon blanc but any dry white will work – stay away from sweet tho)
  • 1/2 cup chicken broth
  • 3/4 cup heavy cream
  • 1/2 cup thinly sliced onion
  • 1 cup sliced crimini mushrooms
  • 1 cup asparagus (cut into 1″ pieces)
  • 1/2 cup minced sun dried tomatoes
  • 1/2 tsp chili flakes (or to taste)
  • 3/4 cup freshly grated parmesan (do NOT use purchased grated!)
  • 2 tbsp fresh parsley, minced
  • black pepper
  • more parmesan for serving
  1. Get a large pot of water on the stove and bring it to a boil.  Salt and add pasta.  Cook to one minute short of the cooking instructions …. (in order to finish in the cream sauce).
  2. Before draining, scoop out about 1/2 cup of pasta water.
  3. Get a nice flat bottom skillet (non-stick works great here) and melt 1 tbsp butter.  Drain your shrimp and pat dry (you don’t want them to steam) ….. toss the shrimp into the melted butter and sauté quickly – until ALMOST cooked.  Depending on your shrimp size this might only take a minute or two.  There is nothing worse than rubbery, overcooked shrimp.  Well, okay, lots of things are worse including this COVID nightmare we are living through….  Remove from heat and lightly season with salt and pepper.
  4. In the same skillet heat the other tbsp butter and add a splash of olive oil – once melted add the onions, sauté until soft, add mushrooms and cook until just lightly browned, then add the garlic, asparagus and sun dried tomatoes.  Add chili flakes.
  5. Stir in the white wine and allow to reduce slightly, then add the chicken broth, cream and parmesan.  Season to taste ….  I didn’t need to add any more salt but that finishing black pepper is great.
  6. Add your mostly cooked pasta to the skillet and toss to cover.  The sauce will continue to thicken and this is the time to add some of your reserved pasta water a bit at a time, only as needed.  Stir in the shrimp to heat through, toss with parsley and serve with a grating of fresh parmesan and black pepper.
  7. Dig in!
These plump & juicy little guys are barely cooked and will finish in the cream sauce
Easy to make this a vegetarian meal – just stir in as many veg as you like and omit the shrimp.