Sweet & Spicy Peach Jalapeño Jam

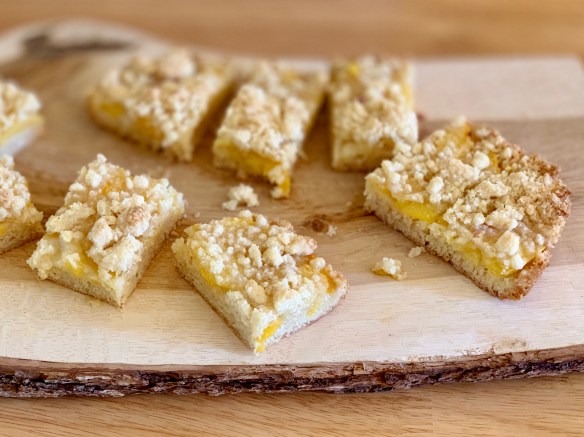
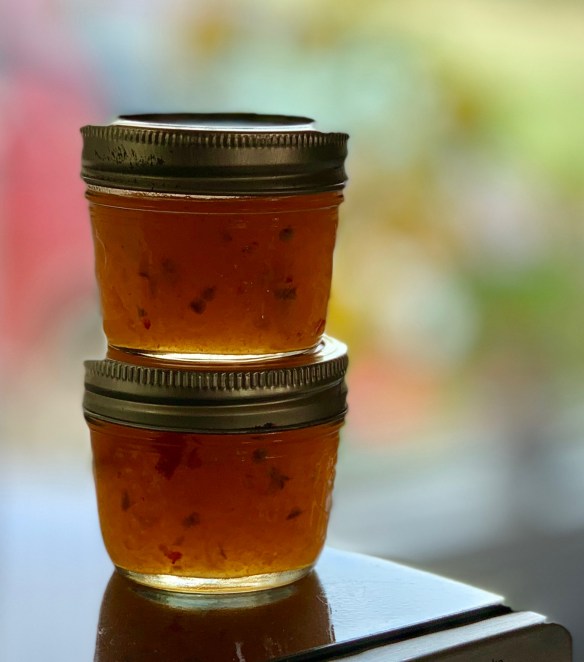
When you’re sitting in an abundance of peaches, and the jalapeños are right outside in the garden, you start thinking of all sorts of great ideas for them.  This jam is perfect with its kick of heat and the sweetness of the peaches.

Spicy Peach 1

Oh my goodness, have to run out right now and get a wheel of Brie to serve this on.  It’s that good.  And that easy!

INGREDIENTS
  • 3 lbs (about 7-8) very ripe peaches, peeled, pitted, and roughly chopped (you should have about 8 cups of fruit)
  • 3 TBSP fresh lemon juice
  • 1 TBSP apple cider vinegar
  • 5 cups sugar* (see below, for Ringo En Orchard peaches you can halve this amount)
  • ½ tsp. Lemon zest
  • ½ tsp. Freshly grated ginger
  • 3 TBSP (half a 1.75oz packet) powdered pectin
  • 3 jalapeno peppers**
INSTRUCTIONS
  1. Before you begin, place a small plate or saucer in the freezer so you can check the jam’s consistency towards the end of cooking.
  2. (Optional), if you plan on canning your jam, bring a large stock pot of water to a boil and cook your (clean and empty) jars and lids to sterilize them. Using canning tongs, remove the jars to a clean dish towel to dry. Keep the stock pot of water at the ready for sealing the jars later.
  3. To peel the peaches, blanch quickly in boiling water (thirty seconds should do), then transfer to a bowl of cool water. This will help the skins slide off easily using just your hands. One peeled, remove the pits and roughly chop the peaches. Place in a large pot or enameled dutch oven (stay away from bare cast iron or aluminum, as the acidity of the jam can react with the metal).
  4. To the pot with the peaches, add the sugar, 2 TBSP lemon juice, cider vinegar, lemon zest, ginger, and pectin. Stir to combine, and let sit for 10-15 minutes to macerate.
  5. Meanwhile, prep your jalapenos. Remove the stems, and cut the peppers in half lengthwise. If you want a spicy jam, leave all of the seeds and veins in the peppers. For a milder jam, remove some or all of the seeds and veins by scooping them out with a spoon. (See recipe notes for more details.)
  6. Add the peppers to the bowl of your food processor, and pulse until very finely chopped, scraping down the sides if needed.
  7. Add the chopped peppers to the pot with the rest of the ingredients, and place over high heat. As the mixture heats up, gently break up the peaches with a potato masher or fork. (If you prefer a smoother jam, use an immersion blender to puree the mixture BEFORE turning on the heat.)
  8. Bring the mixture to a full boil, and let cook for 5-10 minutes, stirring occasionally to keep the bottom from scorching. As the mixture boils, skim off any foam that appears on the surface.
  9. To test the jam, spoon a small amount onto the saucer that’s been chilling in the freezer. This will give you an idea of how thick the jam will be once it’s cooled. If the jam sets up to your liking, it’s done. If it’s too loose, cook a few minutes longer and test again. (Once the jam has cooled on the plate, this is the perfect opportunity to give it a taste. Keep in mind that the jam will taste significantly spicier while it’s fresh than it will the next day. If you’re worried that it is still going to be too spicy, or if it isn’t sweet enough, you can add an additional ½ cup of sugar and cook until completely dissolved.)
  10. Once the jam starts to set up to your liking, remove it from the heat and stir in the remaining TBSP of lemon juice.
  11. Carefully ladle the hot jam into your clean jars (a canning funnel is a big help, if you have one) leaving about ½ inch of head room in each jar. Once the jars are filled, wipe the rims with a damp towel to ensure a clean seal, and screw on the lids.
  12. (Optional) if you want to preserve your jam, return the sealed jars to the stock pot of boiling water, lowering them in carefully with canning tongs, and making sure the water is deep enough to cover the jars completely. Cover the pot with a lid and let the jars process in the water bath for 6-8 minutes. Remove the jars and set them carefully onto a clean kitchen towel. Let sit at room temperature, undisturbed, until completely cool. If you’re using ball jars, the metal lids should make a “pop” or “ting” sound as they cool, and the bump in the center of the lids should no longer flex when pushed down on, letting you know the jars have properly sealed. If any jars don’t seal completely, store these in the fridge and use within a couple months. Jars that are properly sealed can be kept in a cool dark place for up to a year.
Spicy Peach 2

Sweet peaches, just gently stirred with the rest of the ingredients, waiting for their buddy ….. Spicy Jalapeños.

Spicy Peach 3

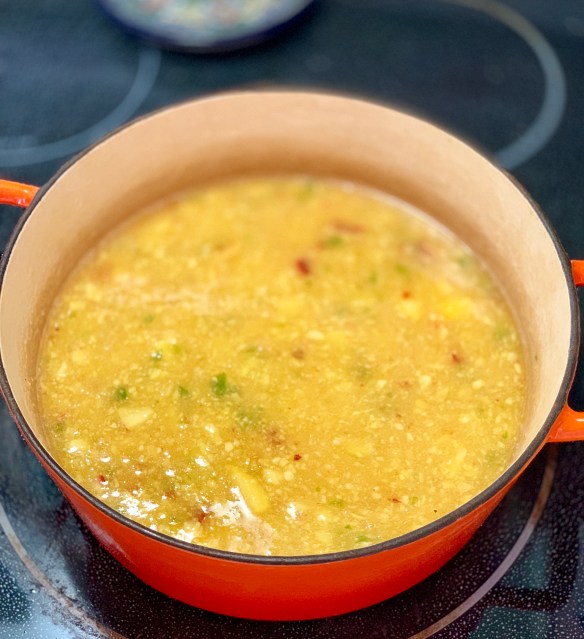
I opted to use my immersion blender to get a mostly smooth jam, leaving a few chunky bits for a little texture.

Spicy Peach 4

Cook until the jam has this glossy glorious sheen to it.  Once it cools it thickens.


This recipe is ENTIRELY from Willow at ww.willcookforfriends.com …. I didn’t change a thing, and it was perfect.  Willow notes that her peaches are not necessarily that sweet, but living here in the Okanagan Valley, and at Ringo En Orchard, our peaches are THE BEST, so I reduced the sugar (according to her suggestion) to 2 1/2 cups sugar.  That was perfect …. the trick is to taste your peaches!

NOTES

*Living here in the midwest, the sweetest peaches I can come by still pale in comparison to true southern, tree-ripened peaches. If your fruit are especially sweet, you can feel free to start with less sugar, and add more to taste. (Keep in mind that if you plan on canning your jam, less sugar means a shorter shelf life.)

**The heat of a hot pepper is contained (mostly) in the seeds and veins. To control how spicy your jam is, you can leave these in (hot!), or remove some or all of them (mild). I found I really liked the level of heat from de-seeding one of the peppers, while leaving the other two. If you aren’t sure how much heat you want, I suggest de-seeding all but one of the peppers, and adjust from there with future batches to find what you like best. (And of course, if you just want some good ol’ fashioned peach jam, you can leave the jalapenos out all together. Ain’t nothing wrong with that!)

Keep in mind that the jam will mellow considerably over the first 24-48 hours after being made, so don’t worry if it seems spicier than you want at first. When I first tasted my batch, it was waaaay spicier than I wanted. The next day? Perfection!

Energy Balls

Energy Balls 3

Nailed it!  These energy balls are perfect for a bite on the go, or if you just realized you forgot to eat today …… (Hello Hayley).  This is the perfect recipe for a little creative flexibility.  We don’t like raisins, so you won’t find any here but they could easily be used in place of cranberries or the dried cherries.  The only thing that matters is that you use 2 cups of dried fruit – use any combination you like.  With all the peanut allergies in schools and restrictions with it (Hello Liv), you can easily replace the peanut butter with any nut butter you like.

Energy balls 2

A big part of the success story is your ingredient source …. Rancho Vignola has amazing nuts, seeds, and baking products.  Make sure you have great quality supplies.                                         Nope, this isn’t a sponsored post, I just love their products!

  • 1 cup toasted sunflower seeds
  • 1 cup toasted sesame seeds
  • 1 cup oats (I use a combination of quick cooking and large flake oats)
  • 1 cup dark chocolate chips
  • 1 cup dried cranberries
  • 1 cup dried cherries (chopped)
  • 1/2 cup unsweetened cocoa powder
  • 2 cups smooth peanut butter
  • 1/2 cup honey
  • 1 1/2 cups toasted coconut flakes
  1. Combine all dry ingredients together in a large bowl and mix thoroughly with your hands.
  2. In a separate small bowl stir peanut butter and honey together until smooth and well incorporated.
  3. Stir into dry ingredients, and mix well.  Again, I find your hands the best tools you’ve got.  Make sure you mix well …. those pesky little sesame seeds like to hide in the bottom of the bowl.
  4. Once you’ve got it all mixed, form balls and roll in the toasted coconut.  I find it helps to put a little coconut in my hands too and that really helps it to adhere.

Energy Balls 1

Store in the fridge for up to a week, or keep them in the freezer for a couple of months (if they last that long).


Asian Style Salmon

In just a few minutes you can pull this together, serve it with a salad and it is a simple easy dinner that you will want on repeat!

Asian Salmon 2

This is the most delicious dish – and the simplest!  A few minutes to prepare, a few more to cook and you are done!  The flavour is just exquisite!  I used parchment instead of foil tonight – either works well.

  • 3 cloves garlic, minced
  • 1/4 cup honey
  • 2 tablespoons reduced sodium soy sauce
  • 1 tablespoon seasoned rice vinegar
  • 1 tablespoon sesame oil
  • 1 tablespoon freshly grated ginger
  • 1 teaspoon Sriracha, optional
  • Freshly ground black pepper, to taste
  • 2 pounds salmon
  • 2 green onions, thinly sliced
  • 1/2 teaspoon sesame seeds
Asian Salmon 1

Whisk these few ingredients together and everything is ready in minutes.

DIRECTIONS:

  1. Preheat oven to 375 degrees F. Line a baking sheet with foil.
  2. In a small bowl, whisk together garlic, honey, soy sauce, rice vinegar, sesame oil, ginger, Sriracha and pepper, to taste.
  3. Place salmon onto the prepared baking sheet and fold up all 4 sides of the foil. Spoon the honey mixture over the salmon. Fold the sides of the foil over the salmon, covering completely and sealing the packet closed.
  4. Place into oven and bake until cooked through, about 15-20 minutes.* Open the packet and broil for 2-3 minutes, or until caramelized and slightly charred.
  5. Serve immediately, garnished with green onions and sesame seeds, if desired.

This recipe came from “damndelicious” and it certainly is!


The Best Peach Shortbread

Peach Shortbread 6

1 cup white sugar
1 teaspoon baking powder
2 3/4 cups plus 2 tablespoons cups all-purpose flour
1/4 teaspoon cinnamon
1/8 teaspoon freshly grated nutmeg
1/4 teaspoon  salt
1 cup room temperature unsalted butter
1 large egg
2 -3 peaches, pitted and thinly sliced (between 1/8 and 1/4-inch thick)


Preheat the oven to 375°F.

Butter a 9×13 inch pan, or spray it with a nonstick spray.

In a medium bowl, stir together sugar, baking powder, flour, salt and spices with a whisk. Use a pastry blender, fork or your fingertips, blend the butter and egg into the flour mixture. It will be crumbly.

Pat 3/4 of the crumbs into the bottom of the prepared pan, pressing firmly. Tile peach slices over crumb base in a single layer. Scatter remaining crumbs evenly over peaches and bake in preheated oven for 30 minutes, until top is slightly brown and you can see a little color around the edges. Cool completely in pan before cutting into squares.

Peach Shortbread 1

I like to whisk the spices with the sugar first, then the flour.  It helps to make sure everything is well distributed.

Peach Shortbread 2

Press 3/4 of the flour/sugar mixture into your baking pan, reserving the rest for topping.

Peach Shortbread 3

These peaches are really the star here, but that buttery crust plays an amazingly delicious supporting role.

Peach Shortbread 7

Not so much topping that the peaches are hidden, and for a little extra crunch, sprinkle the top with a little raw sugar.

Peach Shortbread 4

OOOHHH, the smell of sweet peaches and buttery crumb can’t be beat.

Peach Shortbread 5

It might be difficult to wait, but they cut so much better if you let them cool.

This recipe came from smitten kitchen.com, so if you want to go one more step towards deliciousness, head over to her blog …. Deb Perelman …. she also browns the butter for a nutty flavour that apparently really comes through.  Today, I just didn’t have time, as I wanted to get these slightly cooled bars out to the workers to enjoy the fruits of their labours with peach picking, sorting and packing!

Pork Carnitas

carnitas 5

A homemade corn tortilla, some pickled onions, avocado served with the tender pork and you have a perfect taco.

On our Mexican travels we have had some amazing carnitas, both in Michoacan, which is renowned for carnitas, but also at a Saturday mercado in Mexico City.  Once you have had great carnitas, that is something you will dream of when you get home!  Finally I’ve figured out how to do it at home, and it is the method as well as the recipe that is important.  

Ingredients

  • 2-2.5 lbs. pork shoulder
  • 1 orange
  • 1 lime
  • 1/2 onion
  • 1 jalapeno
  • 4 cloves garlic
  • 2 teaspoons Mexican oregano
  • 1 teaspoon cumin
  • 1/2 teaspoon chipotle powder (optional)
  • 1 teaspoon salt
  • freshly cracked black pepper (approx. 1/2 teaspoon)
  • 2-3 tablespoon oil

For serving:

  • 12-16 corn tortillas
  • 1/2 cup finely chopped onion
  • freshly chopped cilantro
  • 3-4 limes, quartered

For the brine:

  • 1/2 cup sea or kosher salt
  • 2-3 quarts water

Instructions

  • Add 2 quarts cold water to a mixing bowl along with 1/2 cup kosher or sea salt.  Stir to dissolve.  Cut the pork shoulder into 2″ chunks.  Add the pork chunks to the brine, cover, and store in the fridge for an hour.  If the pork isn’t completely submerged just add a bit more water.
  • Once brined, remove the pork chunks and pat them dry.  Add them to a clean mixing bowl along with:  2 teaspoons Mexican oregano, 1 teaspoon cumin, 1/2 teaspoon chipotle powder (optional), 1 teaspoon salt, freshly cracked black pepper, and 2-3 tablespoons oil.  Combine well.
  • Add pork pieces to a casserole dish along with the juice of 1 orange, the juice of 1 lime, 1/2 onion cut into chunks, 1 jalapeno sliced in half, and 4 peeled garlic cloves.  I usually put the leftover orange pieces in the pan as well.   Cover tightly with foil and bake at 300F for three hours.
  • After three hours give it the fork tender test.  If you can insert a fork into the pork with no resistance then it’s done.  If the chunks are still firm give it another half hour.
  • Remove the pork and set aside.  Strain the resting liquid into a bowl and be sure to give it a taste!  As it sits the fat will rise to the top — you can remove some of the fat if you want but I use most of it.
  • To crisp up the Carnitas we’ll put the shredded pork chunks under the broiler (approx. 525F).   You can use the same baking dish, just be sure to remove the leftover fruit and veggie chunks.  Add the pork back to the dish and shred with two forks.  I usually give it a partial shred, leaving it chunky, but you can always shred finer if you want.
  • Drizzle some of the resting liquid over the pork and broil for 5 minutes.  Take a look and broil for another 5 minutes if you want it crispier.


For serving you’ll need corn tortillas, 1/2 cup finely chopped onion, some freshly chopped cilantro, the Salsa Verde, 3-4 limes, and cheese (optional).  You can warm up the tortillas in the oven but you’ll get happier faces if you crisp them up in hot dry skillet first.  I usually put a large skillet over medium high heat and crisp up 3-4 at a time, storing them in a tortilla warmer or tea towel.

If there are Carnitas leftovers, store in an airtight container in the fridge.  I usually store the resting liquid separately.  To re-heat, simply add pork to a saucepan along with some of the resting liquid, cover, and simmer over medium until heated through.
Carnitas 9

Chop the pork into 2 inch pieces and coat all over with the oil and seasonings.

Carnitas 8

Nestle all the pork in with the onion, jalapeño, garlic and squeeze the orange all over.  Tuck the orange pieces in, then cover tightly before slow roasting.

Carnitas 3

Three hours later this pork is tender and your house smells amazing.

Carnitas 4

I drizzled the pork with a little bacon fat just to add to the porky goodness.  Yum.

Carnitas 2

Put the pan under the broiler, and watch carefully – you only want a few crispy bits.

Carnitas 6

Stir the pork back into the cooking liquid and garnish with cilantro.

Carnitas 1

Fragrant and juicy tomatoes make a fantastic base for this refreshing Pico de Gallo.

Carnitas 10

What a fantastic bite!  Reminiscent of eating carnitas on a street corner or mercado in Mexico, we loved every morsel.

I’ve found this amazing new website (new to me anyway), and this recipe is courtesy of Mexicanplease …. check out that website, everything I’ve tried has been perfect …. including the flour tortillas made with bacon, delicious.

Creamy Cucumber Herb Salad Dressing

Creamy Cucumber dressing 2

Smooth, creamy and absolutely delicious – this will make you crave a salad.

We used to love going to a small restaurant in Mexico City, no name on the building and just a few wooden chairs and tables on the sidewalk … but oh … the food!  For 99 pesos we received an amazing set menu with four courses and it was always fantastic.  The chef moved on … (we spotted him at another place finally).  If I could remember the name of his new spot I’d definitely give you a recommendation to try it!  Anyhow … what was I saying … oh of course … this is a salad dressing recipe.  He made this incredible creamy cucumber salad dressing that was divine.  I asked him the recipe and he gave me the basic idea but claimed the key was the sea salt he used.  We walked miles looking for the store he told us to go to, without success.  Eventually, on another trip we found the salt  (from Cuyutlan), and have continued to pick it up every time we go to Mexico City!  I’ve finally hit the right ingredients here and this is delicious.

  • 1 cup chopped cucumber
  • 3/4 cup plain greek yogurt
  • 1 tbsp mayonnaise
  • 1 tbsp freshly squeezed lemon juice
  • handful of fresh herbs (I used basil, parsley and oregano)
  • 1 garlic scape
  • 1 tsp sea salt
  • 1/4 tsp white pepper

Roughly chop the herbs and cucumber and place in blender, then add the rest of the ingredients.  Give it a really good whiz until smooth and creamy.  Depending on how juicy your cucumber is, if needed you can thin it out a bit with milk or buttermilk.

Creamy Cucumber dressing 3

My trusty little bullet whipped this up in no time.

Creamy cucumber dressing 4

My herbs are so happy this year!

Creamy cucumber dressing 5

Here it is, the infamous salt I had Grant, Wilson and Vivian trekking all over                              Mexico City looking for.  Was it worth the effort?  You bet.


Zucchini Ricotta Galette or Tomato Galette

Got a plethora of zucchini in your garden?  Here you go, you are very welcome.  Even if you don’t, head to the grocer or market and buy some because this galette is just that good.

Galette 8

This photo is gorgeous …. but even that doesn’t do it justice.  Oh, the crispy puffy pastry, the creamy rich base …the fresh from the garden (or market) zucchini …. and the aroma as it bakes. This is a sure winner, and certain to be on repeat.

Veg Galette 3

Incredibly delicious as a tomato galette also.

Serve this with a salad for a great vegetarian meal or cut into small pieces for an appetizer, either way it’s fantastic!

For the pastry:
1 1/4 cups all-purpose flour, chilled in the freezer for 30 minutes
1/4 teaspoon salt
8 tablespoons (1 stick) cold unsalted butter, cut into pieces and chill again
1/4 cup sour cream
2 teaspoons fresh lemon juice
1/4 cup ice water

Filling:
1 large or 2 small zucchinis, sliced into 1/4 inch thick rounds
1 tablespoon plus 1 teaspoon olive oil
1 medium garlic clove, minced (about 1 teaspoon)
1/2 cup ricotta cheese
1/2 cup (about 1 ounce) grated Parmesan cheese
1/4 cup (1 ounce) shredded mozzarella
1 tablespoon slivered basil leaves

Glaze:
1 egg yolk beaten with 1 teaspoon water

Veg Galette 2

Glazed and ready for the oven – they already look and smell fantastic.


Make dough: Whisk together the flour and salt in a large bowl. Sprinkle bits of butter over dough and using a pastry blender, cut it in until the mixture resembles coarse meal, with the biggest pieces of butter the size of tiny peas. In a small bowl, whisk together the sour cream, lemon juice and water and add this to the butter-flour mixture. With your fingertips or a wooden spoon, mix in the liquid until large lumps form. Pat the lumps into a ball; do not overwork the dough. Cover with plastic wrap and refrigerate for 1 hour.

Make filling: Spread the zucchini out over several layers of paper towels. Sprinkle with 1/2 teaspoon salt and let drain for 30 minutes; gently blot the tops of the zucchini dry with paper towels before using. In a small bowl, whisk the olive oil and the garlic together; set aside. In a separate bowl, mix the ricotta, Parmesan, mozzarella, and 1 teaspoon of the garlicky olive oil together and season with salt and pepper to taste.

Prepare galette: Preheat oven to 400 degrees. On a floured work surface, roll the dough out into a 12-inch round. Transfer to an ungreased baking sheet (though if you line it with parchment paper, it will be easier to transfer it to a plate later). Spread the ricotta mixture evenly over the bottom of the galette dough, leaving a 2-inch border. Shingle the zucchini attractively on top of the ricotta in concentric circles, starting at the outside edge. Drizzle the remaining tablespoon of the garlic and olive oil mixture evenly over the zucchini. Fold the border over the filling, pleating the edge to make it fit. The center will be open. Brush crust with egg yolk glaze.

Bake the galette until the cheese is puffed, the zucchini is slightly wilted and the galette is golden brown, 30 to 40 minutes. Remove from the oven, sprinkle with basil, let stand for 5 minutes, then slide the galette onto a serving plate. Cut into wedges and serve hot, warm or at room temperature.

Galette 2

See …. not quite enough cutting in yet, those butter cubes are too big.

Galette 3

Small, pea sized bits now and the liquid added.

Galette 4

Do not over mix, just get it together and wrap it to put in fridge for at least 30 minutes).

Galette 7

Salt, and allow to sit for a bit in order to draw the liquid out.

Galette 5

As you can see …. I’m not the best at an exact “12 inch” circle …. but I’m working on that!

Galette 6

Mix all your cheeses with the olive oil & garlic blend … adjust to taste with salt and pepper.

Galette 1

WHAT??  Already I’m crazy about this and it hasn’t even hit the oven yet.  Yes, I need to work on my even edges … ha ha

Veg Galette

Tonight we had enough people celebrating Stella turning 6 that I needed to make 2 …. so I did a tomato galette as well as zucchini.  Both were delicious.

Be as inventive as you like with the cheeses, using the amounts as your guidelines.  With the tomato galette I used aged gouda as well as the ricotta and parmesan.  With the zucchini, tonight I had old white cheddar on hand ….  What won’t change is how amazing your house smells!  Go ahead, invite the neighbours in …..


Absolutely full credit (as well as the copy/paste feature) for this recipe – IN TOTAL – goes to Deb Perelman at http://www.smitten kitchen.com  – one of the very rare recipes I didn’t play around with at all …. okay except I used a couple of patty pan squash because I had them….


Lemony Greek Chicken Thighs

Greek chicken 4

So delicious – olives, caper berries, sweet onions and tender chicken thighs …… you will be licking the pan, at least Leah did!

This is one of those “guideline” recipes.  I’m going to go ahead and give some amounts, but feel free to adjust to whatever you have on hand, or whatever your taste buds are asking for!

  • vegetable or peanut oil
  • 8 boneless, skinless chicken thighs
  • 1/2 large lemon, halved, then sliced
  • 4 garlic cloves, smashed lightly then halved
  • 1/2 large sweet onion, sliced
  • 1/2 cup mixed olives (I used kalamata, stuffed green & caper berries)
  • 2 tbsp of sliced sun dried tomatoes
  • generous handful of minced herbs (today I used parsley, oregano & thyme)
  • Salt & pepper to taste
  • Splash of good dry white wine

Season chicken thighs with salt and pepper.

Bring cast iron skillet up to a moderate temperature, add just enough neutral oil to generously coat the pan.  As soon as it starts to shimmer, add chicken thighs. Try not to overcrowd the pan as you want to get a nice sear on the chicken pieces.

Turn once they release easily from the skillet.  Once the second side has seared, remove from the heat.

To the same pan, add a splash of white wine and the onions, garlic, lemon & sun dried tomatoes.  Saute until the onion is translucent and just starting to soften.  Add the herbs and nestle the chicken back into the skillet.  Scatter olive mixture in amongst the chicken and put the whole skillet into an oven at 375 for 30 minutes.  Watch carefully and if you think the chicken is browning too quickly – cover with tinfoil so it cooks through.

Remove from heat, if desired finish with a squeeze of fresh lemon juice and a splash of your best olive oil.