Aloo Garlic Stuffed Naan

The best naan I’ve made …. to date anyway!

I can’t pretend to be humble when it comes to my cooking, but these naan impressed me more than I usually impress myself! The dough is very pillowy soft and tender, they were so delicious I pulled six out of the oven and they were inhaled.

This is the kind of thing you do when you have a little time on your hands, not necessarily because they are so much work, but it is important to give the dough time to rise and develop that light texture you want in a naan.

NAAN

  • 1 tsp dry active yeast
  • 2 tsp sugar (separated)
  • 3/4 cup lukewarm water (around 100* )
  • 2 cups all purpose flour
  • 1 tsp fine sea salt
  • 1/8 tsp baking powder
  • 1/2 tsp garlic powder
  • 1 tsp dry herbs
  • 2 tbsp olive oil
  • 3 tbsp plain yogurt

In a large glass, dissolve 1 tsp sugar in the warm water and sprinkle in the yeast. Let sit for 10 minutes until it is foamy.

In a large bowl stir together the flour, salt, remaining 1 tsp sugar, baking powder, garlic powder and herbs.

Once yeast is nice and foamy stir in the olive oil and yogurt. Mix well and then stir into flour mixture with a fork. Using your hand, mix and knead in the bowl just until everything is incorporated. As soon as it is together, soft, and slightly sticky, cover it all and let it rest until doubled in size. This could be anywhere from 2-4 hours depending on how warm your kitchen is.

FILLING

  • 1 cup cooked & chopped up potato (could be leftover mashed potatoes too!)
  • Saute 1/2 -1 cup of minced onions in ghee, until nice and soft (amount of onion depends on your love of onions!)
  • Remove from heat and stir in one crushed garlic clove and 1/2 tsp dried coriander.
  • Season to taste with salt and pepper.
  • Set aside until cooled down.

(Ghee is clarified butter and most grocery stores carry it now, but you could easily substitute olive oil or butter)

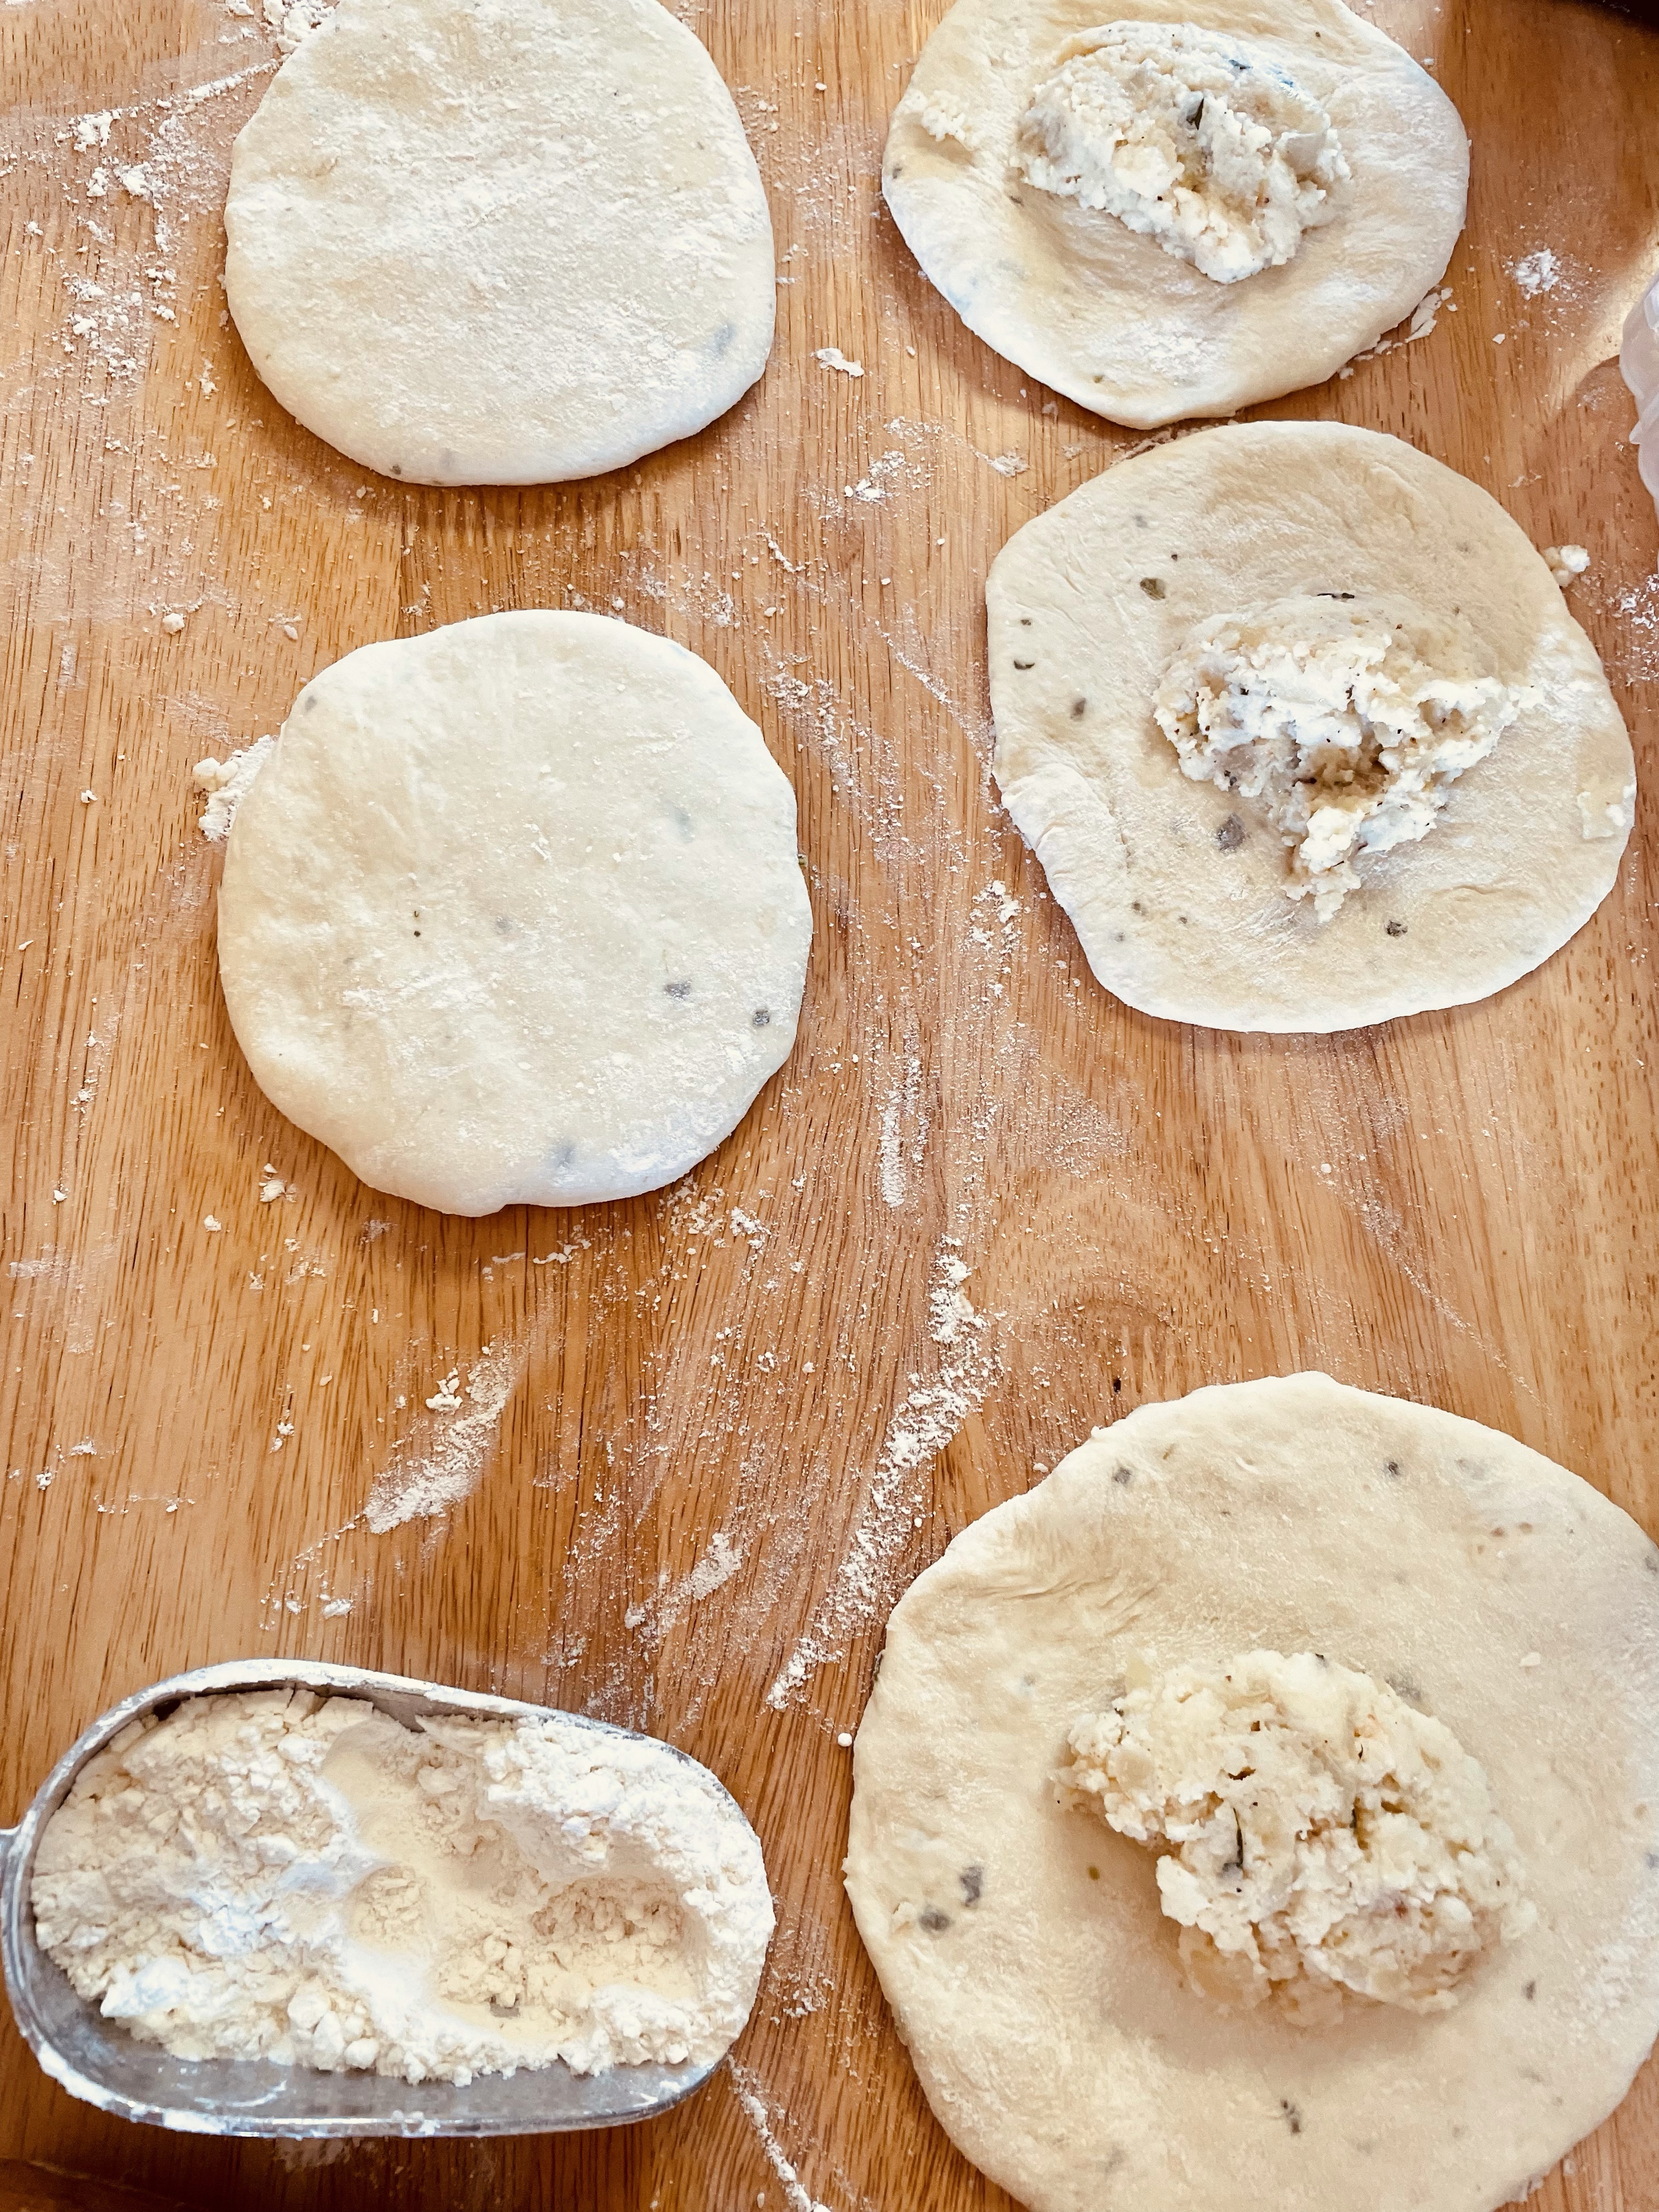
Once the dough has doubled, gently punch it down and divide into 6, rolling those into balls.

Flatten each ball with your hands until they are 6-7 inches across. Divide the potato stuffing amongst the flattened dough pieces, and then gather the outer edges like you are forming a little pocket or purse.. Once you have completely encased the potato mixture press down gently until flattened and once again about 6-7 inches across.

Brush the tops with beaten egg, sprinkle with a little salt & pepper, chili flakes and sesame seeds.

Bake at 400 until golden brown – about 20 minutes.

Remove from oven and rub with a little melted butter and sprinkle with minced cilantro.

Ready to flatten, you can see the bits of herb and they already smell great.
This dough was the easiest naan dough I have ever worked with – so tender and easy to flatten.
Once you have them all stuffed and flattened back out, sprinkle with beaten egg and toppings. Confession time? Somehow I got on a roll and before I knew it I had brushed the tops with melted ghee, not the egg wash I had planned on. Hmm. Still turned out so do whatever floats your boat.
Using your finger tips, flatten around the outer edge to create a bit of a border. Some of them puffed right up like a pita, and others didn’t, and either way they were delicious!
Ready for the oven
Soft potato and onion filling made these the best ever!
Next time I’m going to leave out the garlic, and try using a different stuffing …. ham and cheese maybe? They’d be great for lunches.

This naan dough originally came from an Indian Cookbook I have – Aarti Sequeira “Aarti Paarti”. I’ve loved watching her on Food Network. She added fennel and nigella seeds, and didn’t stuff them. I had something different in mind so I used this dough, and then watched endless YouTube videos on stuffing naan to come up with my own version. Have fun, play around and let me know if you come up with any other stuffings.

In making naan, I often stand over my cast iron pan, frustrated by trying to get nice char marks and yet still allowing the bread dough to be fully cooked inside without burning the outside. This often leaves me less than satisfied! This totally hands off approach yielded the softest naan and the breads were fully cooked while still having wee bits of crunchy dough around the edges and on the tops of the ones that puffed up like a pita.

Sloan’s Lemonade Scones

This is the first time I’ve had a guest contributor …. and it brings me great pleasure to introduce my granddaughter Sloan – 11 years old and very comfortable in the kitchen. She’s made these delicious little morsels with her Australian Nanny and wanted to make them at the orchard for breakfast – we loved them!

Ingredients

  • 3 1/2 cups self raising flour, plus extra for dusting
  • 1 cup heavy cream
  • 1 cup sprite

To serve (sweet)

  • whipped cream
  • jam

To serve (savoury)

  • cream cheese
  • ham

instruction

  1. Preheat oven to 200°C/390°F (180°C fan). Line tray with baking/parchment paper.
  2. Combine the flour, cream and lemonade in a bowl and mix until flour is mostly combined. Do not over mix, it will make the scones dense! The dough should be soft and fairly sticky.
  3. Turn out onto a floured surface, and knead gently just 3 – 5 times to bring dough together, then gently pat into a disc shape 2.5cm/1″ thick.
  4. Use a 6cm/2.5″ round cutter to cut rounds – press straight up and down (don’t twist), flour cutter in between. (Note 4)
  5. Use a knife or similar to scoop up (avoid touching sides) and place on tray, slightly touching each other (they help each other rise).
  6. Brush the tops lightly with milk. (Note 5)
  7. Bake for 15 minutes until golden on top. Place on rack to cool. Place tea towel over them to stop the tops from getting crusty.
  8. Serve with copious amounts of cream and jam, and of course tea!

Tips

  • Less dough handling = fluffier scones. So only mix the batter until the flour is almost fully incorporated (ie can still some flour), then scrape onto work surface and knead as few times as possible to bring together into a disc shape with a pretty smooth surface (I aim for 5 kneads, 8 is ok).
  • Do not twist the cutter – press the cutter straight down and up, resist the urge to twist! If you twist, the sides of the scones gets “smeared” which affects how well they rise.
  • Avoid touching sides of scones – use a big kitchen knife or similar to transfer scones to tray to avoid touching the sides of the scones.
  • Place so they’re touching each other ever so slightly – because they help each other rise (isn’t that just so sweet? 😍)
  • Don’t be tight with the jam and cream – there’s nothing sadder than running out of cream mid scone scoffing!!

This recipe is from Recipe Tin Eats, thanks for a delicious breakfast!!

be careful not to handle them to much