San Juan Chamula

I love getting a glimpse into other cultures.  We always enjoy searching out areas where the locals hang out, and you aren’t quite as likely to run into crowds of international travellers.  We’ve experienced Chiapas, Mexico before, but this time bringing along cousins Vivian and Wilson allows us to share with them the magic and beauty of some of these amazing Pueblas. Chamula is high in the mountains, over an already high city of San Cristobal de las Casas.  We returned the following day, when it was misty and cloudy, but I didn’t take any photos without a guide to let me know when it was advisable.  On that day it was literally like being in a cloud.  Just simple mist in the air, clinging to everything, but no real rainfall.

church cross

Go to the cross in front of the church, town centre in San Cristobal de las Casas.  Look for someone representing AlexyRaul tours.  Be there just before 9:30, and you can hook up for a tour to San Juan Chamula, and San Lorenzo Zinacantan.  The tour is about 3-4 hours (250 pesos – $17) and is one of the best we’ve ever been on.

Both Chamula and Zinacantan are indigenous villages (populated by the Tzotzil – Mayan tribe) a short distance from San Cristobal.  These villages are unique in that they are autonomous from the rules, laws and taxes of Mexico.  They govern themselves entirely.  One of the things we noticed about that is the cars don’t have any licence plates, and virtually as soon as you can reach a gas pedal you can drive…… Needless to say, this can only happen in your village.  Chamula is fiercely independent, and they do not take kindly to outsiders.  A man may marry or bring in an outsider (polygamy is acceptable) but not a female.  No outside males may ever reside in Chamula.  Be very careful taking photographs here, and certainly don’t take ANY of the religious leaders or ceremonies.  Our tour guide explained that we were able to take photos of general scenes, and if that happened to capture some individuals, that is the best you can expect.

cemetary

Arriving in Chamula, our first stop was the cemetery.  Not the solemn place we come to expect in Canada.  Large family groups gather on a regular basis to visit, laugh, talk, eat and drink with their departed family members.  A band is even hired! All those dry pine needles are from previous visits.  They will routinely be replaced by fresh needles.

chamula 2

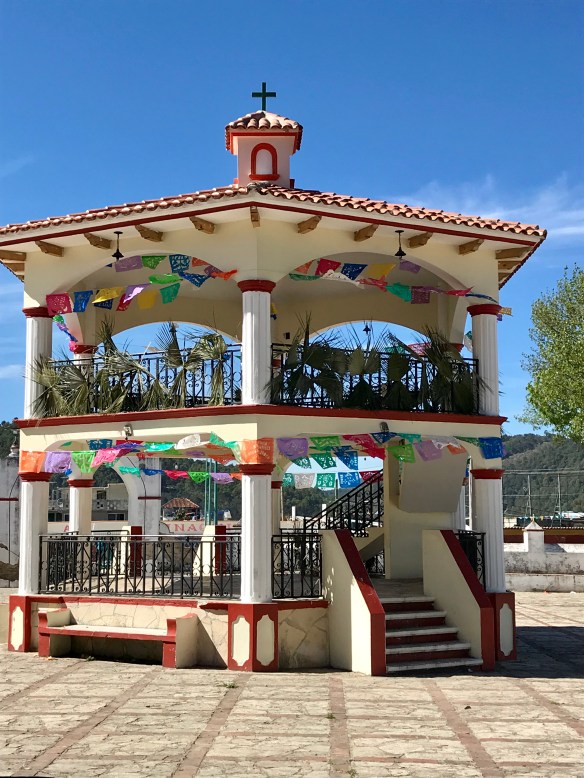
The church, and square is central to all activities.  Built as a Catholic Church, it quickly became more Mayan.  The decorations are all part of Mayan life, and inside it is an interesting combination of Catholic saints and Mayan worship.  You won’t find any pews, or altars, but rather a floor lined with pine needles, candles burning, live chickens and flower petals.  Don’t forget the Coca Cola.  This pop has a life of its own here – considered quite sacred, used in religious ceremonies and just consumed by the case.  We even noted a sign for a village named San Juan Coca Cola.  There are family groups scattered around, each with their own healer, performing ceremonies, and praying to the saint of their choice.  NO, I certainly didn’t take any photos inside.


chamula 1

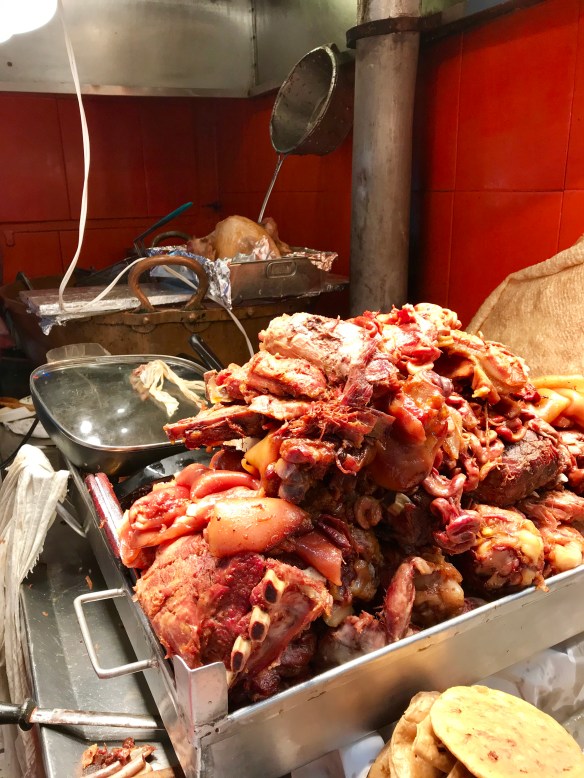
Sunday is a big market day, with both Chamula residents, and those from outlying villages offering everything you can think of.

chamula 4

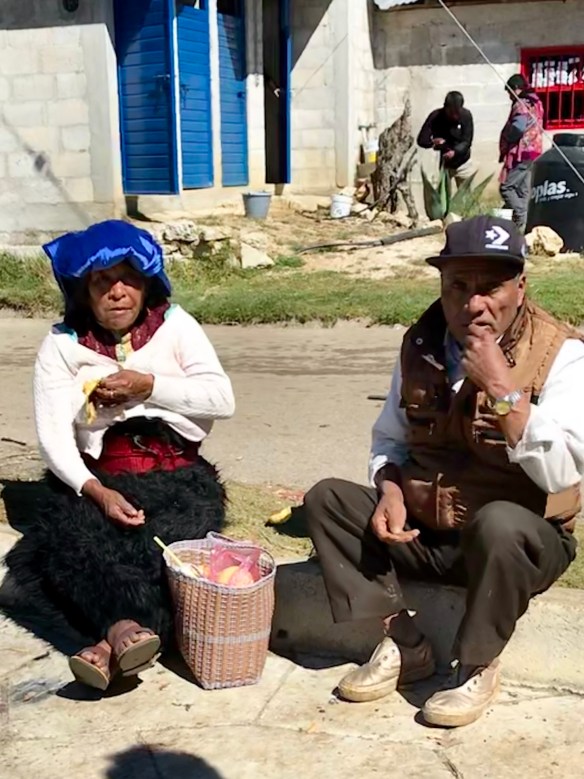
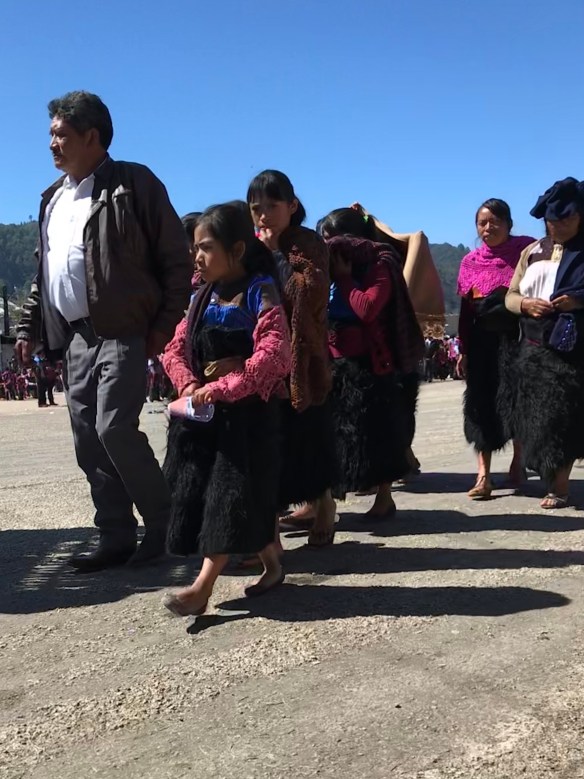
The residents of Chamula speak Tzotzil, and wear traditional clothing all the time, not just on festival days.  The black skirts are woven from the wool of the black sheep you see grazing on the hillsides all over the place, while the men wear the white tunic primarily in the warmer weather, but a woven black coat in the winter.  Black sheep are so predominant here that if a family member causes trouble, they are considered the “white sheep”.  Not the best photo, but I had to crop from a large “scene” photo.


chamula 5

chamula 6

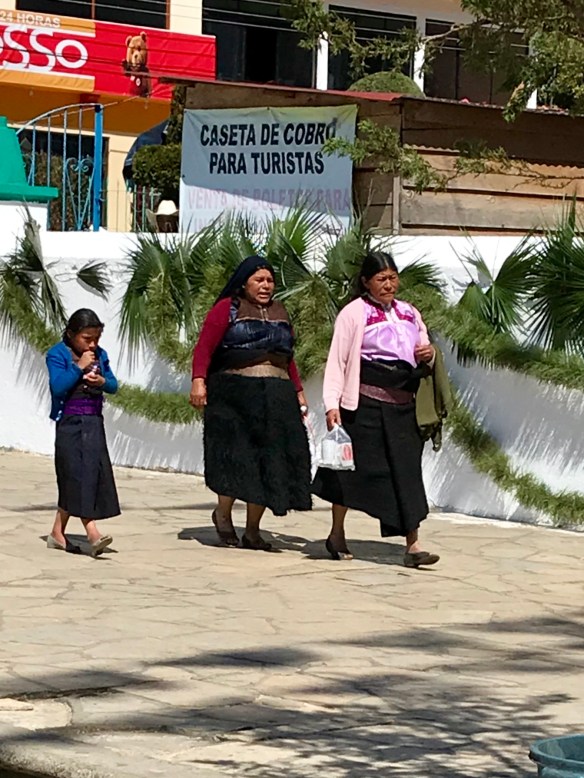
The women often have a scarf or shawl on their head, perhaps to keep the sun off?

chamula 7

We had taken the tour with Alex and Raul  tours about 7 years ago, and returned the following year so Mike and Hayley could experience that.  We have visited the villages since, but with Vivi and Wilson along, we wanted to have them get the same information.  It is really refreshing to find a tour guide that has such respect for the areas we are allowed into.  He also took us into a “holy” home, where some religious ceremonies were performed.  Needless to say, no photos were allowed, but how I wish I could have recorded that room with the incense and smoke absolutely filling the space, such that it was difficult to see across.  The floors are covered with pine needles, and the saint is protected from view by multiple levels of foliage.  The elders and religious leaders were praying and the musicians kept up a steady beat.  It is literally impossible not to be moved in such a setting.  Alcohol plays a large part of the ceremonies too, with them consuming “poxx” or “posh”.  Over 40% alcohol, it is distilled from sugar cane and helps, with the repetitive music, take them to a “higher level of consciousness”.

chamula 8

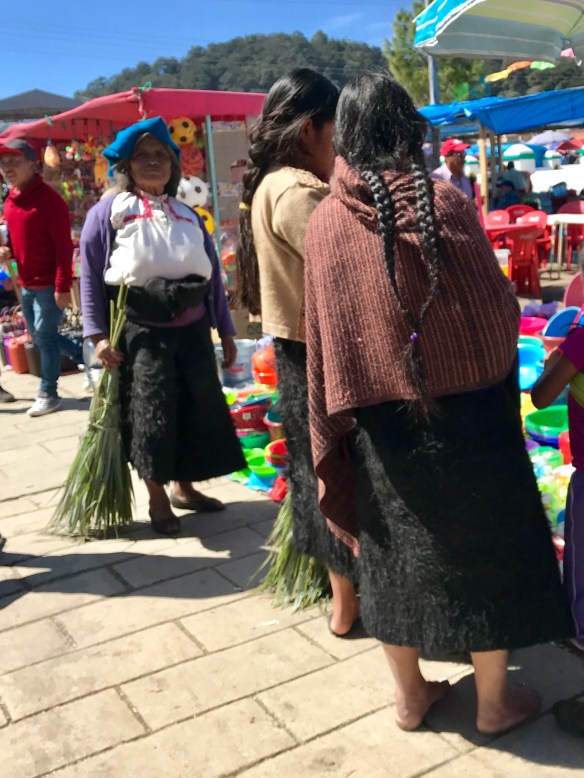
These women are selling fleece recently sheared, for the woven garments.

chamula 9

chamula women

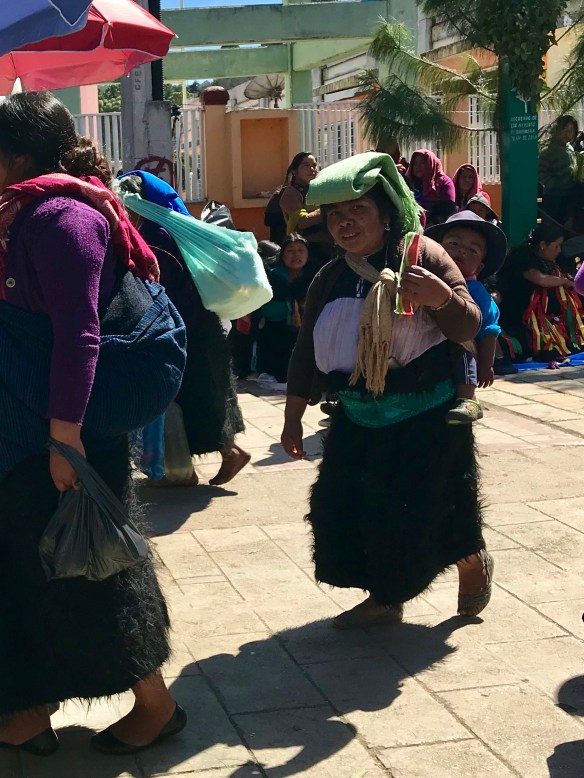
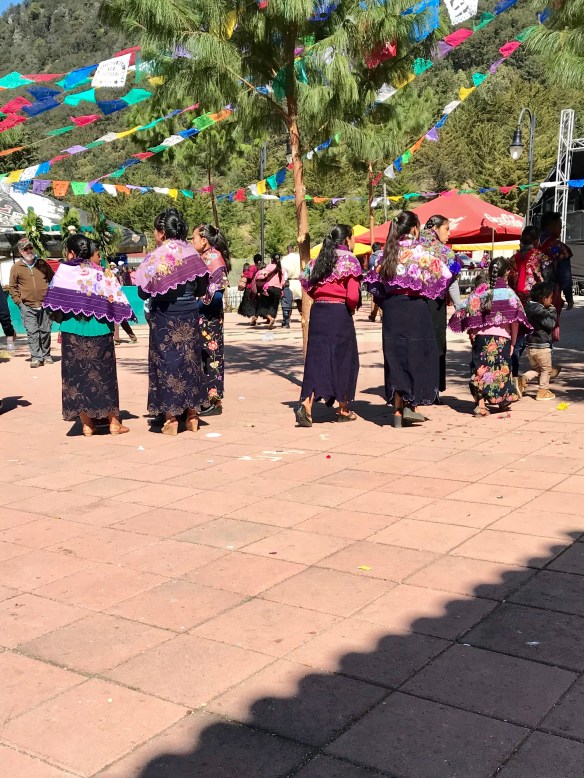
The women of Chamula gather to socialize on market day.

chamula men

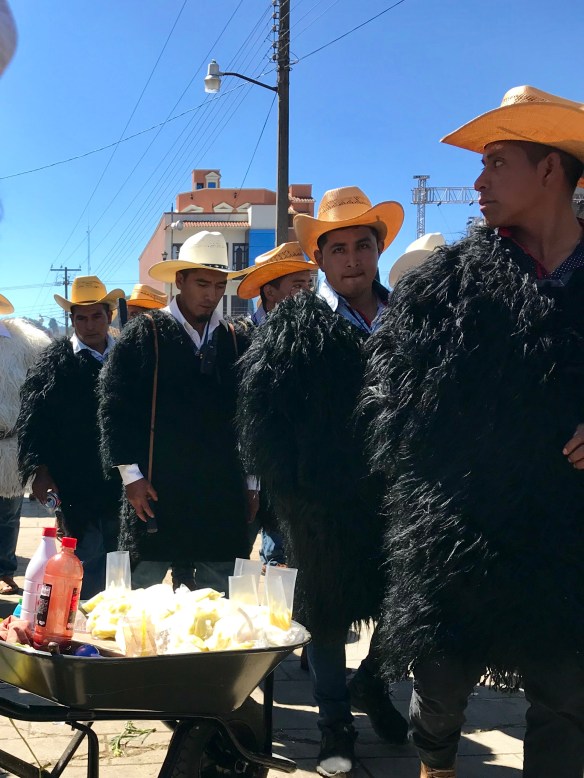
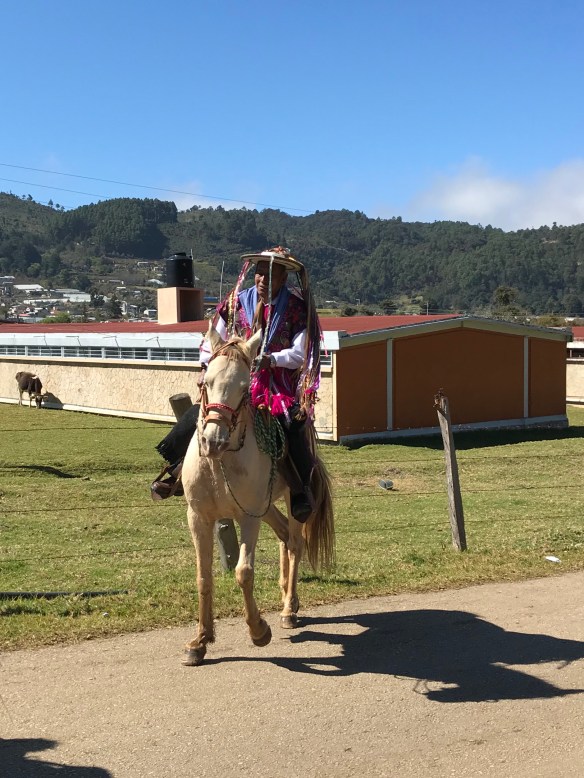
Can you even imagine how warm these woven wool coats are?  Note the 4th man, with the “rifle” over his shoulder??  That indicates he is a policeman.  They carry sticks, to represent rifles, and travel in pairs throughout the village.  That wheelbarrow is full of bags of freshly cut coconut and mango, just waiting to be drizzled with hot sauce.  Delicious!

When you return from a visit to these villages, it is with a sense of experiencing the surreal.  A guide allows you the comfort to see the areas you wouldn’t otherwise be able to.  We don’t often hire them, but when we do, it is to make sure we are understanding the cultures and customs of a region without offending.  These indigenous villages are that situation, and when I get home, I often drift back to these moments, with a sense of privilege that we were able to experience this.  I want so many more photos than I take, just to memorize the images of such beautiful faces, unadorned with makeup and certain on their path, unchanged for generations.  We did notice certain differences this time, in that more people had cell phones and I can’t help but wonder how that will change their future.


San Lorenzo Zinacantan

Zinacantan is an Indigenous village outside San Cristobal.  We recommend you tour this village with a guide (we suggest Alex and Raoul Tours).  In combination with a tour to San Juan Chamula it will take about 3-4 hours.  Just meet up with Raoul or one of his members at the cross in front of the church in San Cristobal.  Be there any time between 8:45 – 9:30 in the morning and you can join in with a group.  What is really impressive about this tour is that they are so respectful of the villages you are going to visit. We really enjoyed our time with Raoul Jr, and loved the way he interacted with the elders of the villages.

church cross

You might wonder how you will find one of the tour guides here ….. but you will.

Zinacantan is similar to San Juan Chamula only in that it is an autonomous village, exempt from the taxes, rules and laws of Mexico.  This village is supported by the flower industry, and arriving in the village you see miles and miles of greenhouses, sometimes on the most impossible slope and you have to wonder about the logistics on managing those.  Flowers are evident everywhere!  They are all over their clothing and the buildings.  It is such a colourful village.  I wish I had been able to take photos inside the churches – they were absolutely beautiful with archways of flowers and banana plants.  Slightly different from Chamula, these churches had altars and a few pews.  Behind the altar though, was an astonishing array of flowers.  You simply can’t believe the colourful display.

zinacantan 2

Part of our tour took us into a weaver’s home, where they showed us how labor intensive the weaving is.  Literally days worth to create a shawl.  THEN, they start the embroidery.

zinacantan 3

CORN. Part of everyday life, in all its varieties.

zinacantan 4

This is life in the village. We were so fortunate to have this family prepare a snack for us in their kitchen, Blue corn tortillas on the comal (flat cooking surface) over a wood fire.  Can tortillas ever taste better?  I don’t think so.


zinacantan 1

zinacantan 7

If this is what the entry to church looks like, can you even imagine the interior?  It was stunning.

We were in Zinacantan during festival days (no accident, you know Grant looks up all this extensively!)

zinacantan 6

zinacantan 8

All  in traditional clothing, they are chanting and dancing their way into the church for blessings before carrying on with the next stage of the festival.  (All stages include lots of moonshine!)

zinacantan 10

Hard to imagine all the colour ….. these are the men involved in the ceremonies.

zinacantan 9

The flowers themselves are stunning, but the artistry in the arrangements really is amazing.

zinacantan 13

Just look at the embroidery on the clothing – this is everyday wear!

zinacantan 21

zinacantan 22

The colours are brilliant.  It’s hard to imagine how many hours of embroidery go into the daily clothing for both males and females.

zinacantan 20

zinacantan 23

There were all sorts of activities going on for the festival that involved the horses, but we never did catch the race this year.

zinacantan 24

Residents of Zinacantan aren’t quite as upset about getting their photo taken.

zinacantan 25

This guy loved having his photo taken, wish I’d turned it to video as he and his horse danced around.  See the school in the background & the cow grazing.  No need for a lawn mower here.


All the guys with black painted faces are panthers, the beak guys with corn in their mouths are crows, and well…. the others are jaguars.  The panthers climb that stripped tree, with the dissected squirrels (real ones, but stuffed) and throw them down to the hunters who race around trying to collect them.  We waited for hours, but no one ever seems to know when something is actually going to transpire!

zinacantan 28

Look at all that embroidery, even the youngest wear the traditional clothing.

zinacantan 29

You know right away this family is from Chamula by the black wool skirts. (and the suspicious look at my phone)

zinacantan 30

If you have time on your vacation to tear yourself away from Mexico’s amazing beaches, we heartily recommend you go inland …. the culture, food and sights you see are well worth it.


Mexico City bites

We arrive in Mexico City late, and won’t even be there for 24 hours before flying out to Tuxtla ….. this presents a real dilemma for us, requiring us to narrow down the places we eat.  We’ve eaten our way through CDMX more than a few times, and on a restricted time frame, but this will be the shortest eating walking, walking in order to eat stop.  EEK.  I’m already dreaming of the places to quickly stop for a bite.

cdmx churro

Churros are a natural start for us!  This place, El Morro, is one of the oldest Churreria spots in the city, and they are delicious.  It is usually easy to get a table early in the day, but you should see the lineups late afternoon and into the night!

cdmx el morro churro

Next head to a mercado – the food is always amazing in the markets, and once we’ve had our coffee and churro it is time for a savoury bite ….. how about carnitas?  These tacos are mouth watering pork goodness.

cdmx carnitas 2

Every bit of the pork is waiting to be chopped up and served in a taco.  We loved the tortillas they made at this stand, they have fresh herbs in the tortilla masa and added so much flavour.

cdmx carnitas 1

No shortage of amazing toppings for your taco.

cdmx carnitas

It’s hard to only eat a couple of tacos at this place, but so many more steps and bites to come …

cdmx fruit

Time to lighten things up a bit …. how about some fruit?  These cups of fruit and vegetables are available everywhere and bursting with freshness.

cdmx fruit 2

Look for these vendors on the streets – you can choose whatever you want in your cup!

cdmx mango

Don’t miss the mango!

cdmx peruvian ceviche

How about a little ceviche next?  So refreshing and absolutely delicious.

cdmx walk

When you walk this much, your little 5 year old legs need a boost from big sister …..

cdmx la docena

La Docena – our favourite oyster bar.  These blue crab tostada’s with habanero foam are the bomb!  Served with a crisp white from the Baja region its a perfect bite.

cdmx la docena 1

cdmx la docena 2

Crunchy oyster croutons served with fresh greens and creamy avocado – love this salad.

cdmx dessert

Save room for dessert – these pastries are a great way to finish off a day.

Less than a day to eat, so many bites waiting …… we will get off that plane with an appetite and start walking!


Halibut Veracruzana

halibut veracruzana

This is one of those recipes that is more a guideline.  Inspired by the flavours of fish we’ve had served in the style of Veracruz in Mexico, this is so easy to prepare at home, and if you have a good source of fish, give it a try!

You will need:

  • enough fish to feed your family (I’ve used halibut here but any white fish will work)
  • green olives
  • fresh tomatoes
  • black olives
  • capers
  • roasted red peppers
  • fresh red peppers
  • your best olive oil
  • lemon
  • sea salt & pepper

Generously butter a baking dish (extra points for using a pretty one that you can also serve this dish in!)

Lay in your fish, cut in serving size.

Chop the olives, peppers and fresh tomato, and then cover your fish with all the toppings.  Again, be generous with seasoning – liberally sprinkling salt and pepper over it all.  Then – squeeze a whole lemon and drizzle olive oil over the top.

Roast at 375 just until fish flakes nicely.  This will entirely depend on the thickness of your fish, so watch it carefully and check after 10 minutes.

Serve over rice, with a bright, crunchy salad on the side.  Add crusty bread to soak up those juicy drippings and you’ve got a quick easy dinner good enough for company.

Tossed Salad

Gram’s Shortbread Cookies

shortbread 4

Sprinkle with a little coloured sugar, or mini decorations, to fit the season, but don’t overload these delicate little gems.  They really don’t need much of anything.

This is an age old recipe, probably handed down for generations, and all from a box of cornstarch.  I started looking for this recipe as a way to honour Gram Shirley Goldie, and posting it today, on the first anniversary of her passing, seems fitting.  What I didn’t expect in my search through recipes to find her special recipe, is that it was also my mom’s recipe, another much loved and very much missed Gram.  Our very dear Auntie Elsie used the same recipe.  This year when I made the cookies, I felt the need to work the dough by hand, no mixer needed here.  As I watched my hands in the dough, I saw the hands of my mother.  I saw the hands of my mother in law Shirley, and I saw Auntie Elsie’s hands.  I’m posting the recipe to honour them all, and in the hopes that for generations to come, this will be the “go to” Christmas shortbread recipe.

  • 1 cup Canada corn starch (really, you can use any corn starch)
  • 1 cup icing sugar
  • 2 cups sifted all purpose flour
  • 1 1/2 cups butter (softened)

Sift cornstarch, flour & icing sugar together.  Use your fingers and work in the butter until a soft dough is formed.

shortbread

Maybe it was the Christmas season, but I found myself lost in watching my hands and thinking of the hands that taught me so much in the kitchen.

shortbread 2

Once the dough is held together nicely it should be soft and supple.  Either put in the fridge to rest at this point, or carry on with simple dough balls.

Shape into 1 inch balls and place on an uncreased cookie sheet.  Flatten lightly with a fork in a crosshatch pattern.

shortbread 3

Bake the cookies at 325 for 10 min or so – watch them, every oven is different.  Remove them the minute they show any colour.  They are very soft when they come out, so I recommend allowing them to cool on the pan so they don’t break.

It is possible to allow the dough to set up in the fridge after forming it into a ball, and use it to roll out and cut shapes.  This is a pretty delicate dough though, so don’t expect it to be as easy as sugar cookie dough.

How easy is this?

Naan Bread

Soft and supple, yet crunchy bits.  Homemade naan can never be totally authentic without a tandoori oven, but you can come pretty close!  I love the feel of this dough, and always make enough for leftovers, they heat up really well.

onion naan 3

naan 5

Just look at the way they puff up in my cast iron pan!

INGREDIENTS

For Dough

  • 2 tsp active dry yeast
  • 1 tsp sugar
  • 1/2 cup water lukewarm
  • 1/4 cup vegetable oil
  • 1 egg large
  • 1/4 cup yogurt plain
  • 2 1/2 cups all-purpose flour
  • 1 tsp salt
  • 1/2 tsp garlic powder

Other

  • 12 tsp olive oil
  • 4 tbsp butter melted
  • 2 tbsp parsley chopped


  • Heat the oven to 200 F degrees.
  • In a medium bowl, combine the yeast, sugar and water. Lightly whisk it all together, then let it sit for about 5 to 10 minutes or until the yeast dissolves and starts to foam.
  • To the same bowl, add the oil, yogurt, egg and whisk well. Set aside.
  • To the bowl of your mixer, combine the flour with the salt and garlic powder. Add the yeast mixture and mix for a couple minutes, until the dough comes clean from the sides of the bowl. If the dough is too wet, add a bit more flour, starting with a tablespoon at a time. The dough should be nice and soft but not sticky.
naan

Your dough should feel soft and smooth, but not too sticky.

  • Place the dough in an oiled bowl and cover it with a clean kitchen towel or plastic wrap. Turn OFF your oven, place the bowl inside and allow to rise for about 30 minutes to 1 hour or until doubled in size. I use this trick all the time to speed up the rising time. Mine only took about 40 minutes, so the time depends on your yeast and your environment.
  • After it rises, cut the dough into 12 equal pieces and shape each piece into a small ball.

naan 1

naan 2

These little dough balls are so soft and supple, they roll out beautifully.

naan 4

onion naan 1

This variation included slivered green onions, we loved it.  Don’t worry about the making the dough balls round, as long as it fits in your pan, and you can handle it, it works!


  • Heat a large cast iron skillet over medium-high heat and add about 1 tsp of olive oil. Roll out one ball at a time until it’s about 1/3 inch thick and about 5 inches in diameter. Add the piece of rolled dough to the hot skillet and cook for about 1 minute, the skillet should be very hot, so you’ll see bubbles forming as you cook the dough on the first side. Flip the dough and cook the other side until the bottom is golden.

onion naan 2

naan 3

  • Repeat with remaining dough until all of the pieces are cooked. Keep the naan covered in a towel so that it doesn’t dry out. When all of them are cooked, brush each one with the melted butter and garnish with some parsley.
naan 6

Keep these covered and warm until ready for service.

Have you checked out the website “Jo Cooks” ??  She has some amazing recipes, and this is where I got this one from, I felt the texture was amazing, but I added just a bit more salt and some garlic powder.

Spanakopita

spanakopita

These little pockets are a great addition to a Greek dinner, or perfect served as appetizers.


I loved making these little pockets of deliciousness.  Once I got into the rhythm of the folding and rolling it went quite quickly and they were fantastic.  The recipe came from Food Network, Mary Sue Millikin and Susan Feniger.  My only addition was the fresh dill.


  • 1/3 cup olive oil
  • 2 pounds spinach, washed and drained
  • 1 bunch scallions, white and green parts, chopped
  • 1/4 cup finely chopped parsley
  • 2 tbsp fresh dill
  • Salt and freshly ground black pepper
  • 1/2 pound feta cheese, crumbled
  • 1 to 2 eggs, lightly beaten
  • 1 cup (2 sticks) unsalted butter, melted
  • 1 pound filo pastry sheets
  1. Heat 1 tablespoon of the oil in a large saute pan, add half of the spinach and saute until spinach wilts, tossing with tongs, about 2 minutes. Remove spinach and squeeze out excess liquid, then chop roughly. Repeat with remaining spinach, using 1 more tablespoon of olive oil. Pour off any liquid from the pan, and add remaining olive oil. Add scallions and saute until soft, about 2 to 3 minutes. Add the spinach to the scallions, along with the parsley, dill, salt and pepper. Cook over low heat for 1 to 2 minutes, then remove from heat to cool. (This part can be done ahead and kept refrigerated).
  2. Stir the feta and as much beaten egg  as needed to moisten the cooled spinach mixture.
  3. Preheat the oven to 350 degrees F. Brush a baking sheet with some of the melted butter.
  4. Unroll the filo dough on a flat surface and keep it covered with waxed paper and a damp towel so it doesn’t dry out and become brittle. Using a sharp knife, cut the filo into 3 by 11 inch strips, and recover with the towel. Use a pastry brush to brush a strip of filo with melted butter. Place a small spoonful of spinach filling 1 inch from the end of the pastry. Fold the end over the filling to form a triangle, then continue to fold up the strip in triangles, like folding up a flag. Continue with remaining strips of dough, placing filled triangles on the baking sheet and keeping them covered with a towel until all are ready to bake.
  5. Brush the triangles lightly with butter, then bake for 20 to 25 minutes, or until golden and crisp. Serve hot. (These may be frozen before baking, layering waxed paper between layers of triangles to keep them from sticking. Bake frozen triangles an extra 10 minutes.)
spanakopita 1

Start with a healthy “dollop” of the spinach mixture, then start folding over into triangles.

spanakopita 3

I quickly discovered that using a healthy amount of the filling made better triangles.

spanakopita 4

spanakopita 5

Ready for baking or at this point you can freeze them for serving later.  Bake from frozen.

Cook’s Note

Variation: Butter a 9 by 13 inch baking pan, and spread 6 sheets of filo, brushing each with butter, on the bottom. Spoon the spinach filling over the filo, then cover with 6 more sheets of filo, buttering each sheet. Score the top 3 sheets with a sharp knife. Bake 40 to 45 minutes, or until top is golden, let stand 15 minutes, then cut into squares and serve warm.

Irresistible Turtle Cheesecake

turtle cheesecake 4

Not sure how a cheesecake can be creamy, delectable and somehow light at the same time.  As an added bonus, it’s easy to make.


3 cups cups finely crushed chocolate wafers (or use a combo of graham and chocolate wafers)

3 Tbsp. butter, melted – use your judgement, may take a little more to get the crumbs to stick together
1/4 cup caramel sauce (plus more for drizzle)
1/4 cup chocolate sauce (plus more for drizzle)
1 cup chopped and roasted pecans
3 pkg. (8 oz. each) Cream Cheese, softened
3/4 cup sugar
1 Tbsp. vanilla
3 eggs
I used a 9 1/2″ springform pan for this cake – depending on the size of your pan, you may need to adjust slightly for the amount of crumb.
Heat oven to 325°F.
Combine cookie crumbs and butter; press onto bottom and 1-1/2 inches up side of 9 1/2 inch springform pan.
Sprinkle toasted and chopped pecans over crust layer, and top with the caramel sauce.
turtle cheesecake 1

I used a combination of chocolate and graham crumbs and really loved the way it turned out,

Beat cream cheese, sugar and vanilla in large bowl with mixer until blended. Add eggs, 1 at a time, mixing on low speed after each one, until really smooth.  Pour over caramel layer in crust.  With an offset spatula smooth the top.
I always like to bake my cheesecakes in a water bath – this makes them even smoother and creamier, as well as less likely to crack on top.
turtle cheesecake 2
TIP – Double wrap your cheesecake pan with foil, then set in large roasting pan.  Put this in your preheated oven, and ONLY THEN fill with hot water until about 1/2 way up the sides of the springform pan.
Bake 1 hour 5 min. to 1 hour 10 min. or until center is almost set. Run knife around rim of pan to loosen cake; cool before removing rim. Refrigerate 4 hours.
turtle cheesecake 3
When the cake is completely cooled, remove from springform pan and sprinkle reserved pecans over.  Then drizzle with both caramel and chocolate sauces.  Irresistible.
turtle cheesecake 5
You can be as creative as you like with both the caramel and chocolate sauces.  They are easy enough to make, but if you are inclined to take it easy on yourself, just buy them.