Pumpkin Scones

pumpkin scones

Pumpkin scones just scream fall.  You can either use your own pumpkin flesh or canned pumpkin – whatever you have works with these incredibly moist and pumpkin filled, spice laden muffins.


Preheat oven to 425°.

2 c flour
7 TBSP granulated sugar
1 TBSP baking powder
1/2 tsp salt
1/2 tsp ground cinnamon
1/2 tsp ground nutmeg
1/4 tsp ground cloves
1/4 tsp ground ginger
1/2 cup cooked or canned pumpkin

6 TBSP cold butter
3 TBSP half-and-half cream
1 large egg

Pumpkin scones 1

Baking Class – one of Sloan and Stella’s favourite activities in Nana’s kitchen.  (Nana’s too!)

White Glaze:
1 cup plus 1 TBSP powdered sugar
2 TBSP whole milk

Spiced Icing:
1 cup plus 3 TBSP powdered sugar
2 TBSP whole milk
1/4 tsp ground cinnamon
1/8 tsp ground nutmeg
pinch ground ginger
pinch ground cloves

Combine flour, sugar, baking powder, salt, 1/2 t cinnamon, 1/2 t nutmeg, 1/4
t cloves 1/4 t ginger in a large bowl.

In a separate medium bowl, whisk together pumpkin, half-and-half, & egg.

Cut cold butter into cubes then add it to the dry ingredients. Use a pastry knife or
a fork to combine butter with dry ingredients. Continue mixing until no
chucks of butter are visible.

Fold wet ingredients into dry ingredients, then form the dough into a ball.
Pat out dough onto a lightly floured into a round shape.

Cut through with a large knife, or a pizza wheel to make 6 wedges.

Bake for 14 to 16 minutes on a baking sheet that has been lightly oiled or
lined with parchment paper. Scones should begin to turn light brown.

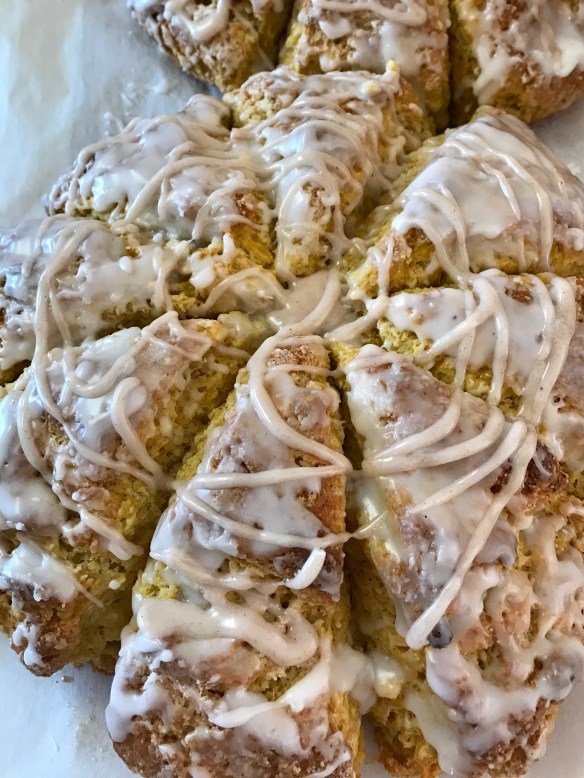
While scones cool, prepare white glaze by combining ingredients Mix until smooth. When scones are cool, use a brush to paint a coating of the glaze over the top of each scone.

pumpkin scones 2

If you are as careful as Stella, the scones will get good coverage.

As that white glaze firms up, prepare spiced icing by combining
ingredients in another medium bowl until smooth.
Drizzle this thicker icing over each scone & allow the icing to dry before
serving (at least 1 hour). A squirt bottle works great for this, or you can 
drizzle with a whisk.  Our other trick is to just fill a ziplock bag, and cut a tiny hole in one corner.

pumpkin scones

Sloan likes using the ziplock bag to drizzle – I think she likes the feel of the icing in her hand….

Limoncello Cake Pops

Cake pops are such a fun little bite of deliciousness.  These ones were made for a stagette/shower – the brides colors are purple and yellow so of course we had to make the cake pops to match – they were fantastic.

A piece of styrofoam works well to stand the cake pops in, but if you want to get creative, like my daughter Hayley, drill holes into a 2 x 6, sand it well, give it a light brushing of stain, and finish it with decorative edges!

As well as the cake and icing ingredients you will need chocolate (whatever color you like – for this one we used purple chocolate wafers), lollipop sticks and whatever you would like to decorate with.

LIMONCELLO CAKE

Preheat oven to 325

1 1/2 cups flour

1 tsp baking powder

1/2 tsp salt

1/2 stick butter

2 oz cream cheese

1 cup sugar

3 large eggs

1 tbsp limoncello

1/2 cup buttermilk

1/4 cup lemon juice

zest of 1 lemon

Soften the butter and cream cheese – beat well.  When incorporated well add the sugar and beat until it is creamy in color and fluffy.  Add eggs, one at a time beating well each time, finally adding the limoncello.  In a separate bowl sift flour, baking powder and salt.  Add the buttermilk and the flour mixture alternately to butter.  Gently fold in the lemon juice and zest until just blended.

Bake at 325 in a greased, lined 8×8 cake pan for about 20-25 minutes, then cool completely.

ICING

1/2 stick butter

6 oz cream cheese

4 cups icing sugar

2 tbsp limoncello

Bring butter and cream cheese to room temperature and beat well.  Add limoncello and whip.  Beat in icing sugar until it is as thick as you would like.

ASSEMBLY

When cake has completely cooled crumble it into a large bowl – make sure there aren’t any large bits.  Add the buttercream icing until it can be easily rolled into a ball.  (no larger than 1 inch)  You may not need all the icing.

Roll all the cake/icing mixture into little 1 inch balls and set in container – freeze if you don’t have time to complete the next step.

Melt chocolate over warm water just until smooth and creamy – taking care not to get any water into the chocolate.  A small canning jar works really well for this – set into a pot of gently simmering water.

Dip the lollipop stick into the melted chocolate and press deep into the cake ball.

Amy and Tyler were a great help making cake pops!

Allow to harden (we found it easiest to place the cake with stick into the freezer until that part was completed)  Only take out what you need so it all stays cold.

Then dip the cake pop into the melted chocolate until coated nicely – gently turning it and tapping on the edge of the jar the chocolate is in so the excess chocolate falls away.  If you want to press any cake decorating sprinkles etc on, now is the time.

A large piece of styrofoam is perfect to set the lollipop sticks in so that the chocolate hardens without touching anything.  Once hardened they are pretty sturdy, and you can further decorate or just put on display.

If you don’t have a styrofoam block for display, using a covered cardboard box works well too but it will be a little harder to get the cake pops to all stand at attention …

Sugar Cookies

This is the best sugar cookie recipe – our family has been making it for generations – many years of cookies being decorated for any occasion.  As the girls got older, the competitions heated up for making the most creative cookie.

Preheat oven to 375

3/4 cup butter

These little helpers are 32 and 30 years old now!

1 cup white sugar

2 beaten eggs

2 1/2 cups flour

2 tsp cream of tartar

1 tsp soda

pinch of salt

Cream butter well, adding sugar.  Beat until well incorporated then beat in eggs.  Whip until light and fluffy.

Sift dry ingedients together and add to butter mixture.  Knead well, adding flour until dough is soft and easy to work with.  Cover tightly with plastic wrap and put in fridge for one hour before rolling.

Emma and Allison always love it when they come to visit and get to help Auntie Kathy bake – decorating is the best part!

Roll out on lightly floured surface and using cookie cutters, cut out shapes.

Our family isn’t really crazy about icing, so we always decorate the cookies at this point with egg paint.

Bake at 375 for 10 minutes

Be careful not to get too much egg paint, or candies on the cookies – a light touch makes for better cookies, and more even baking. You can see the cookies here that just may have had a little too much decorating from the younger ones around the table!

EGG PAINT

Separate yolks and whites into separate bowls.  It doesn’t take much so you can make 2 colors out of each egg white, and 2 from each egg yolk.  Beat each bowl lightly with a fork, adding 1 tbsp of water to each.  Separate into small containers so you can make 4 different colors.  Using food coloring add until you get the color you like.  With the egg yolk make sure to choose a color that will work with yellow!    Using paint brushes, decorate the cookies while raw, then bake.

Toffee Chocolate Chip Cookies

soft and chewy, these cookies are a sweet treat

Cold and rainy here today, so baking cookies filled the house with delicious smells!

Preheat oven to 350, grease baking sheet

1 1/4 cups butter                

2 cups brown sugar

1 cup white sugar

4 eggs

4 tsp vanilla

2 tsp baking soda

1/2 tsp salt

4 1/2 cups flour

1 cup semi sweet chocolate chips

1 cup toffee bits (Skor type)

Beat together butter and sugar until well blended with electric hand mixer – beat in eggs until light and fluffy – add vanilla. Sift dry ingredients together (minus the chips and toffee).  Blend everything together well, then add chocolate chips and toffee bits.

Drop by teaspoons onto greased baking sheet – leaving about 1 inch between them as they do spread out.

Bake @ 350 for 10 minutes.

Ginger Snap Cookies

Ginger snap lovers are divided – soft and chewy or crispy???  Follow the baking instructions for our favourite, soft and chewy, but if you belong to those crispy ginger snap lovers use a wee bit more baking time …

Preheat oven to 325, grease baking sheet.

3/4 cup butter             

2 cups white sugar

2 well beaten eggs

1/2 cup molasses

2 tsp white vinegar

3 3/4 cups all purpose flour

1 1/2 tsp baking soda

2-3 tsp ginger (depending on your love of ginger)

1/2 tsp cinnamon

1/4 tsp cloves

Cream the butter well with electric hand mixer, beat in sugar until fluffy, then add eggs and beat until mixture is light and creamy – add molasses and vinegar, blending well.

Different brands of molasses vary in color – darker the molasses – darker the cookie!

Sift dry ingredients together.

Mix your butter mixture together with flour mixture – nothing like using your (well washed) hands to get in there and make sure it is well blended.

Form 3/4 in balls.  Press down gently in sugar.  Turn sugared side up on greased baking sheet.  Bake at 325 for 12 minutes for soft and chewy, a couple minutes more for crunchy.

Yield: about 100 small cookies – but go ahead and make them whatever size you like!

These cookies were sold for years during Fulton High School  basketball tournaments, and returning out of town teams always asked for them!

Crispy Gouda Herb Cornmeal Muffins

2 cups cornmeal

2 cups flour

2 tbsp plus 2 tsp baking powder

2 tbsp sugar

1 1/2 tsp salt

1/4 tsp freshly ground pepper

1/4 (rounded) tsp cumin

1 tbsp minced fresh basil

2 sticks unsalted butter – softened

2 large eggs

2 cups milk

3 cups shredded gouda cheese

Preheat oven to 400.  Grease or line 2 12 cup muffin tins.

Combine all dry ingredients, including basil – set aside.

In large bowl beat butter until light and fluffy.  Beat in eggs 1 at a time.  At low speed beat in half of the milk, then half of the dry ingredients.  With rubber spatula fold in the rest of the milk and the dry ingredients – stir in cheese.  Do not over mix.

Spoon batter into baking cups – I like to add a bit more grated cheese to the top and a sprinkling of freshly ground salt and pepper.

Bake for 30 minutes, or until golden and pulling away from the tin.  Transfer to a rack to cool.

Fantastic served with soup (try Roasted Potato Fennel Soup!) on a cool night.

Get up and Go Granola – 2 ways!

preheat oven to 300 for both versions

first you have to carefully measure your ingredients …   

FREE FLOWING

3 cups old fashioned oats

3/4 cup sliced almonds

1/2 cup raw sunflower seeds

1/2 cup raw pumpkin seeds

1/2 tbsp wheat germ

1/2 cup coconut flakes

1/2 cup chopped pecans

1/4 tsp salt

1/2 tbsp cinnamon

(oh what the heck, not many oats left – just dump them ALL in …)

2 tbsp canola oil or unsalted butter, melted

1/2 cup pure maple syrup

1 cup dried fruit (cranberries, cherries, apricots, blueberries)

Toss all dry ingredients together (except the fruit).  Heat the oil/butter and maple syrup together and then mix well with dry ingredients.  Spread on baking sheet and bake until toasted nice and brown – just the way you like it.

Stir every 15 minutes or so until it is all toasty and crunchy.  Let cool before adding the dried fruits.

Now if you like your granola even crunchier, and in big chunks, this is the one for you ….

CHUNKY GRANOLA

3 cups old fashioned oats

1 cup sliced almonds

1/3 cup toasted sunflower seeds

1/3 cup chopped walnuts

1/3 cup sesame seeds

1/3 cup ground flax seeds

1/3 cup pumpkin seeds

1/2 cup coconut flakes

1 tsp cinnamon

2/3 cup brown sugar

1/2 cup canola oil

1/2 cup honey

Might be a good idea to taste and make sure you have the right mixture of dry ingredients ….

Again – toss all your dry ingredients together.  Heat up the sugar, oil and honey until bubbling merrily and mix with dry ingredients.  Bake for 45 minutes – only tossing it in the pan once at the 20 minute mark and then let it be still for the rest of the baking.  When you take it out of the oven just let it sit – undisturbed – on a cooling rack until completely cold.  Break into whatever size chunks you want!  So good you may have trouble keeping it until you can get it safely stored …..

Go ahead and try with your favorite seeds, nuts, seasonings and have some fun!

Boston Cream Pie

Boston Cream Pie

This Boston Cream Pie is much easier to make than many desserts, and will quickly be a family favourite.

Boston Cream with fruit

Look what I did here.  Topped with fruit instead of chocolate.  Make a slurry out of juice and cornstarch, cook over medium heat until thickened, and spread that lightly on top of the cake just enough to set the fruit onto, then cover the top of the fruit with what’s left.  So light tasting, and even though it isn’t spring here yet, this made me feel like it’s on the way!

CAKE

Preheat oven to 350                       

  • 1 cup flour
  • 3/4 cup white sugar
  • 1/4 tsp salt
  • 1/3 cup milk
  • 1 1/2 tsp baking powder
  • 1/4 tsp baking soda
  • 6 tbsp butter
  • 1 1/2 tsp vanilla
  • 2 eggs

(I have listed these ingredients in random order to show you just how simple this cake is – throw everything in a bowl and mix!)  It will quickly become your “go to” cake any time you need a simple white cake. If you really feel the need to get technical, mix the butter, eggs and vanilla together until light and fluffy, then add the rest.

Mix well with hand beater at low speed until mixed, then high speed for 2 minutes.  Pour into greased and floured 9″ round cake pan.

Bake at 350 for 25 minutes, check with cake tester.  Cake should be just baked enough to be pulling away slightly from the sides of the baking pan, and tester should come out clean.  Let rest for 10 minutes then remove from pan and cool completely on wire rack.

CREAMY CUSTARD FILLING 

  • 2 cups milk
  • 1/4 tsp salt
  • 1/4 cup sugar
  • 2 egg yolks
  • 3 tbsp cornstarch

In heavy saucepan, whisk all ingredients until incorporated very well then cook over medium-low heat until mixture thickens and boils, about 20 minutes.  Boil 1 minute stirring frequently.  Remove from heat and stir in 1 tsp vanilla.

I have also done this part in the microwave – stir every 2 minutes until mixture has thickened well.  Make sure you use a large bowl as the mixture will raise and lower several times while it cooks.

Cover right on the surface of the pudding with saran until cool, but not set, about 30 minutes.

CHOCOLATE ICING

  • 2 squares semisweet chocolate
  • 1 tbsp butter or margarine
  • 1/2 cup icing sugar
  • 2-3 tbsp milk

In heavy saucepan over low heat, melt chocolate and butter.  Remove saucepan from heat.  With wire whisk beat in 1/2 cup icing sugar and 2-3 tbsp milk until smooth and easy spreading consistency.

ASSEMBLY

With serrated knife, cut cake horizontally in half to form 2 equal layers.  Place 1 cake layer on cake platter, spread evenly with the cooled custard.  Top with 2nd cake layer, pressing down gently but firmly.  Cover top of cake with chocolate icing.  Try to spread chocolate cover to the edges so it drips down over the sides.  Refrigerate until serving time.

This cake is so versatile.  If you have a large crowd, double the recipe and make it 4 layers high!  So impressive looking – for extra flair, save some of the custard and spread it around the outside of the cake, then press in sliced toasted almonds.  You can also make one cake with chocolate  (add 1/4 cup cocoa powder to cake batter or use your own favorite chocolate cake) and add your toasted almonds to the top.

Creamy Raspberry Cheesecake

Image

CRUST

1 1/2 cups crushed graham cracker crumbs

4 tbsp butter or margarine – melted

4 tbsp sugar

1/2 tsp cinnamon

Preheat oven to 350.  To prepare cheesecake, mix crumbs, melted butter, sugar and cinnamon together.  Press evenly and firmly over bottom of an 8 1/2 – 9″ springform pan.  Bake until lightly browned (8 – 10 minutes).  Set aside to cool

CHEESECAKE

16 ounces cream cheese (softened)

1/2 – 3/4 cup sugar (to your taste)

1 tsp vanilla

1 tsp grated lemon rind

3 eggs

1 cup sour cream

Beat cream cheese until fluffy.  Gradually beat in sugar, then beat in vanilla andlemon rind.  Add eggs, one at a time, beating well after each addition.  Blend in sour cream.  Pour mixture into cooled crust.

The best way to cook the cheesecake is in a bain marie.  Fancy expression for a water bath.  Double or even triple wrap the springform pan in tin foil, bringing the foil right up to the top.  Using a large enough roasting pan, place the wrapped springform pan in the center, and pour really hot water in the pan to about halfway up the springform pan.  I think it is easiest to get the springform pan into the roasting pan first, set that on your oven rack, and then pour in the hot water.

Bake at 350 until knife inserted near center comes out clean (50 – 60) minutes.  Turn off oven and let cheesecake stand in oven with door ajar for about 30 minutes.  Cool.

RASPBERRY TOPPING

10 ounces raspberries (frozen in syrup)

2 tbsp sugar

2 tbsp corn starch

2-3 cups fresh raspberries

Defrost and drain very well.  Prepare slurry with sugar, corn starch and cold raspberry juice.  Heat over medium temperature until mixture is very thick and has boiled clear (if you leave it cloudy you will taste the corn starch).  Add the drained raspberries and set aside to let cool.

When both the cake and the topping are cool, spread the raspberry topping over the cake and immediately press fresh raspberries gently into the topping all the way around in circles until you have covered the surface of the cake.  Let rest for at least 4 hours.

When you slice into a cheesecake, always dip your knife into hot water, wipe it dry and then slice.  If you do this with each slice your slices will all be nice and clean.

This cake is equally delicious if you use different fruit – go ahead and experiment.  The process is the same, just substitute the fruit you want to use.  If you are using fresh fruit for the topping altogether and no frozen fruit, just make sure you use a juice concentrate to make your slurry with corn starch otherwise their won’t be quite enough flavour.

Image

Blueberry Lemon Muffins

Super Blueberry Lemon Muffins

2 cups flour

1/2 cup sugar

1 T baking powder

1/2 t salt

rind of 1 lemon

1 egg

1 cup milk

1/2 cup butter, melted

1 cup fresh or frozen blueberries

Lemon Butter Topping

1/4 c melted butter

2 T lemon juice

1/2 cup sugar

Mix flour, sugar, baking powder, salt, and lemon rind in large bowl.  Beat egg, add milk and butter. Add egg mixture to dry ingredients . Stir until just mixed, stir in blueberries.

Fill greased (or lined with muffin paper) pans 2/3 full, Bake 375 degrees for 20 minutes

Topping- Combine butter and juice. Measure sugar in separate dish. Dunk tops of slightly cooled muffins into lemon butter and then sugar. Makes 12 muffins