Thai Halibut Curry

Thai halibut curry 4

I made this today with Penang curry paste, which is my current fave, but it would be equally delicious with your fave curry paste.

This is one of the easiest, quickest curries I make.  Amazingly, it is also one of the tastiest!  We make it with halibut, but you could just as easily make it a vegetarian dinner or cook any protein you like to make the complete meal.

  • 6 four ounce halibut pieces
  • peanut oil (or any neutral oil)
  • 1 can coconut milk
  • 1/2 cup sliced shallot
  • 1 tsp minced garlic
  • 1 tsp minced ginger
  • 1 tbsp (heaped) curry paste
  • 1 tbsp roasted red chili sauce
  • 2 tbsp brown sugar
  • 2 green onions, thinly sliced
  • juice of 1 fresh lime
  • 2 tbsp (dry) white wine
  • salt & pepper to taste

Season halibut with salt and pepper.  Fry in hot oil on each side for 2 minutes each … then set aside.

In the same pan, saute shallot, garlic, ginger, curry paste and chili paste.  Cook for one minute just to allow the flavours to wake up.  Add one can coconut milk, brown sugar, lime juice, and simmer until it has reduced by half.  Depending on how fresh your curry paste is, you may need more paste.  I also find that curry paste varies a lot by brand so please make sure you taste it to be sure you have enough curry flavour.

Taste …. does it need salt and pepper?  If so, add to taste.

Now is time to add the vegetables if you are going to make this a one dish meal:

I’ve made this in so many ways:

  • on a sheet pan, roast cauliflower, patty pan squash &  chicken thigh pieces
  • on a saute pan, cook shrimp just until pink and cooked through
  • saute bits of pork tenderloin with snap peas and peppers
  • saute tofu and mushrooms in garlic butter

Or simply add any vegetable you like:

  • bok choy
  • broccoli
  • red pepper
  • snap peas

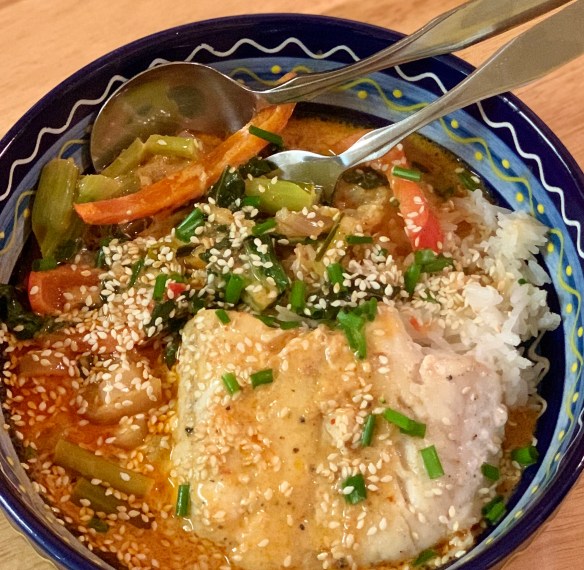
No matter how you do it, this curry sauce enhances anything you come up with!  Serve with jasmine rice, your protein of choice and this amazingly delicious curry poured over top.

Garnish with slivered green onions and toasted sesame seeds.

Thai halibut curry

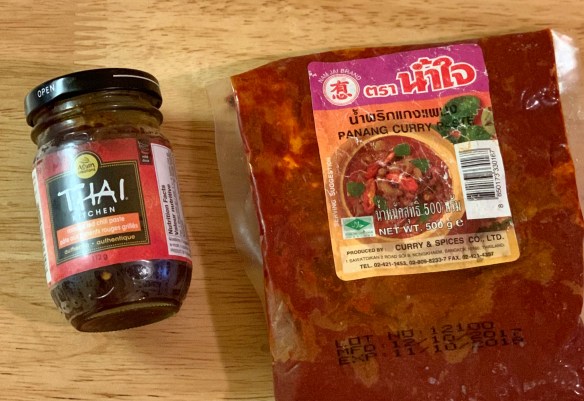
The brand of curry is my favourite …. it is the same as the packs I brought home from Thailand, and I always look for it.  The “Thai Kitchen” chili paste is the best mistake I’ve made ….. didn’t have reading glasses on and thought I was buying red curry paste …. I love it, and add it to so many curry dishes, it just adds so much punch.

thai halibut curry 2

Throw in whatever vegetables you like. Today I used bok choy and red pepper from Farmers Market, and the last little broccoli floret I had in the fridge.

Thai halibut curry 3

Sear halibut on both sides.  (Or just use whatever protein you have on hand)  I like that this curry dish is poured over the halibut, keeps the curry fresher tasting somehow.


Lemon Artichoke Pasta


Lemon Artichoke Pasta

Have you ever seen artichokes growing in the field?  Well, maybe it isn’t a big deal to Californian’s……  It took a few miles before we realized that was what we were seeing but ever since we cooked some fresh artichokes (Thanks Meghan)  I can’t stop adding them to everything. This quick and easy pasta dish is bright and refreshing – dinner ready in 20 minutes!

  • 2-1/2 teaspoons salt, divided
  • 1 pack angel hair/capellini pasta
  • 3 tablespoons butter
  • 1/2 cup thinly sliced shallots
  • 1 can (14 ounces) water-packed quartered artichoke hearts, well drained
  • 1/2 cup minced sun dried tomatoes
  • 2 garlic cloves, minced
  • 1 cup crumbled feta cheese
  • 1/2 cup sliced kalamata olives
  • 2 cups fresh spinach
  • 2 tablespoons minced fresh parsley
  • 1 tablespoon grated lemon zest
  • 2 to 3 tablespoons lemon juice
  • 1/3 cup shaved Parmesan cheese
  • freshly ground black pepper

This recipe makes enough to serve 2-4 people.  4 as a side, 2 as a main meal

Angel hair pasta cooks very quickly (4 minutes) to prepare the artichoke sauce first and allow it to sit while you cook the pasta.

Saute the shallots in the melted butter, adding the artichoke hearts, sun dried tomatoes, and garlic as soon as the onions have softened.  When heated through add the olives, parsley, lemon zest and lemon juice.  Set aside while the pasta cooks.

As soon as the pasta is cooked, pull it out of the boiling water and drop it into the lemon artichoke sauce, allowing some of the pasta water to drip into the pan also.  Stir in the spinach and let the warm pasta wilt the spinach.  Add feta and serve with fresh ground pepper and parmesan shavings to garnish.


Hot & Sour Soup

Nothing like a steaming bowl of hot and sour soup to fight off the cold season!  This soup is surprisingly easy to make and can be as versatile as the ingredients in your fridge.  You won’t be calling for take out after you give this a try.

Hot and Sour Sop

  • 6 cups chicken broth
  • 3 tbsp soy sauce
  • 3 cloves minced garlic
  • 2 tbsp minced ginger
  • 1 tbsp sambal oelek (or any Chinese hot sauce)
  • 1 tsp white pepper
  • 4-5 tbsp rice vinegar (start with 4 and see how it tastes to you)
  • 2 tbsp cornstarch
  • shitake mushrooms
  • thinly sliced red peppers
  • thinly sliced cauliflower
  • slivered snap peas
  • 6 ounces extra firm tofu, cut in small pieces
  • 1 tsp sesame oil
  • green onions, thinly sliced

For a little extra protein, stir in some cooked chicken or pork.

Combine chicken broth, soy sauce, garlic, ginger, hot sauce and white pepper.  Bring to a boil, then simmer.

Stir in vegetables.  Be as liberal with the vegetables as you like, I like to pack the soup with a variety.

Mix rice vinegar with corn starch and stir while pouring the mixture into the pot.  Allow to gently boil and thicken.  If you need more thickening, add a mixture of 2 tbsp vinegar and 1 tbsp corn starch.

This is the point where you really need to taste …. how hot do you like it?  How sour?  Work with the white pepper and vinegar if you need a little more punch in your soup.  Once you like the flavour it is time to work in the eggs.

Whisk egg until creamy, then pour into the soup in a very slow, thin trickle, stirring the pot as the egg goes in to create those little streams that help give you that true hot and sour soup texture.

Garnish with the sesame oil and green onions.  Best served with these amazing scallion pancakes.

Scallion Pancake 9.jpg

Portugese Stew With Pork and Clams

I haven’t been to Portugal, but I sure do want to!  This aromatic braise melds fields, land and sea, in the most satisfying way.  Grab some crusty bread and you’ve got a fantastic meal.

Portugese stew 2

I had a few of these adorable baby Yukon golds at hand, along with some bell peppers that went in also ….. after all, a stew is intended to help you clean out the fridge!

  • 2 pounds boneless pork shoulder, cut into 1 1/2-inch cubes
  • 2 3/4 teaspoons kosher salt, divided
  • 3/4 teaspoon black pepper, divided
  • 6 garlic cloves, divided
  • 1 cup dry white wine
  • 2 bay leaves
  • 1 tablespoon Pimentón de la Vera dulce (or your favourite paprika)
  • 1 tablespoon extra-virgin olive oil, divided
  • 1 medium-size (9-ounce) yellow onion, thinly sliced
  • 1 (28-ounce) can whole peeled tomatoes, drained and crushed by hand
  • 1/2 teaspoon crushed red pepper
  • 2 cups chicken stock or lower-sodium chicken broth, divided
  • 2 pounds baby Yukon Gold potatoes, halved
  • 2 pounds Manila clams or cockles, scrubbed
  • Chopped fresh cilantro, for garnish
  • Lemon wedges and crusty bread, for serving

How to Make It

Step 1

Season pork all over with 1 1/4 teaspoons salt and 1/2 teaspoon black pepper, and place in a large ziplock plastic bag. Smash 3 garlic cloves, and add to bag with wine, bay leaves, and Pimentón. Seal and refrigerate 8 hours or overnight.

Step 2

Preheat oven to 350°F. Remove pork from marinade, and pat dry. Remove and discard garlic and bay leaves; reserve remaining marinade. Heat 1 1/2 teaspoons oil in a large Dutch oven over medium-high. Add half of pork, and cook, stirring once or twice, until lightly browned, about 5 minutes. Transfer pork to a plate. Repeat with remaining half of pork. Chop remaining 3 garlic cloves, and add to Dutch oven with onion and remaining 1 1/2 teaspoons oil; cook, stirring often, until golden, about 6 minutes. Stir in crushed tomatoes, red pepper, and reserved marinade

Step 3

Bring to a boil; reduce heat to medium-low, and simmer, stirring often, 3 minutes. Return cooked pork to Dutch oven; stir in 1 cup stock until pork is mostly submerged. Cover and bake in preheated oven until pork is fork-tender, 1 hour and 30 minutes to 2 hours.

Step 4

Stir in potatoes and remaining 1 cup stock. Cover and bake until potatoes are tender, about 30 minutes.

Step 5

Transfer Dutch oven to stovetop over high, and add clams. Cover and cook until clams open, 3 to 5 minutes. (Remove and discard any unopened clams.) Season with remaining 1 1/2 teaspoons salt and remaining 1/4 teaspoon black pepper. Garnish with cilantro. Serve with lemon wedges and crusty bread.

bread

My “no knead” bread was a gift with this stew, the perfect combo!

Make Ahead

Pork may be prepared through step 3 and refrigerated overnight. Reheat before proceeding with step 4.

Suggested Pairing

Robust Portuguese red.
Portugese stew 3

If you should be lucky enough, you will have friends with an amazing bonfire pit to sit around and enjoy your stew, dunking the crusty bread and sipping your beverage of choice.

I spotted this recipe just as we finished making our own Paprika – grilling or smoking, then drying a variety of peppers before grinding them up to enjoy all winter.  This was featured in Food and Wine Magazine, and I’ve copied it exactly as written.  On this particular day we were eating it the same day, so I had to skip the lengthy marinade, and just carried on as it is written, stirring the onions and garlic together after browning the pork.  Everything went into the oven and it wasn’t long before the most magical aroma was filling the house.  We then carted it off, with the bread, to enjoy at our friend’s house with a bonfire.

Beautiful Barley Bowl

Beautiful bowl 7

This bright and beautiful bowl is packed with intense flavour and crunchy bits along with the chewy barley combined alongside pickled radish & ginger.

Dressing:

  • 1/2 cup rice vinegar
  • 1/4 cup miso paste
  • 4 tsp honey
  • 3 tbsp sesame oil
  • 2 tsp wasabi paste
  • 2 tsp fresh lime juice
  • 2 tsp soy sauce
  • 1/4 cup olive oil
  • 1 cup minced cilantro (use the stems!)

Combine all ingredients in a food processor and give it a good whiz until it is bright and creamy.

Beautiful bowl 1

Gather all the dressing ingredients together and it will take just a few minutes to combine.

Beautiful bowl 2

Use the stems of the cilantro, that is where the most flavour is – mince it first before blending.

Beautiful bowl 3

Bright, fresh, green – this dressing is a flavour packed bomb.  I’m sure it would be great on anything as well as this bowl …. I’m going to put it to use in whatever way I can find.

Pickled Radish:

  • 6-8 radishes, thinly sliced
  • 1 tbsp rice vinegar
  • 1 tsp sugar
  • 1/2 tsp salt

Slice radishes, and sprinkle with salt and sugar, then pour the rice vinegar over.  Allow the radishes to sit for at least 10 minutes.

Beautiful bowl 4

Barley:

  • 4 cups water
  • 1 tsp chicken or vegetable stock
  • 1 tbsp miso paste
  • 1 1/2 cups pearl barley

Bring water, miso and stock to a boil, then add the barley.  Bring to a slow gentle boil and allow barley to cook until just tender – about 25-30 minutes.  Rinse under cool water and allow to drain.

This recipe was inspired by Whitewater Cooks, and her Beautiful BC Bowl with salmon ….but you can do whatever you like with it.

YOUR BOWL:

If you are cooking a protein, marinade in some of the dressing, and then grill until cooked.  Grilling is by far the best – the honey will stick to any fry pan you use!

Beautiful bowl 6

This is as customizable as your fridge!  Use what you’ve got – tonight we had leftover flank steak so that made our protein, but honestly without a protein you will enjoy this just as much.

Assemble bowl with the barley, protein of choice and an assortment of toppings.  Tonight we used:

  • roasted peanuts
  • roasted sesame seeds
  • avocado
  • sliced snow peas
  • halved cucumber slices
  • slivered green onions
  • sautéed mushrooms
  • sautéed red onions & sweet peppers
  • cilantro, roughly chopped
  • nori sheets – roasted lightly and slivered

Everything about this bowl is a delight!  Customize it to your tastes.


Pork Chili Verde

or as Stella calls it, Mexican Green Chili!

Chili Verde 4

The most fun comes when you get to dress up your chili bowl just the way you like it.  Stella said it was so good she couldn’t stop eating.  Magic words for Nana’s ears!!

Serves 6

  • 2-3 pounds pork shoulder, cut into 1-2″ pieces
  • lard for browning the meat
  • flour for dredging
  • salt and pepper
  • 2 jars tomatillo salsa
  • 3 cups chicken stock
  • 2 cups chopped sweet peppers
  • 1 cup diced white onion
  • 1 cup corn
  • 1 tin white kidney beans
  • 1 small tin diced green chilis (use mild or spicy depending on who’s coming for dinner!)

Preheat oven to 325.

Heat the lard in a large heavy bottom saucepan.  (Yes, you can use a neutral oil, but lard does add a certain level of flavour that you won’t get with neutral oil)

Season pork with salt and pepper, then dredge in flour.

Fry the pork pieces a few at a time, until you have a golden crust.  If you overcrowd the pan they will steam rather than get a nice carmelized crust.

Chili Verde 1

Once all the pork has been browned, saute the onions and peppers, seasoning with salt and pepper while you do that, then deglaze the pan with the chicken stock.  Stir in the tomatillo salsa and then return all the pork to the saucepan.  Stir to combine, and then bake in the slow oven for about 3 hours, until the pork is tender and falling apart with just a touch.  Stir in the beans, green chilis and corn, allow to heat through.

Chili Verde 2

Bring the whole saucepan to the table and surround with toppings for everybody to help themselves.

Suggested toppings:

  • sliced radish
  • cubes of avocado
  • sliced jalapeno
  • grated cheese
  • crumbled taco chips
  • cilantro
  • green onions
  • Sour cream


  • Serve with a loaf of crusty bread ….. try my recipe, (No Knead bread) its quick and easy, and completes this meal perfectly.

Chili Verde 3


Teriyaki Chicken Rice Bowls

Looking for a quick dinner?  When the grandkids are here, I sure am!  This was perfect, and the girls loved it.  They built their own bowls and tucked right in.

Teriyaki 2

Here was my surprise for the night – Sloan put this together, and then handed it to me.  “Here you go Nana, take a photo now …… it looks pretty good”.  Then she handed me her cilantro before adding her vegetables and digging in.  The cilantro, apparently, was only for the photo!  Yes, it is the only photo I got tonight.  I will have to do it again soon.

Do you know how easy it is to make your own teriyaki sauce?  This recipe is so quick and simple to do you will want to keep a jar of it in the fridge all the time.

TERIYAKI SAUCE

  • 1/2 cup light brown sugar
  • 1/2 cup low sodium soy sauce
  • 4  tbsp rice vinegar
  • 1 tsp ground ginger
  • 2 – 3 garlic cloves, minced
  • 2 tbsp cornstarch

Combine all ingredients in a small sauce pan and bring to a boil.  Allow to boil gently just until sauce has thickened.  Thin with a bit of water if necessary to have it sauce like, and not jelly like!

Teriyaki 3

This jar might not look like much, but this teriyaki sauce is the bomb!  

Cook rice according to instructions.

Cut about 1 pound of chicken breast into bite size pieces, and marinate with a few tablespoons of the teriyaki sauce, while you prep the rest:

Slice a variety of vegetables, whatever you like!

Teriyaki 1

This could so easily be a vegetarian meal – just serve with the stir fried vegetables, or use tofu in place of the chicken.

Prep some toppings:

  • rough chop on cilantro
  • slivered green onions
  • toast sesame seeds

Okay, now things come together quickly!

In a hot wok or skillet, heat a neutral oil and quickly fry the chicken just until cooked through.  Set aside.

Wipe out wok/skillet and heat a bit more oil.  Stir fry vegetables until just crisp tender.

Set everything out and allow everybody to build their own bowls.  Remember to set out your teriyaki sauce to drizzle over.

Caesar Salad

Caesar salad 3

Love the textures of a great Caesar salad – contrasting fresh crisp greens, crunchy bacon and croutons, soft parmesan and a creamy dressing.

Everybody needs a great Caesar dressing in their kitchen, try this one and adjust to your families taste.  My grandkids don’t love garlic, so when they are over I usually go light on the garlic cloves but that’s totally up to you!

  • 1 egg (or 1/4 cup mayonnaise)
  • juice of 1/2 lemon
  • 1-3 cloves garlic
  • 2 anchovy fillets (packed in oil)
  • 1 tbsp Worcestershire sauce
  • 1 tbsp dijon mustard
  • 1-2 tbsp red wine vinegar
  • pinch of sugar
  • 1/2 tsp salt
  • 1/2 tsp pepper
  • 1/2 – 3/4 cup oil (I like to use a combo of vegetable oil and really good extra virgin olive oil)
  • dash hot sauce (totally optional)

Combine all ingredients except oil in jar or blender.  Shake/blend really well until smooth, and slowly add oil until emulsified.  Taste and adjust for salt and pepper, adding more if necessary.

Caesar salad 1

Everybody helps make dinner around here, and Stella is learning the fine points of knife work!  Don’t worry, she quickly learned to rest the knife against her knuckles to avoid trimming her fingers……

Caesar salad 2

Assembling that cheese grater has all Sloan’s attention.

  • Wash your lettuce leaves and spin dry (you can do this ahead of time, wrap in clean kitchen towel and keep in fridge until ready to use, it really crisps up the lettuce)
  • Cook bacon until crisp and crumble.
  • Toss stale bread chunks in olive oil and a bit of salt and pepper and toast until dry and crunchy.  (This is also a great place to use dried herbs, and some garlic powder)
  • Grate Parmesan cheese

Toss lettuce pieces in very large bowl with the bacon, croutons and parmesan cheese.  Just before serving toss with dressing just until everything has a delicious coating.  Taste and squeeze a bit of lemon over if you like.

This easily goes from a side dish to a whole meal if you serve Caesar salad with grilled chicken or shrimp, and a side of garlic toast.


Fajita Seasoning

Fajita Seasoning 1

Having this seasoning mix on hand makes dinner easy breezy!  (lemon squeezy??) Make a double batch and you can keep it for months in a cool, dry spot.  Use it on vegetables, fish or meat alike, these flavours go so well together and make dinner quick and simple.

  • 1 tbsp chili powder
  • 1 tsp ground cumin
  • 1 tsp smoked paprika
  • 1/4 tsp cayenne pepper (or to taste)
  • 1 tsp sea salt
  • 1 tsp ground black pepper

How easy is this? just toss it all into a bowl and thoroughly mix.  Do yourself a favour and make lots.

Fajita Seasoning

Just looking at this, you can tell it’s tasty, right??

This works with anything your imagination can come up with …. salad dressing or vegetable dip or seafood bake …. you let me know if you come up with more!


For fajitas:

  • protein (or not to make it vegetarian)
  • onions
  • peppers


To make fajitas, simply generously sprinkle slivered chicken (or any meat, seafood of your choice) and toss in fry pan until just cooked through.

Cook sliced peppers and onions separately so they don’t overcook.

Serve with:

  • lime crema (sounds fancy, but it’s just a squeeze of lime juice with sour cream and a bit of salt)
  • salsa
  • avocado
  • lime wedges
  • chopped cilantro
  • toasted pepitas (pumpkin seeds)
  • tortillas

You can so easily turn this into what is crazy popular right now,  power bowls!  Just serve with cooked quinoa or grain of your choice.

Turn it into a sheet pan dinner, also featured everywhere right now, just generously sprinkle everything with the seasoning and toss it into a hot oven (?400?).

Yes, you are welcome, you didn’t know dinner could be so quick, easy, healthy and delicious, did you???


Chicken Pot Pie

Chicken Pot Pie 2

See the sauce bubbling out the side?  That’s what you are looking for.  Crust is golden, now just try and wait while it sets up a bit …. no judgement if you can’t!  I promise it is delicious.

Fall ….. it just makes me want to bake, and roast, and toast.  This chicken pot pie recipe is a staple around here.  You can make it as easy as “pie” by purchasing pre-made pastry shells or make your own – either way, this pie is flaky, tender and bursting with bites of chicken and vegetable goodness.  Serve with a tossed salad and dinner is ready.

Preheat oven to 400

  • 2 pastry shells
  • 2 cups cooked chicken (use leftovers or a rotisserie chicken for simplicity)
  • olive oil
  • 1 small onion
  • 1 garlic clove
  • 2 tbsp flour
  • 1/4 tsp pepper
  • 1 tsp salt
  • 2 cups chicken stock
  • diced vegetables – your choice and about 2 cups worth of:
  • sweet peppers
  • celery
  • carrots
  • peas (not in my house, neither of us like cooked peas)
  • zucchini
  • corn
  • green beans
  • a generous handful of herbs, I like thyme, basil, oregano and parsley
  • salt and pepper

Brush one pie shell with beaten egg white, sprinkle with sea salt and bake at 400 for 8-10 minutes, just until starting to turn golden brown.  Remove from oven and allow to cool.

pie shell

I find if you pre-bake the bottom crust, brushed with beaten egg white, the pastry stays flaky.  Sprinkle a little sea salt on for that extra bit of crunch.  I think you can see here that my bottom crust was in the freezer, thank you Tenderflake pastry!

In saucepan heat olive oil, then stir in onion.  Stir until just translucent and add in the garlic clove.  If celery is one of your chosen vegetables, add it now too.  Allow to saute for a few minutes until just starting to become tender.  Add the flour and create a thick paste, letting the flour cook for a minute in order to remove that “floury” taste.  Gradually stir in the chicken stock, just a bit at a time until it is all incorporated and your sauce is starting to thicken.  Stir in the rest of your vegetables, taste and season with salt and pepper, and set aside.

Pour the chicken & vegetable mixture into the prebaked pie shell, and cover with the 2nd pastry shell.  If you’ve purchased pre made pastry, just squish and squiggle it around a bit and play with the edges, nobody will ever know you didn’t make it!

chicken pot pie

The top crust was a pastry shell I had in the freezer, probably leftover from an apple pie day!

TIP:  If you are vegetarian, or just feel like a vegetarian meal, this is so easy to do!  Just omit the chicken and use a LOT more veg.  Instead of chicken stock use a vegetable stock.  Your results will be ever so delicious …. you’re welcome!

Sprinkle the top with a bit more salt and pepper, some Italian herbs and either paprika or a bit of dried roasted red pepper.  (yes, we do our own dried seasonings with the surplus of vegetables in the field)

Put the whole pie in the oven (I’ve learned to have a foil dripping sheet below it…..) and cook for 15 minutes at 400, then lower the oven to 350 and cook for about 40-50 minutes, until you see the sauce bubbling out the side and the pie looks golden brown.

If your pie is looking golden brown, but not yet bubbling out the sides, loosely lay a sheet of tin foil over the pie until you see that bubbling action.

Make sure you let it sit for 15-20 minutes after it comes out of the oven, that allows it to set a bit.  Not that it tastes any less wonderful if it is running all over your plate ……..

chicken pot pie 3

See what I mean?  We couldn’t wait the 15 minutes, but it was delicious.  By the time we came back for seconds it had set up and made nice even slices.  Amazing either way!