Sourdough Sandwich Bread

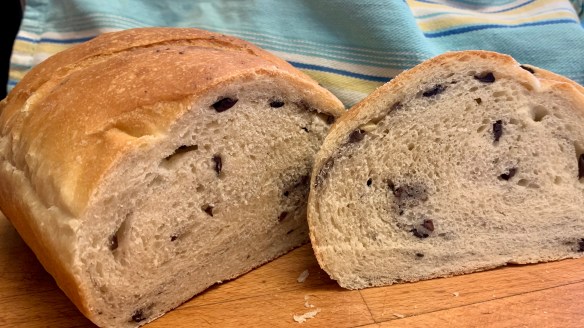
I love those round loaves of sourdough bread, crunchy crust, chewy interior with lots of holes …… but this is not one of them.  Sometimes I also just want a soft sandwich loaf with all the flavour of my sourdough breads.  This makes enough for 2 loaves.  I made one in a traditional loaf pan and the rest of the dough turned into the most amazing rolls I’ve ever come up with.

Soft sourdough 6

Ingredients

Levain

  • 1 cup + 1 tablespoon (128g) King Arthur Unbleached All-Purpose Flour
  • 1/2 cup + 1 tablespoon (128g) cool water (60° to 70°F)
  • 3 tablespoons (44g) ripe (fed) sourdough starter

Dough

  • 5 1/4 cups (631g)  Unbleached Bread Flour or  Unbleached All-Purpose Flour*
  • scant 6 tablespoons (50g) milk powder
  • 1/4 cup (50g) sugar
  • 2 1/2 teaspoons salt
  • 2 teaspoons instant yeast
  • 1/4 cup (4 tablespoons, 57g) unsalted butter, room temperature
  • 1 1/2 cups (340g) water (70° to 80°F)
  • all of the ripe levain
*All-purpose flour will produce a somewhat stickier dough.

Instructions

  1. To make the levain: Mix all of the levain ingredients together and place in a covered container with room for the levain to grow. It will almost double in size, and will take about 12 hours to ripen (ferment) at room temperature (70°F). When perfectly ripened, there’ll be large bubbles (mostly below the surface) creating a somewhat rippled effect. It’ll appear almost fluffy. If the levain is covered with a froth of tiny bubbles, it’s a bit over-ripened; but don’t worry, you can still use it.
  2. To make the dough: Mix and then knead together all of the dough ingredients, including the levain, to make a smooth, supple, and not overly sticky dough.
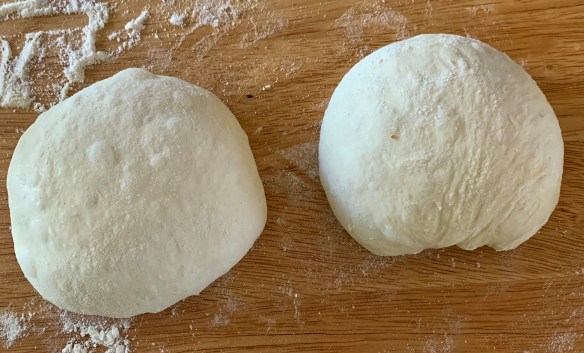
  3. Place the kneaded dough in a lightly greased bowl, cover the bowl, and let the dough rise for 1 to 2 hours, until doubled in size.
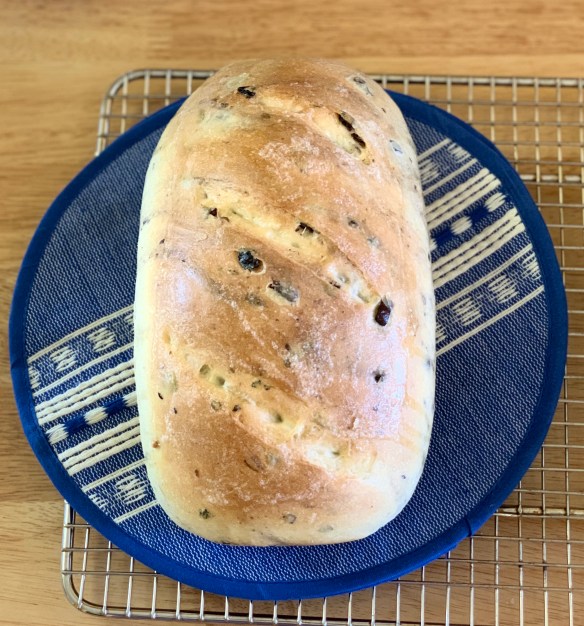
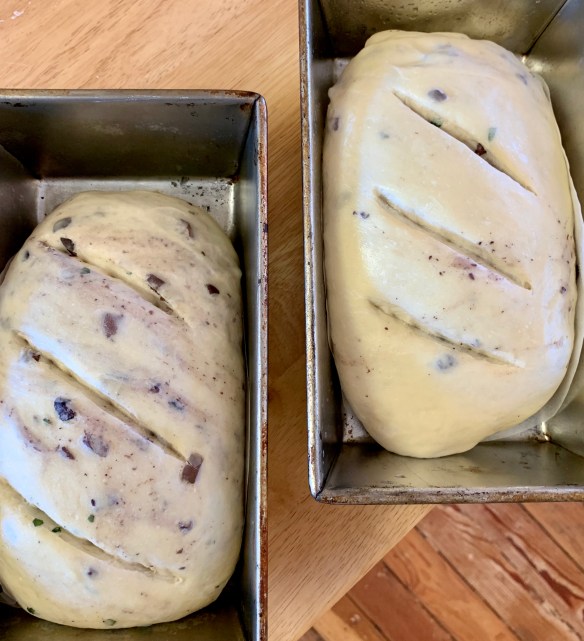
  4. Divide the dough in half, and shape each half into 8″ logs. Place the logs in two lightly greased 8 1/2″ x 4 1/2″ bread pans. Cover the pans with lightly greased plastic wrap (or a couple of plastic shower caps), and let the loaves rise until they’ve crowned about 1″ over the rim of the pan, about 1 to 2 hours.
Soft sourdough 4

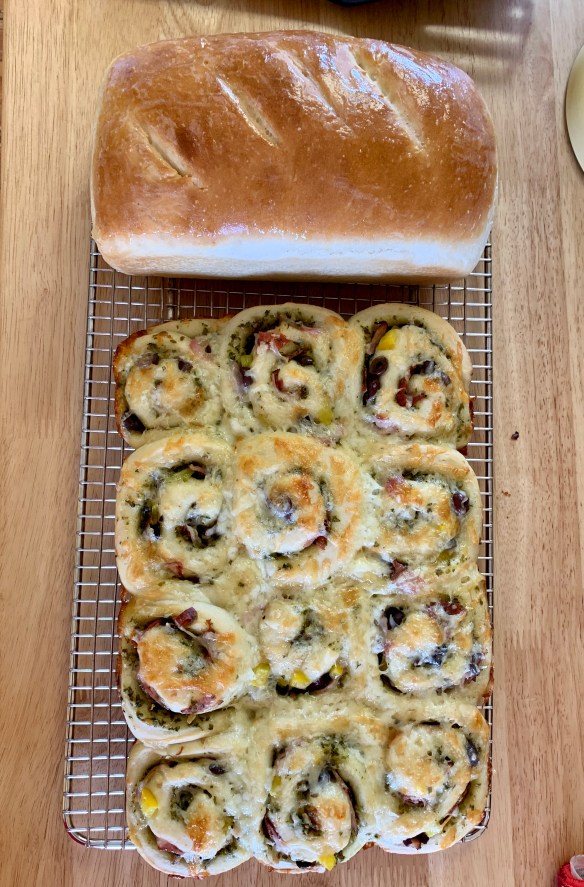
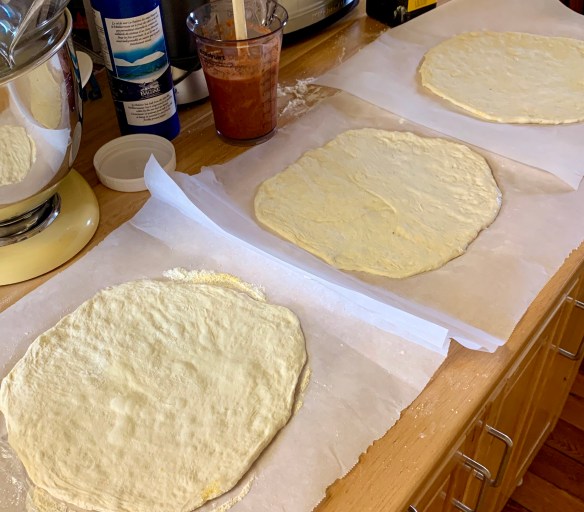
Look at all this from just a few moments work!  I almost injured my arm I was so enthusiastically patting myself on the back.

This recipe yielded such a beautiful soft sandwich loaf for sure, but it was these rolls that stole the show.  The dough is tender and incredibly flavourful.

Soft Sourdough 1

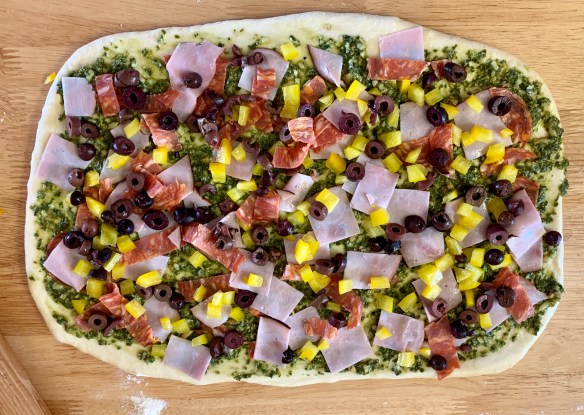
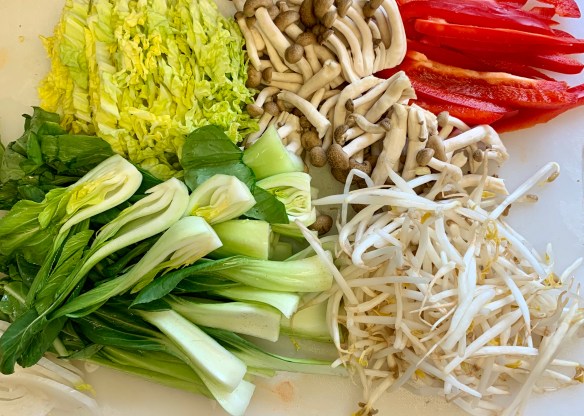
It’s the same principal as a cinnamon bun – but savoury!  You can fill the roll with anything you like.  Today I used Black Forest ham, cut into small squares, and spicy Calabrese sausage cut into little strips along with kalamata olives and diced yellow pepper.

Today I got frustrated because I wasn’t able to use tomato sauce like the pizza roll I envisioned.  So, Plan B …… I defrosted one of my basil almond pesto blocks, stirred in a bit more olive oil and spread that over the dough.  In the end, it was the happiest of Plan B’s ever!  In fact I got so excited by how good it was smelling that I rolled it all up, forgetting to add cheese.  Oh well, another Plan B – cheese sprinkled over the top before baking.

Soft sourdough 3

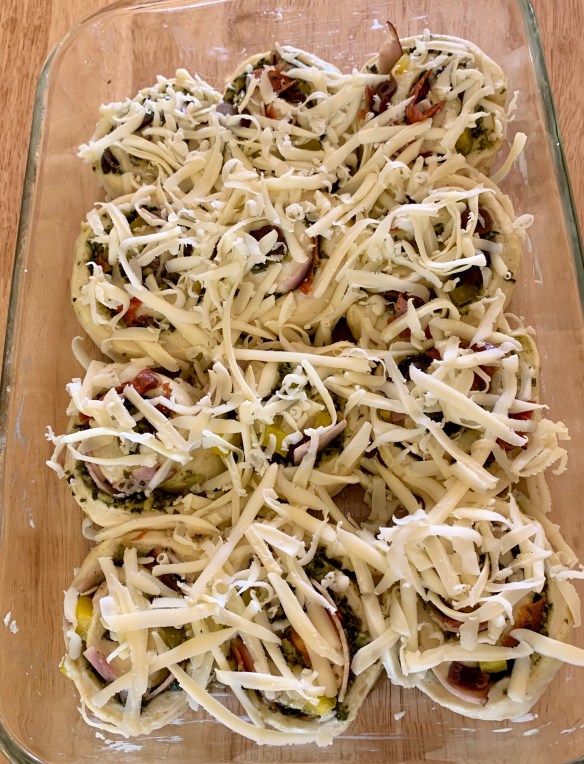
A mixture of aged white cheddar and mozzarella graced the top of these rolls right before baking and it was just fabulous.

I’ve been reading a lot of the King Arthur Flour website recipes during my sourdough explorations, and this recipe also came from there.  We don’t have any of that particular flour around here, but I wonder how much difference that makes?  We do have Rogers Flour locally and that is what I have been using with great success.

Rhubarb Citrus Bars

With a hint of citrus these rhubarb bars just scream spring.  I think everybody is glad I found something to bake other than sourdough bread.  

Rubarb citrus 4

Nothing better than the smell of this custard filled rhubarb citrus bar on a rainy spring day.

INGREDIENTS

FOR THE SHORTBREAD:

  • 1 ½ cups/190 grams all-purpose flour
  • cup/65 grams granulated sugar
  • ¼ teaspoon fine sea salt
  • ¾ cup/170 grams cold unsalted butter (1 1/2 sticks), cut into 1-inch pieces

FOR THE FILLING:

  • 10 ounces rhubarb, sliced (2 1/2 cups), plus 1 slender red stalk for the top
  • 1 ¼ cups/250 grams granulated sugar
  • 4 large eggs
  • 2 tablespoons freshly squeezed lemon juice (1 to 2 lemons)
  • 3 tablespoons all-purpose flour
  • 1 tablespoon finely grated orange or lemon zest
  • Pinch of fine sea salt
  • Confectioners’ sugar, for serving

PREPARATION

  1. Heat oven to 325 degrees and line a 9-by-9-inch pan with parchment paper, leaving two edges long so they overhang the pan by at least 1 inch. (This is for lifting the bars out later.)
  2. In a food processor, pulse together flour, sugar and salt. Add butter and process until a crumbly dough forms. Press dough into the lined pan in an even layer. Don’t clean out the food processor, you’re going to need it.
  3. Bake crust until golden at the edges, 35 to 40 minutes, rotating halfway through. Transfer to a wire rack and raise oven temperature to 350 degrees.
  4. While the crust is baking, make the filling. In a medium saucepan, combine the rhubarb slices and 1 cup sugar. Cook, stirring frequently, over medium-low heat until rhubarb releases its juices. Raise heat and bring to a simmer. Keep simmering, stirring once in a while, until the rhubarb breaks down completely, about 15 to 20 minutes. Transfer the rhubarb and juices to the food processor, and let it sit with the cover off until it cools down a bit, about 15 minutes.
  5. Meanwhile, using a vegetable peeler, lay the very pink rhubarb stalk on its narrower side. From the edge of the stalk, peel a long strip from the stalk. Continue to peel strips from the stalk, flipping it around the other side to keep it even. (This makes it easier to peel, but don’t worry too much about getting uniform strips.) Line up peeled strips and cut into 1 1/2-inch lengths. Some may curl up, and that’s fine. You’ll have about 1 cup strips.
  6. To the food processor, add the eggs, remaining 1/4 cup sugar, lemon juice, flour, zest and salt, and pulse until mixture is puréed. Pour into baked shortbread base, and carefully scatter the rhubarb strips on top. It should look a little like confetti. Bake until the filling is set and puffy, 20 to 30 minutes. Transfer to a wire rack to cool completely in the pan.
  7. Once cool, use a butter knife to cut at the edges of the crust to release them from the pan, then use the parchment “handles” to lift up and transfer the pastry to a cutting board. Cut into 1 3/4-inch squares. Dust with confectioners’ sugar before serving.

Ready to put together … you can see I’ve added a bit of orange zest to the shortbread crust, loved the way it was aromatic and added a bit of flavour as well.

Rhubarb Citrus 7

The custard is creamy, the rhubarb is tart, and the shortbread crust is buttery …. perfect.

This recipe came from New York Times, and they recommend a 9″ square pan, which I don’t have …. the only adjustments I made (for the sizing) were to use just 3 eggs, and I withheld a bit of the shortbread crust and sprinkled it over the top before baking as a bit of a crumb, and it worked perfectly in my 8″ pan.  Some reviewers suggested less sugar, and I’d agree with that – depending on your rhubarb.  I also didn’t  need to put the rhubarb into the mixer to blend as it cooked down beautifully and I preferred the texture.

Rhubarb citrus 3

You can totally skip the step of those rhubarb ribbons on top, but I love the way they look.  Also, the extra crumb on top is just because I didn’t have a large enough baking vessel, and I’m kind of glad I didn’t ….. love anything with crumb on top.

Rhubarb citrus 5

Just out of the oven and the house smells fabulous!  So hard to let this cool down until it is safe to cut it – must let that custard set ….

Miso Glazed Sablefish

We don’t cook a lot of fish, really only seafood like prawns, crab, or white meaty fish items that are as tasty as this is.  Fish and chips are my specialty and they often show up … Of course, when Grant isn’t home …. salmon might be on the menu!

IMG_2947

Just look at that glistening, tender, flaky sablefish.  Drool worthy.


6 6 ounce pieces of fresh sablefish (any meaty white fish will do)

Marinade

  • 1 tbsp miso paste
  • 2 tbsp grainy dijon mustard
  • 2 tbsp creamy dijon mustard
  • 1/2 cup low sodium soy sauce
  • 2 tbsp wasabi paste (from tube)
  • 1/4 cup olive oil
  • 1/2 fresh lemon (juiced)
  • 3 tbsp fresh ginger, peeled and finely grated
  • 2 tsp crushed garlic

Crust

  • 2 cups panko breadcrumbs
  • 3 tbsp cornmeal
  • 1/4 tsp salt
  • 1/4 tsp pepper

3 tbsp olive oil

Whisk together all marinade ingredients – pour over fish pieces in a shallow pan – make sure all sides are coated.  Cover and marinate for 45 minutes in the fridge.

Combine panko, cornmeal, salt and pepper.

Remove fish from marinate and dip in panko mix.

Heat olive oil in heavy bottom fry pan – once it is sizzling, add the fish.

Cook for about 4 minutes per side, just until fish flakes and is glistening.

This recipe is deceptively simple.  It holds such a flavour wallop. As an added bonus, I make it often just for the two of us, and freeze the excess marinade.  It freezes well and I’ve got all the work done for another night.

Thanks go entirely to the cookbook “Whitewater Cooks” for this amazing recipe (and many more!).


Olive Sourdough Loaf

Okay, my goodness …. you have to try this loaf.  Love kalamata olives any day of the week, but add them to a loaf of sourdough goodness, include some fresh garlic chunks and oregano right out of the garden and you have a sure fire winner.

olive loaf 6

I think it is the combination of sourdough starter with the yeast that creates the perfect crumb and texture for soft and delicious bread.

  • 1 cup (227g) sourdough starter, ripe (fed) or discard
  • 1 1/4 cups (283g) lukewarm water
  • 1/4 cup (50g) olive oil
  • 2 teaspoons instant yeast
  • 1 tablespoon sugar
  • 2 1/2 teaspoons salt
  • 2 cloves garlic, finely chopped
  • 1 tablespoon fresh oregano, finely chopped; or 1 1/2 teaspoons dried oregano
  • 4 1/2 to 4 3/4 cups (539g to 574g) Unbleached All-Purpose Flour
  • 1/2 to 3/4 cup (71g to 142g) drained, pitted, and coarsely chopped kalamata olives
  1. Combine all of the ingredients, except the olives, mixing and kneading to form a smooth dough then fold in the olives.
  2. Cover the dough, and allow it to rise until it’s doubled in size, about 90 minutes.
  3. Gently divide the dough in half; it’ll deflate somewhat.
  4. Shape each piece of dough into a round loaf. Place each loaf on a lightly greased or parchment-lined baking sheet.
olive loaf 3

Knead the olives in until the dough is soft, only slightly sticky to the touch, and smooth.

Olive loaf 1

This loaf came out of the oven looking irresistible.  It was amazing!


olive loaf 4

I was looking for a loaf shape today, so baked them in these pans.

olive loaf 5

Just look!  These olive loaves were absolutely perfect – the texture and flavour can’t be beat.

This recipe came from the King Arthur Flour website, and if you ever have any questions about baking, check out their website, they have everything.


Sourdough Pizza Dough

Starting a sourdough project means a lot of sourdough discard …. this is a brilliant way to use some of that discard.

Ingredients

  • 180 grams bread flour
  • 120 grams warm water
  • 60 gram active sourdough starter
  • 15 grams extra virgin olive oil
  • 5 grams sea salt
  • Gather the ingredients.

  • Add all of the ingredients to a medium bowl (a glass bowl is great because you will be able to observe bubbles from fermentation activity). Stir to thoroughly combine. The dough will look rough and shaggy and feel soft and sticky.

  • Cover bowl with a damp towel or plastic bag and rest for 20 minutes.

  • Then stretch and fold the dough, more or less as follows. Moisten your hand with a little water, scoop your hand underneath the dough and gently grasp one side of the lump. Lightly stretch the dough in your hand away from the main mass, then fold it over. Repeat this motion on different sides of the dough three or four more times.

  • Then flip the whole mass of dough such that the seams of your folds face down against the bottom of the bowl. You should notice that the shaggy dough becomes considerably more smooth, which is the goal.

  • Rest the dough for another 20 minutes, then stretch and fold again.

  • Cover once more and ferment for 3 to 4 hours at room temperature. Your dough will probably not rise significantly, but you should see bubbles forming on the surface and underneath (which you can observe if your dough is in a glass bowl). If you do not see bubbles, continue to ferment until you do.

  • Lightly flour a work surface. Invert the bowl above the floured area and wait for the dough to release itself from the bowl. Divide the dough in half. Using essentially the same technique as the stretch and fold earlier (minus the wet hands), shape the pieces into rounds.

  • Coat the inside of two round, one-pint storage containers (preferably with lids) with oil and place a dough ball seam-side down into each one. Cover with lids or plastic wrap.

  • Refrigerate for at least 24 hours before using. Dough kept in the refrigerator longer will continue to develop flavor and has a shelf life of a week or more.

  • To make pizza, remove the dough from the refrigerator and place on a well-floured surface. Coat the dough lightly all over with flour as well. With your hands, gently flatten and stretch the dough into a thin circle about 12 inches in diameter.

  • Add sauce and toppings as desired and bake according to your preferred method. Serve immediately.


    This recipe comes from http://www.thespruceeats.com – love it!


    Sourdough pizza dough

    Look at those little bubbles in there already – you know its going to be good.

    Sourdough pizza dough 1

    Set aside to rest – a minimum of 24 hours, and up to one week.

    Sourdough pizza 1

    Flour your hands to stretch the dough out … it is super soft and moves easily.

    Sourdough pizza 2

    This dough is soft, chewy and extremely tasty!


    This recipe makes enough for 2 small pizza shells …… not sure about your home, but that’s never enough for my household so make sure to double this recipe

Wonton Soup

A gloomy April day needs just this kind of soup – so much flavour and just packed with fresh vegetables.  I think the miso is what really bring the flavour bomb.

Wonton Soup 4

Loads of vegetables, a few wontons and the best broth you could wish for.


  • 1 tablespoon sesame oil
  • 2 cloves garlic, minced
  • 1 tablespoon freshly grated ginger
  • 4 cups chicken broth
  • 3 tablespoons low sodium soy sauce
  • 1 tablespoon chili oil
  • 4 ounces shiitake mushrooms
  • 2 baby bok choy
  • 3 green onions, thinly sliced
  • 1 tablespoon yellow miso paste, or more, to taste

FOR THE WONTONS

  • 8 ounces medium shrimp, peeled, deveined and diced
  • 2 cloves garlic, minced
  • 2 green onions, thinly sliced
  • 1 tablespoon oyster sauce
  • 1 tablespoon reduced sodium soy sauce
  • 1 tablespoon freshly grated ginger
  • 1 teaspoon sesame oil
  • 1/2 teaspoon Sriracha, optional
  • 1/4 teaspoon ground black pepper
  • 36 2-inch won ton wrappers

DIRECTIONS:

  • In a large bowl, combine shrimp, garlic, green onions, oyster sauce, soy sauce, ginger, sesame oil, Sriracha and pepper.
  • To assemble the wontons, place wrappers on a work surface. Spoon 1 tablespoon of the shrimp mixture into the center of each wrapper. Using your finger, rub the edges of the wrappers with water. Fold the dough over the filling to create a half-moon shape, pinching the edges to seal; set aside.
  • Heat 1 tablespoon sesame oil in a large stockpot or Dutch oven over medium heat. Add garlic and ginger, and cook, stirring frequently, until fragrant, about 1-2 minutes.
  • Whisk in chicken broth, soy sauce, mushrooms and 2 cups water.
  • Bring to a boil; reduce heat and simmer until mushrooms have softened, about 10 minutes. Stir in bok choy and green onions. Stir in miso paste until well combined, about 1-2 minutes.
  • Stir in wontons until cooked through, about 2 minutes.
  • Serve immediately.
  • This soup is as flexible as the ingredients in your fridge – I like to prep them and stir fry them separately, which keeps them fresh and bright.
Wonton soup 1

A huge pile of fresh vegetables disappears in a hurry in this delicious broth.

Serve this incredible soup with these crispy scallion pancakes for a total win.

The soup recipe is courtesy of http://www.damndelicious.net and I’d recommend looking at her recipes …. everything I’ve tried has been fantastic.

Rhubarb Blueberry Oat Bars

Is there anything better than oat bars that you can grab and eat while doing whatever you need to be doing?  These are absolute perfection, with a hint of sweetness from the blueberries (last years frozen) and a bit of tang from the rhubarb (fresh this year).

Rhubarb 2

These bars have the exact perfect ratio of fruit to oat bar, I could have devoured many more than I did.  Thank goodness I didn’t.  It’s hard enough not to eat all the sourdough I’m baking!

Ingredients

  • 3 cups Rhubarb Cut Into 1 Inch Pieces
  • 3 cups Blueberries
  • 2 Tablespoons Lemon Juice
  • 3/4 cup Sugar
  • 4 Tablespoons Cornstarch
  • 1-½ cup All-purpose Flour
  • 1-½ cup Uncooked Quick Cooking Oats (not Instant)
  • 3/4 cup Brown Sugar
  • ¾ cup Softened Butter
  • ½ teaspoon Baking Soda
  • 1/2 teaspoon cinnamon
  • ¼ teaspoon Salt

Preparation

Preheat oven to 350ºF.

Combine rhubarb, blueberries and lemon juice in a large saucepan and cook over medium heat until rhubarb is softened. No added liquid is needed as the water from the rhubarb and blueberries will come out naturally.

In a small bowl, combine sugar and cornstarch. Mix well to break up the lumps of cornstarch. Set aside.

While rhubarb and blueberries are cooking, begin making the crust. Combine flour, oats, brown sugar, butter, baking soda and salt together in a bowl until well mixed and crumbly. Reserve 1 1/2 cups of crust to be used as a topping. Grease a 13×9 pan with cooking spray. Press remaining crust mixture into the pan in an even layer. Set aside.

When rhubarb and blueberries are softened, use a potato masher to mash and smooth out the larger chunks. Once bigger pieces are broken up, mix in the sugar/cornstarch mixture. Continue to stir until thickened.

Once mixture is thickened, pour over crust. Top with reserved crust mixture.

Bake at 350ºF for 30 minutes.

Rhubarb 1

Ready for the oven, and it already smells heavenly.

Rhubarb 3

Make sure they cool completely before cutting them.

I found this recipe on http://www.tastykitchen.com, and the only changes I made were to include some cinnamon in the crust/topping mixture and reduce the sugar a bit … these are also their tips:

Tips:
1. Mixing the sugar and cornstarch together will prevent lumps of cornstarch in your mixture.
2. The bars will puff up considerably, so don’t be alarmed when you open the oven to take out the bars. They will be a bit jiggly. That’s OK! They are done!
3. When they cool, they’ll “deflate” a bit and set up nicely.

Sourdough Crackers

These crispy, crunchy, tasty crisps are the perfect way to quickly use up some of that sourdough starter discard that is threatening to take over your fridge.  Eaten on their own, or as a vessel for your favourite dip, they are a winner any way you serve them.

Sourdough crackers 8

A little fresh homemade tzatziki sauce was the perfect way to eat up a bunch of these crisps!

  • 200 grams (about 1 cup) mature sourdough starter
  • 60 grams (about 1/2 cup) all purpose flour
  • 60 grams (about 1/2 cup) whole wheat flour
  • 12 grams (about 2 tbsp) rye flour
  • 32 grams (3 tbsp) extra virgin olive oil
  • 1 tbsp dried herbs de Provence (or any herbs you like)
  • 1/2 tsp fine sea salt


  • flaky sea salt for topping

In mixing bowl combine all ingredients except for the flaky sea salt.  Mix well, kneading until you get it all together in a nice smooth ball.

To get 200 grams of starter, I often use what I have left from the jar I am feeding, then add to it with starter discard that is in the fridge.  If using entirely discard from the fridge you can either wake it up with a feed and use it once you see it has doubled, or just use it straight from the fridge.  With these crackers you are mainly looking for the flavour more than a rise like you expect from a loaf of bread.

Wrap tightly in plastic and put in the fridge for anywhere from 30 minutes to 24 hours.  Sitting helps the sourdough flavours to develop, as well as make the dough easier to work with.

Preheat oven to 350 and line 2 baking sheets with parchment.

Cut dough in half, place one half in fridge and roll out the other very thin, as thin as you can get and still work with it.  If you like a hardier crisp, then just roll out to 1/4 inch.  I’ve also used my pasta rolling machine with varied success.  When the dough feels soft and supple it works extremely well, but if your dough ends up a bit on the drier side of things it is easiest to roll out by hand)

You can either cut the dough before putting on the baking  sheet, or bake them as is and then break them into rustic crisps.

Spritz very lightly with water, then sprinkle with flaky sea salt right before baking.

Bake for 12-15 minutes – make sure you rotate your pans half way through for even baking.

Sourdough crackers 4

This dough is with the exact measurements and seasonings listed above.  It made a drier dough, and was much easier to roll out by hand than it was to put through the pasta roller.

Sourdough crackers 3

This dough was made with less whole wheat and rye flour, and it was by far the easiest dough to work with and slid through the pasta rollers with ease..  For seasoning I used my granddaughter Sloan’s magic taco seasoning mix.  They were delicious!

These crackers are only limited by your imagination!  Use any variety of flours or seasonings and get creative.

Sourdough crackers 1

These literally took minutes to make, and they are ready for the fridge.  I rested the dough until the next day (just because that was easiest today), and then rolled them out the next day.

Sourdough crackers

I cut these ones into long triangles prior to baking, but it is just as easy to create a more rustic crisp by baking them first and then breaking them up.

Sourdough crackers 2

These herby little bites were cut into a square (fish) shape prior to baking.

Sourdough crackers 5

Aren’t they pretty??  I loved these!  So easy to make, and the extra bonus is that so far I haven’t actually had to “discard” any of my discard.

I found this recipe during one of my many ventures down the internet rabbit hole in search of ways to use sourdough discard – it was on http://www.loveandoliveoil.com

img_3328

Pretty hard to go back to buying crackers when you realize how easy these are, and how absolutely delicious.


Carne Asada

Missing Mexico right about now, so these Carne Asada tacos were just perfect!

Carne Asada 4

Carne Asada is one of those quintessential Mexican dishes …. pretty simple really, meat and a tortilla shell.  Make it exceptional by adding pickled onions and a fresh pico de gallo, and I promise – everything will look bright and cheerful!

Ingredients

  • 2 limes juiced
  • 4 cloves garlic crushed
  • 1/2 cup orange juice
  • 1 cup chopped fresh cilantro
  • 1/2 teaspoon salt
  • 1/4 teaspoon black pepper
  • 1/4 cup vegetable oil
  • 1 jalapeno minced
  • 2 tablespoons white vinegar
  • 2 pounds flank or skirt steak

Instructions

  • In a large resealable bag, combine lime juice, crushed garlic, orange juice, cilantro, salt, pepper, vegetable oil, jalapeno, and vinegar. Squeeze it around to mix it up.
  • Put the entire flank steak into the resealable bag. Seal it up tight. Make sure all the meat is exposed to the marinade, squishing the bag around to coat. Refrigerate for at least 2 hours, or overnight.
  • Heat an outdoor grill to high heat.
  • Remove the flank steak from the marinade, and discard excess marinade. Cook on the grill for 7 to 10 minutes per side.
  • Once done, remove from heat and let rest 10 minutes. Slice against the grain, and serve.

We love to serve this with fresh, homemade flour tortillas (my flour tortilla game is way stronger than my corn tortilla game ….. so far)

Carne Asada

You won’t believe it, but the rib eye steak was on sale, not the flank …. so that is what I used.  It was incredible.  All the citrus shows up in the marinade, and you can still taste it in the grilled steak, but it doesn’t overpower the meat.

Carne Asada 1

Grilled to perfection, moist and juicy inside – this steak is the best bite.  Just hope some gets to the table for the tortillas.

Carne Asada 2

Just look at how moist that steak looks.  Yum.

carne Asada 3

Place it all out on the table, and let the family make their own plates.  Smiles all around!


The “stay at home chef” adapted this recipe from one of my favourite chefs – Rick Bayless.  This is so easy to do at home and gives you the flavour you might expect from sitting in a Mexican cantina ….. not only that, it is easy!

The BEST Chocolate Chip Cookies

Stella says I’ve baked too much bread for them and she’s gained about 40 pounds (in total I think she weighs 40 pounds!).  She did, however, think chocolate chip cookies would be a good idea.

CC Cookies 5

The BEST Chocolate Chip Cookie Recipe

Makes 26 HUGE cookies (or 52 regular size!)

  • ½ pound butter, softened (2 sticks)
  • ¾ cup granulated sugar
  • ¾ cup packed light brown sugar
  • 2 large eggs
  • 1 ¼ teaspoons vanilla extract
  • ¼ teaspoon freshly squeezed lemon juice
  • 2 ¼ cups flour
  • 1/2 cup rolled oats
  • 1 teaspoon baking soda
  • 1 teaspoon salt
  • Pinch cinnamon
  • 2  cups Nestle Tollhouse semi-sweet chocolate chips (or sub 1/2 with cranberries)
  • 1 3/4 cups chopped walnuts

Preheat oven to 300

Cream butter, sugar and brown sugar in the bowl of a stand mixer on medium speed for about 2 minutes. 

Add eggs, vanilla and lemon juice, blending with mixer on low speed for 30 seconds, then medium speed for about 2 minutes, or until light and fluffy, scraping down bowl. 

With mixer on low speed, add flour, oats, baking soda, salt and cinnamon, blending for about 45 seconds. Don’t overmix. 

Remove bowl from mixer and stir in chocolate chips and walnuts.

Portion dough with a scoop (about 3 tablespoons) onto a baking sheet lined with parchment paper about 2 inches apart for extra large cookies – I prefer to get more cookies to share and make them smaller – to fit 12 on a cookie sheet.

Preheat oven to 300°F. Bake for 20 to 23 minutes, or until edges are golden brown and center is still soft. 

Remove from oven and cool on baking sheet for about 1 hour.

Cook’s note: You can freeze the unbaked cookies, and there’s no need to thaw. Preheat oven to 300°F and place frozen cookies on parchment paper-lined baking sheet about 2 inches apart. Bake until edges are golden brown and center is still soft.

CC Cookies 1

I found this the perfect size for home eating – 12 to a cookie sheet.

CC Cookies 2

Good thing I have 4 cookie sheets, otherwise it might have taken all day to allow them to completely cool on the baking sheet.  As it is, I did move them after about 30 minutes.

CC Cookies 3

CC Cookies 4

A plate of these crispy edged, chewy interior cookies is a good idea any time of day.

There are moments of sharing during this 2020 Covid-19 pandemic, and this recipe is one of them.  Apparently a famous recipe from DoubleTree hotels, it is their signature cookie, and I’m not the only one to love this cookie.  No, I haven’t stayed there, so I’ve never had one of these warm on arrival, but they are delicious out of your own oven.  I reduced the chocolate slightly – the original calls for 2 2/3 cups of chocolate chips but I found that a bit overpowering.  Yes, you can have too many chocolate chips.