Quick Focaccia

img_8247

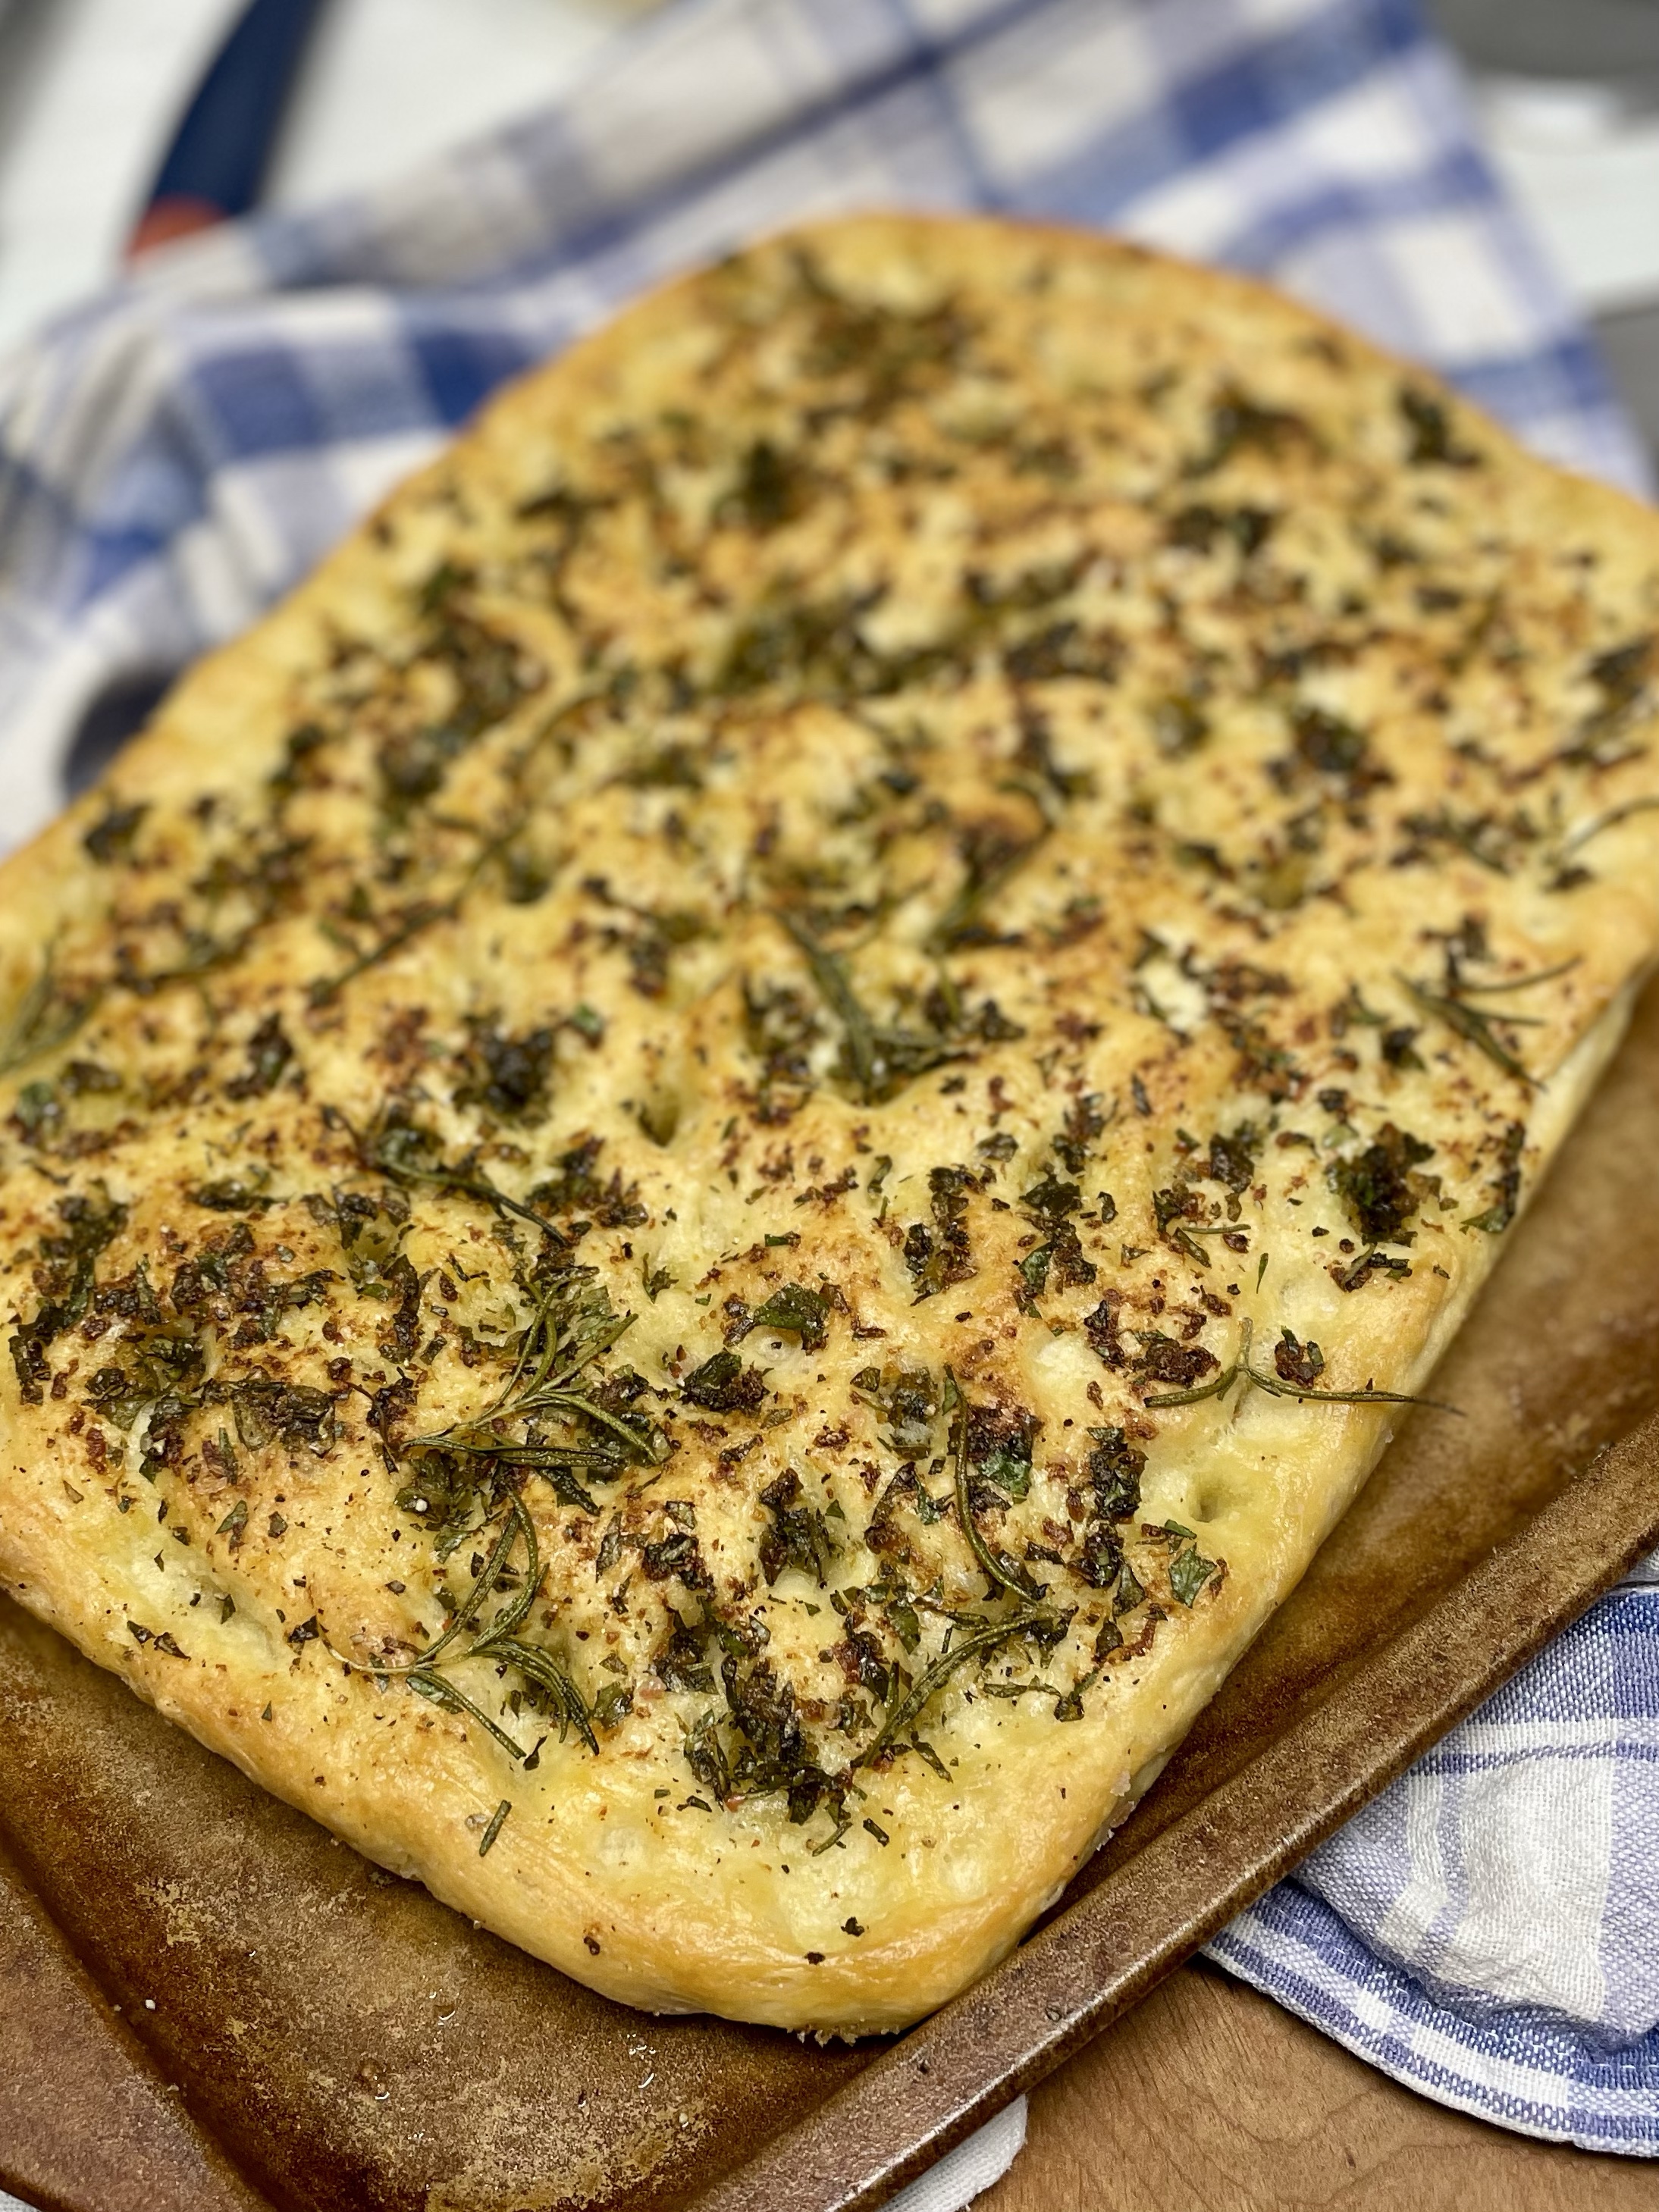
There is something about making breads that just feels like a win.  Focaccia always does that!  The very best focaccia recipes allow for the dough to rest anywhere from hours to days.  If you are like me, some days you are driving home from work thinking focaccia would really boost dinner TODAY.  Not 3 days from now.  This recipe is for those days.   If you’ve got a little over an hour, you’ve got enough time to pull this off – and trust me, it’s easy.  No intensive kneading or stand mixer necessary!

  • 2 Tbso olive oil
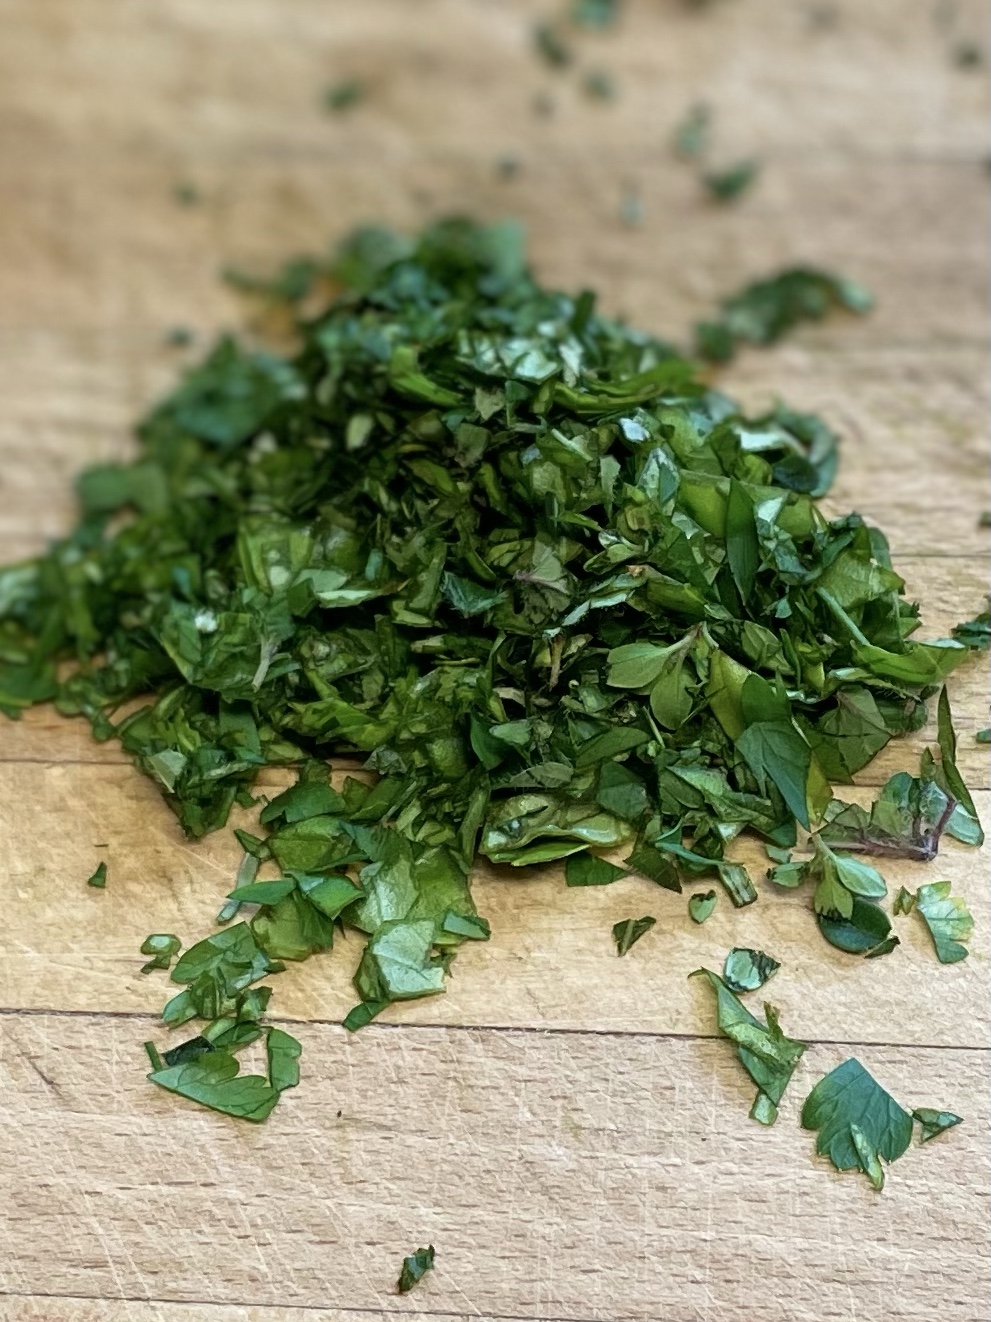
  • 2 Tbsp fresh herbs – I used basil, parsley, rosemary, oregano and thyme. minced

Mix well and if it looks a little herb heavy, add a bit more olive oil. Set aside.

  • 3/4 cup warm water (the perfect temperature for blooming yeast is between 105-115)
  • 2 1/4 tsp dry active yeast (1 pack)
  • 1/2 tsp sugar
  • 2 cups all purpose flour
  • 1 tsp salt
  • 1 Tbsp olive oil

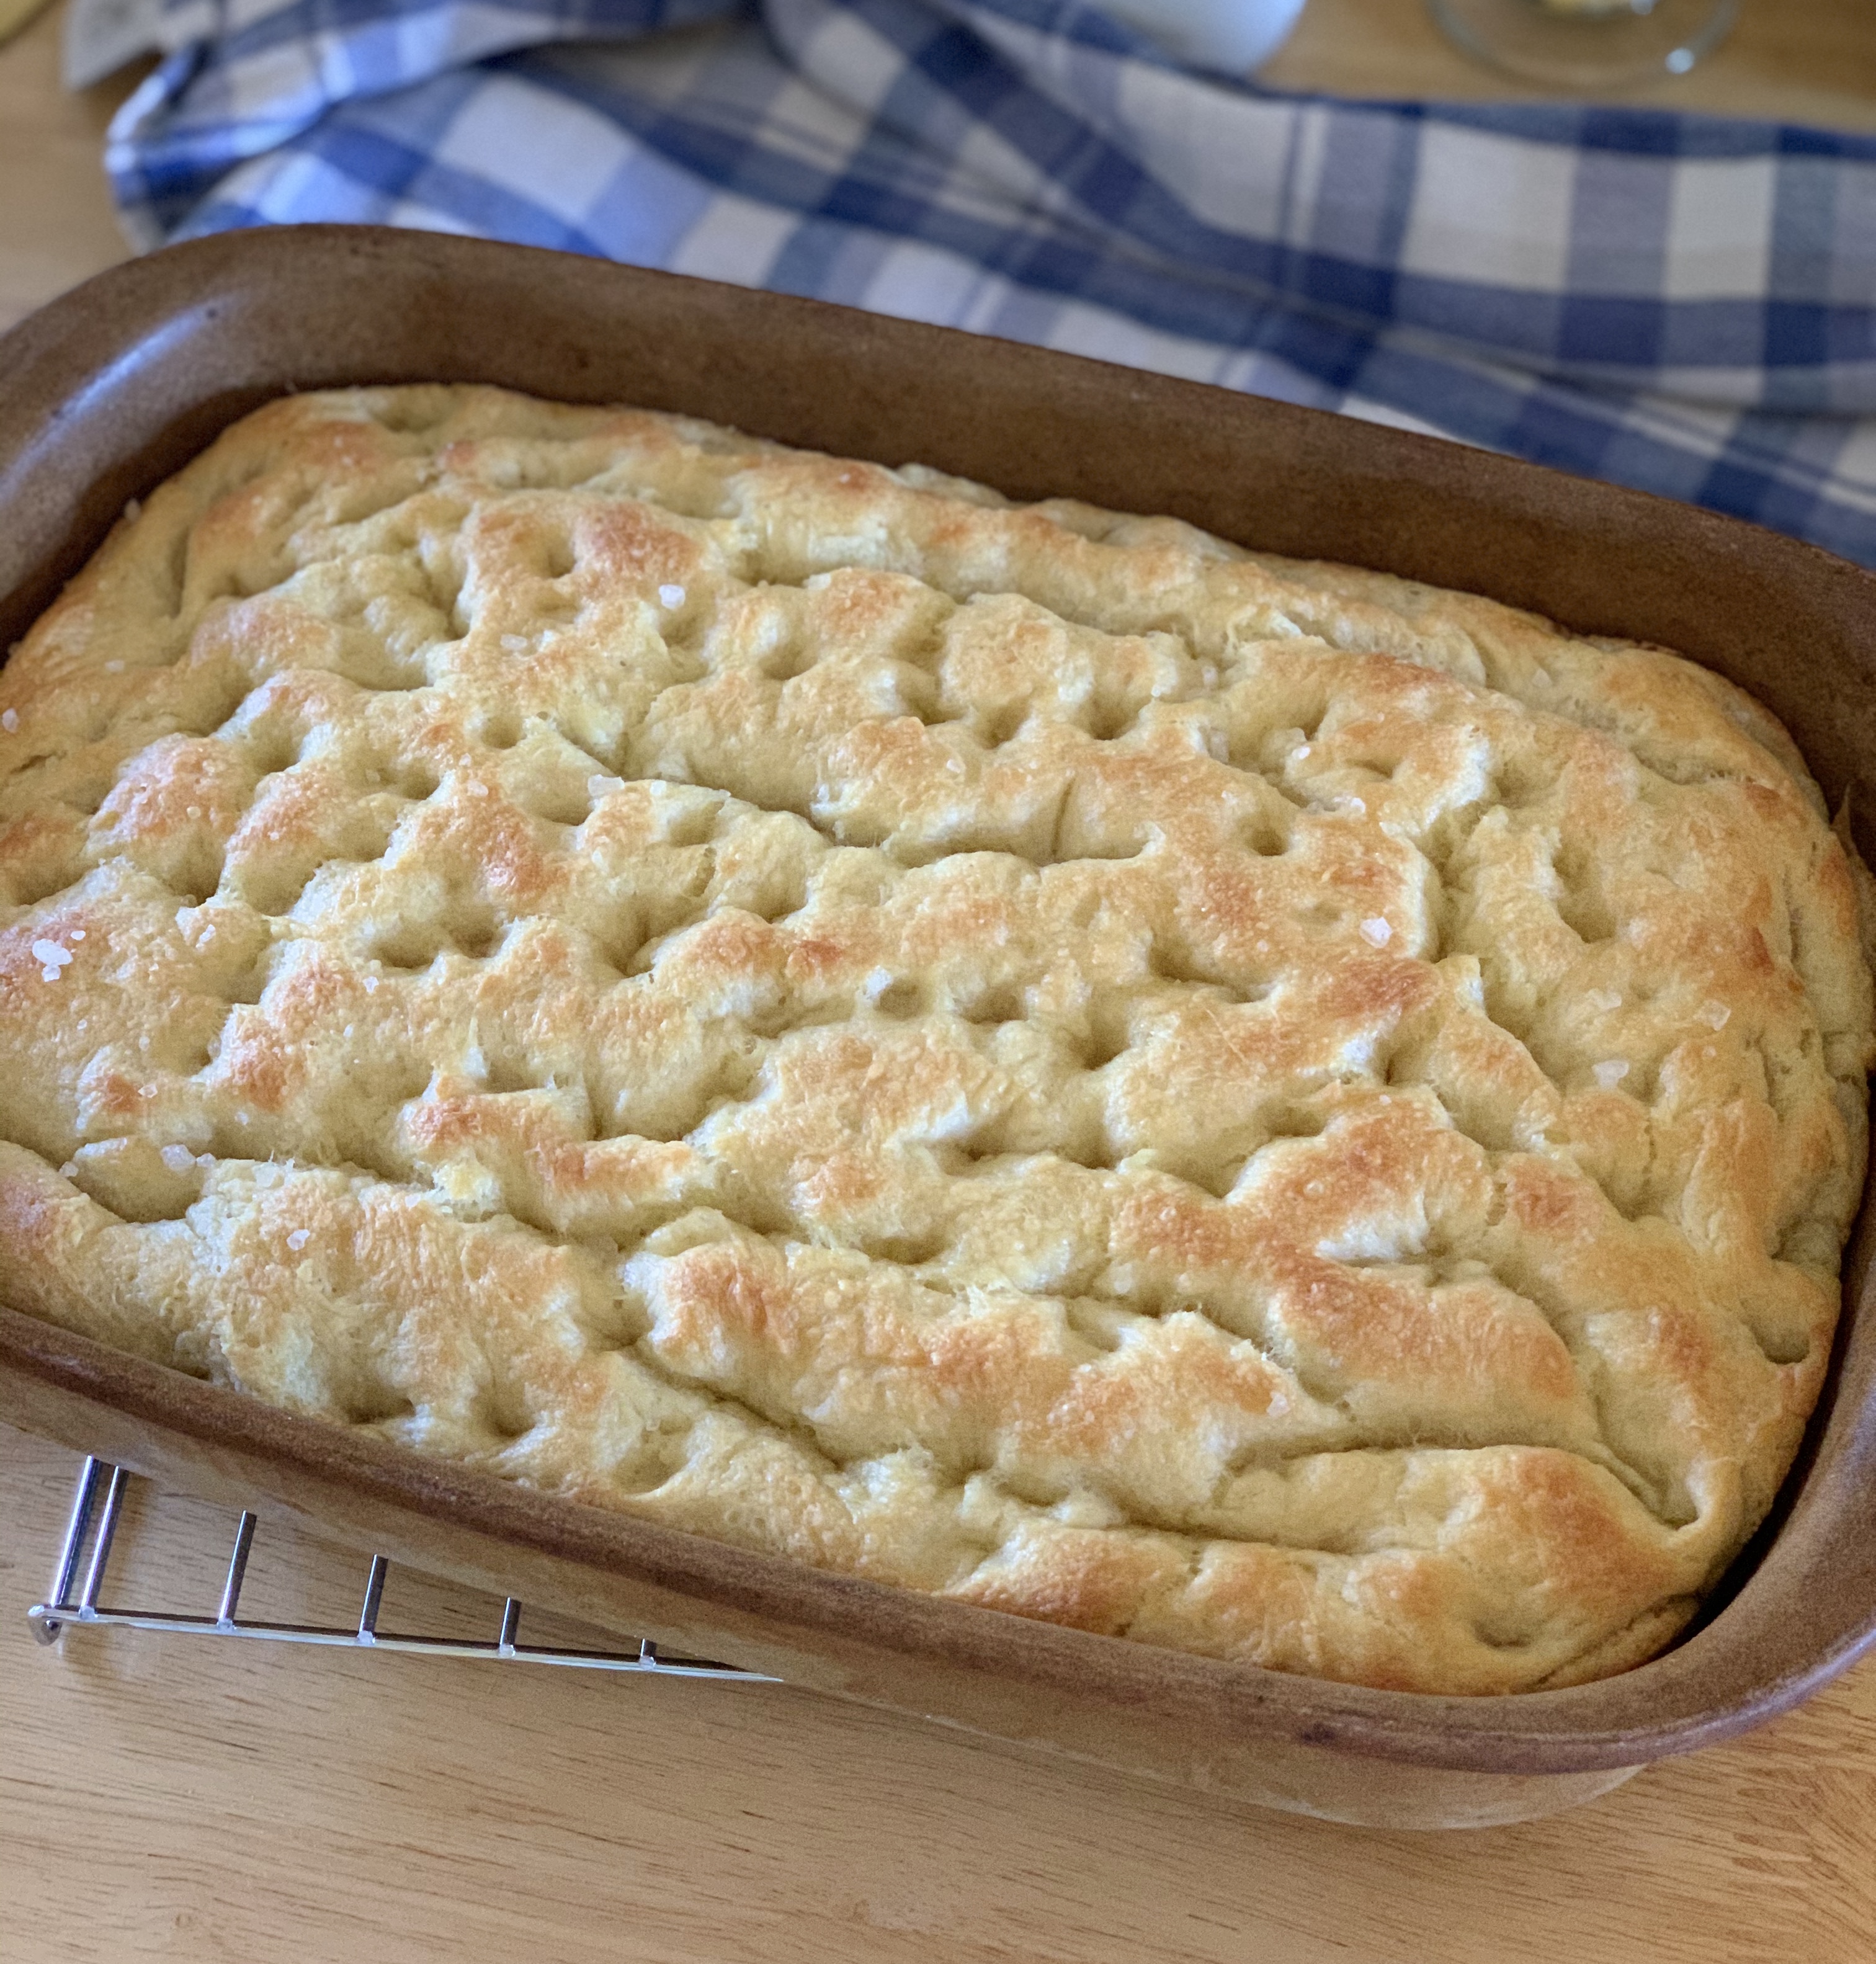
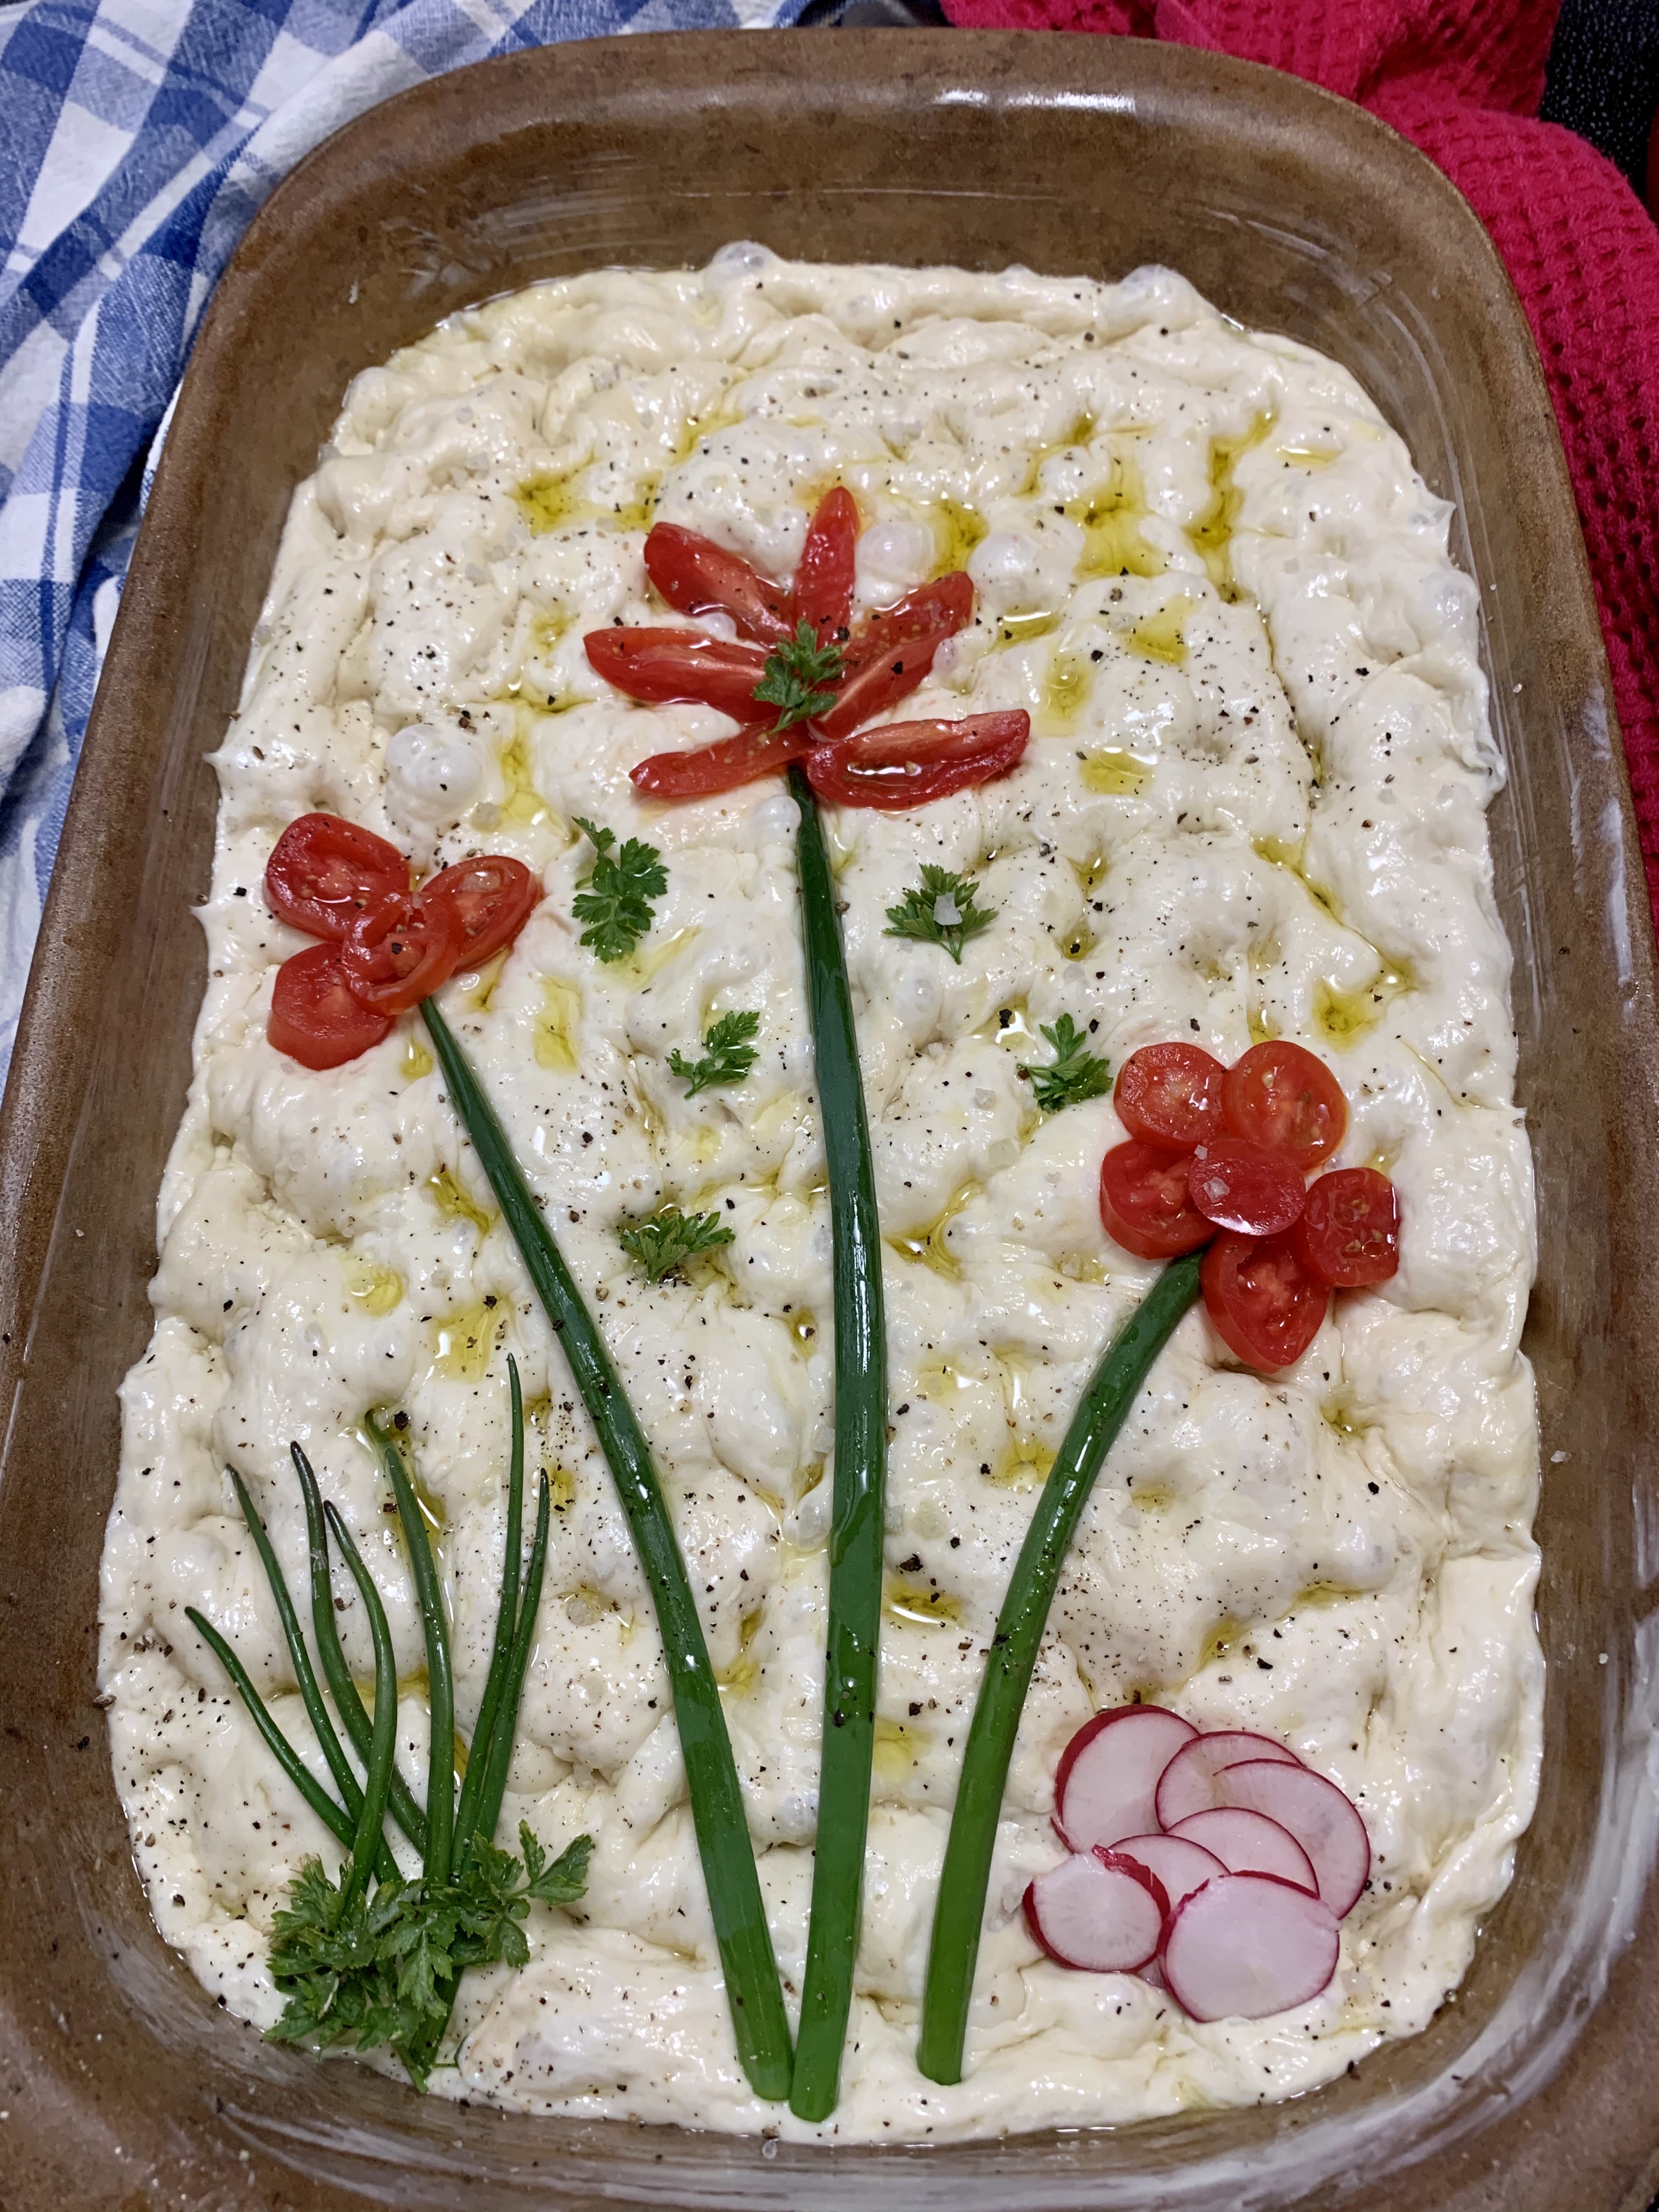
Top with flaky sea salt and more fresh rosemary.

INSTRUCTIONS

  • Proof yeast and sugar in 3/4 cup warm water – 105-115 degrees F until foamy and active.
  • In a bowl, combine flour, salt.
  • Add in yeast mixture & olive oil, and mix to get it all together.  You may need to add a couple tablespoons more warm water.  You want this to be slightly sticky.
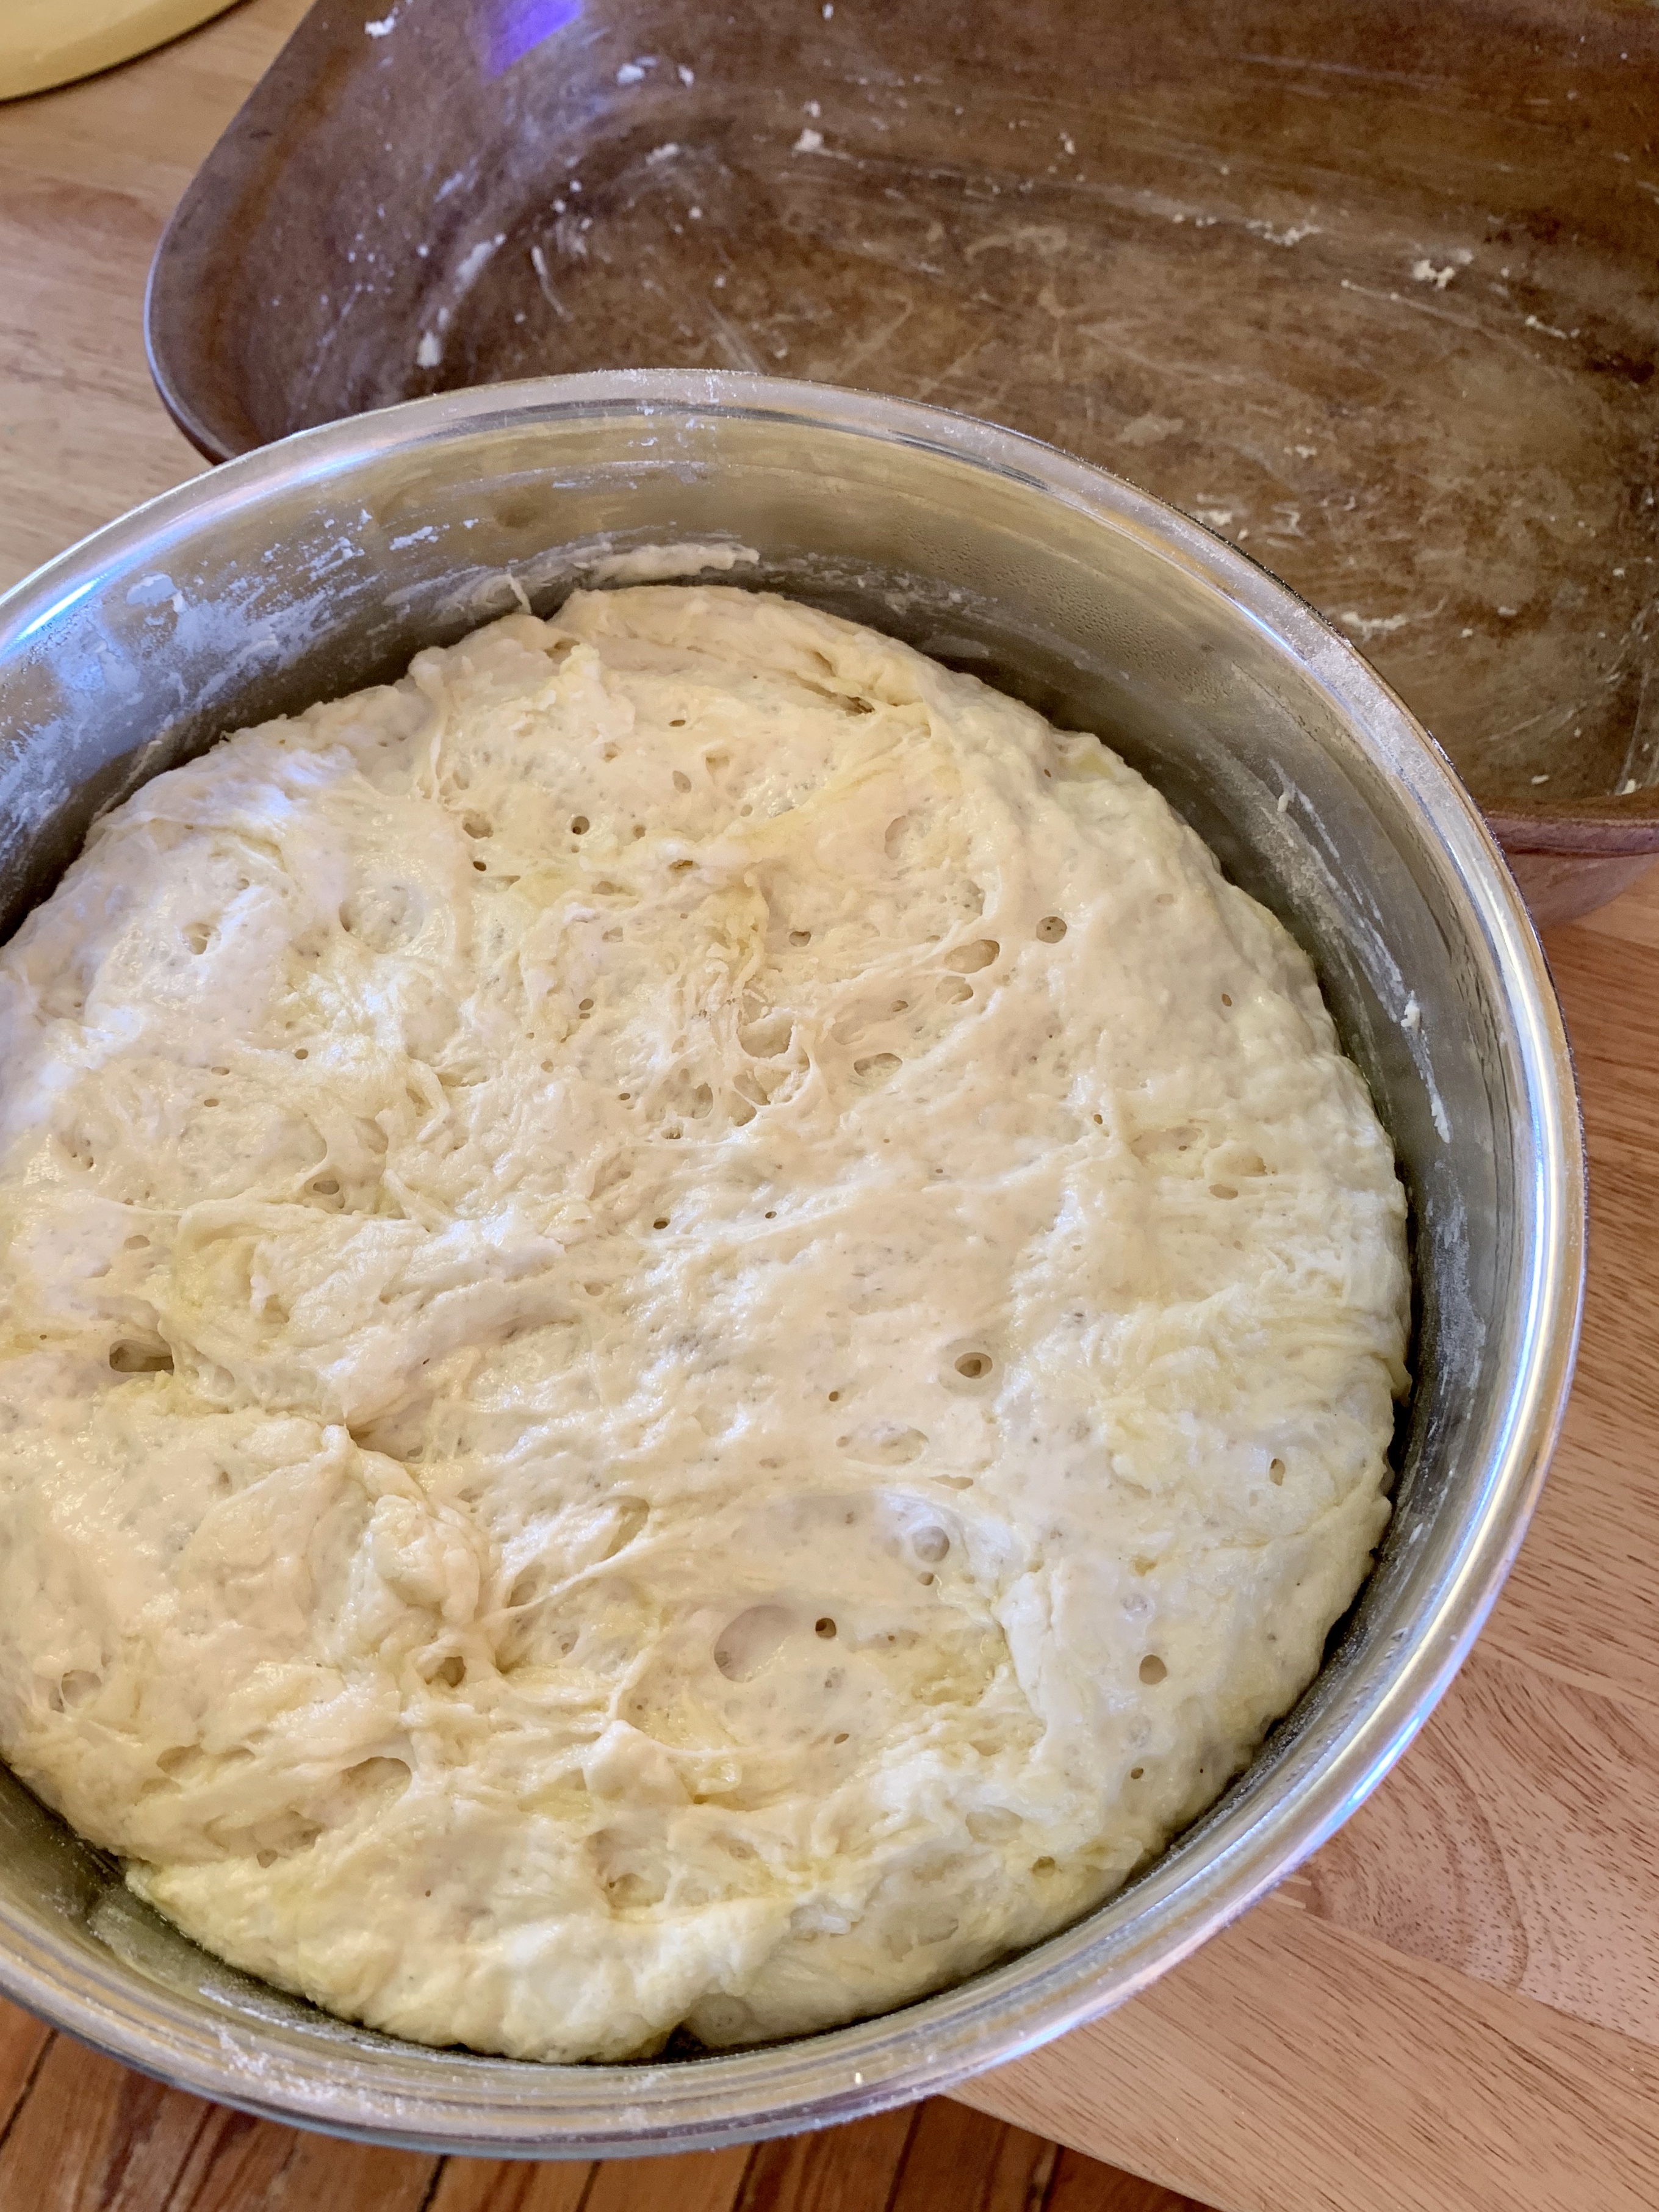
  • Cover and allow dough to rise for around 30 minutes.  The time isn’t as important as that you need to let the dough to pretty much double in size.
  • Add 1 -2 tbsp  olive oil into small baking vessel – either  9 x 7 inch sheet pan, or this also works well in an 8 x 8 square baking pan. You want a fair bit of oil here, rub it all around the sides of the pan as well.
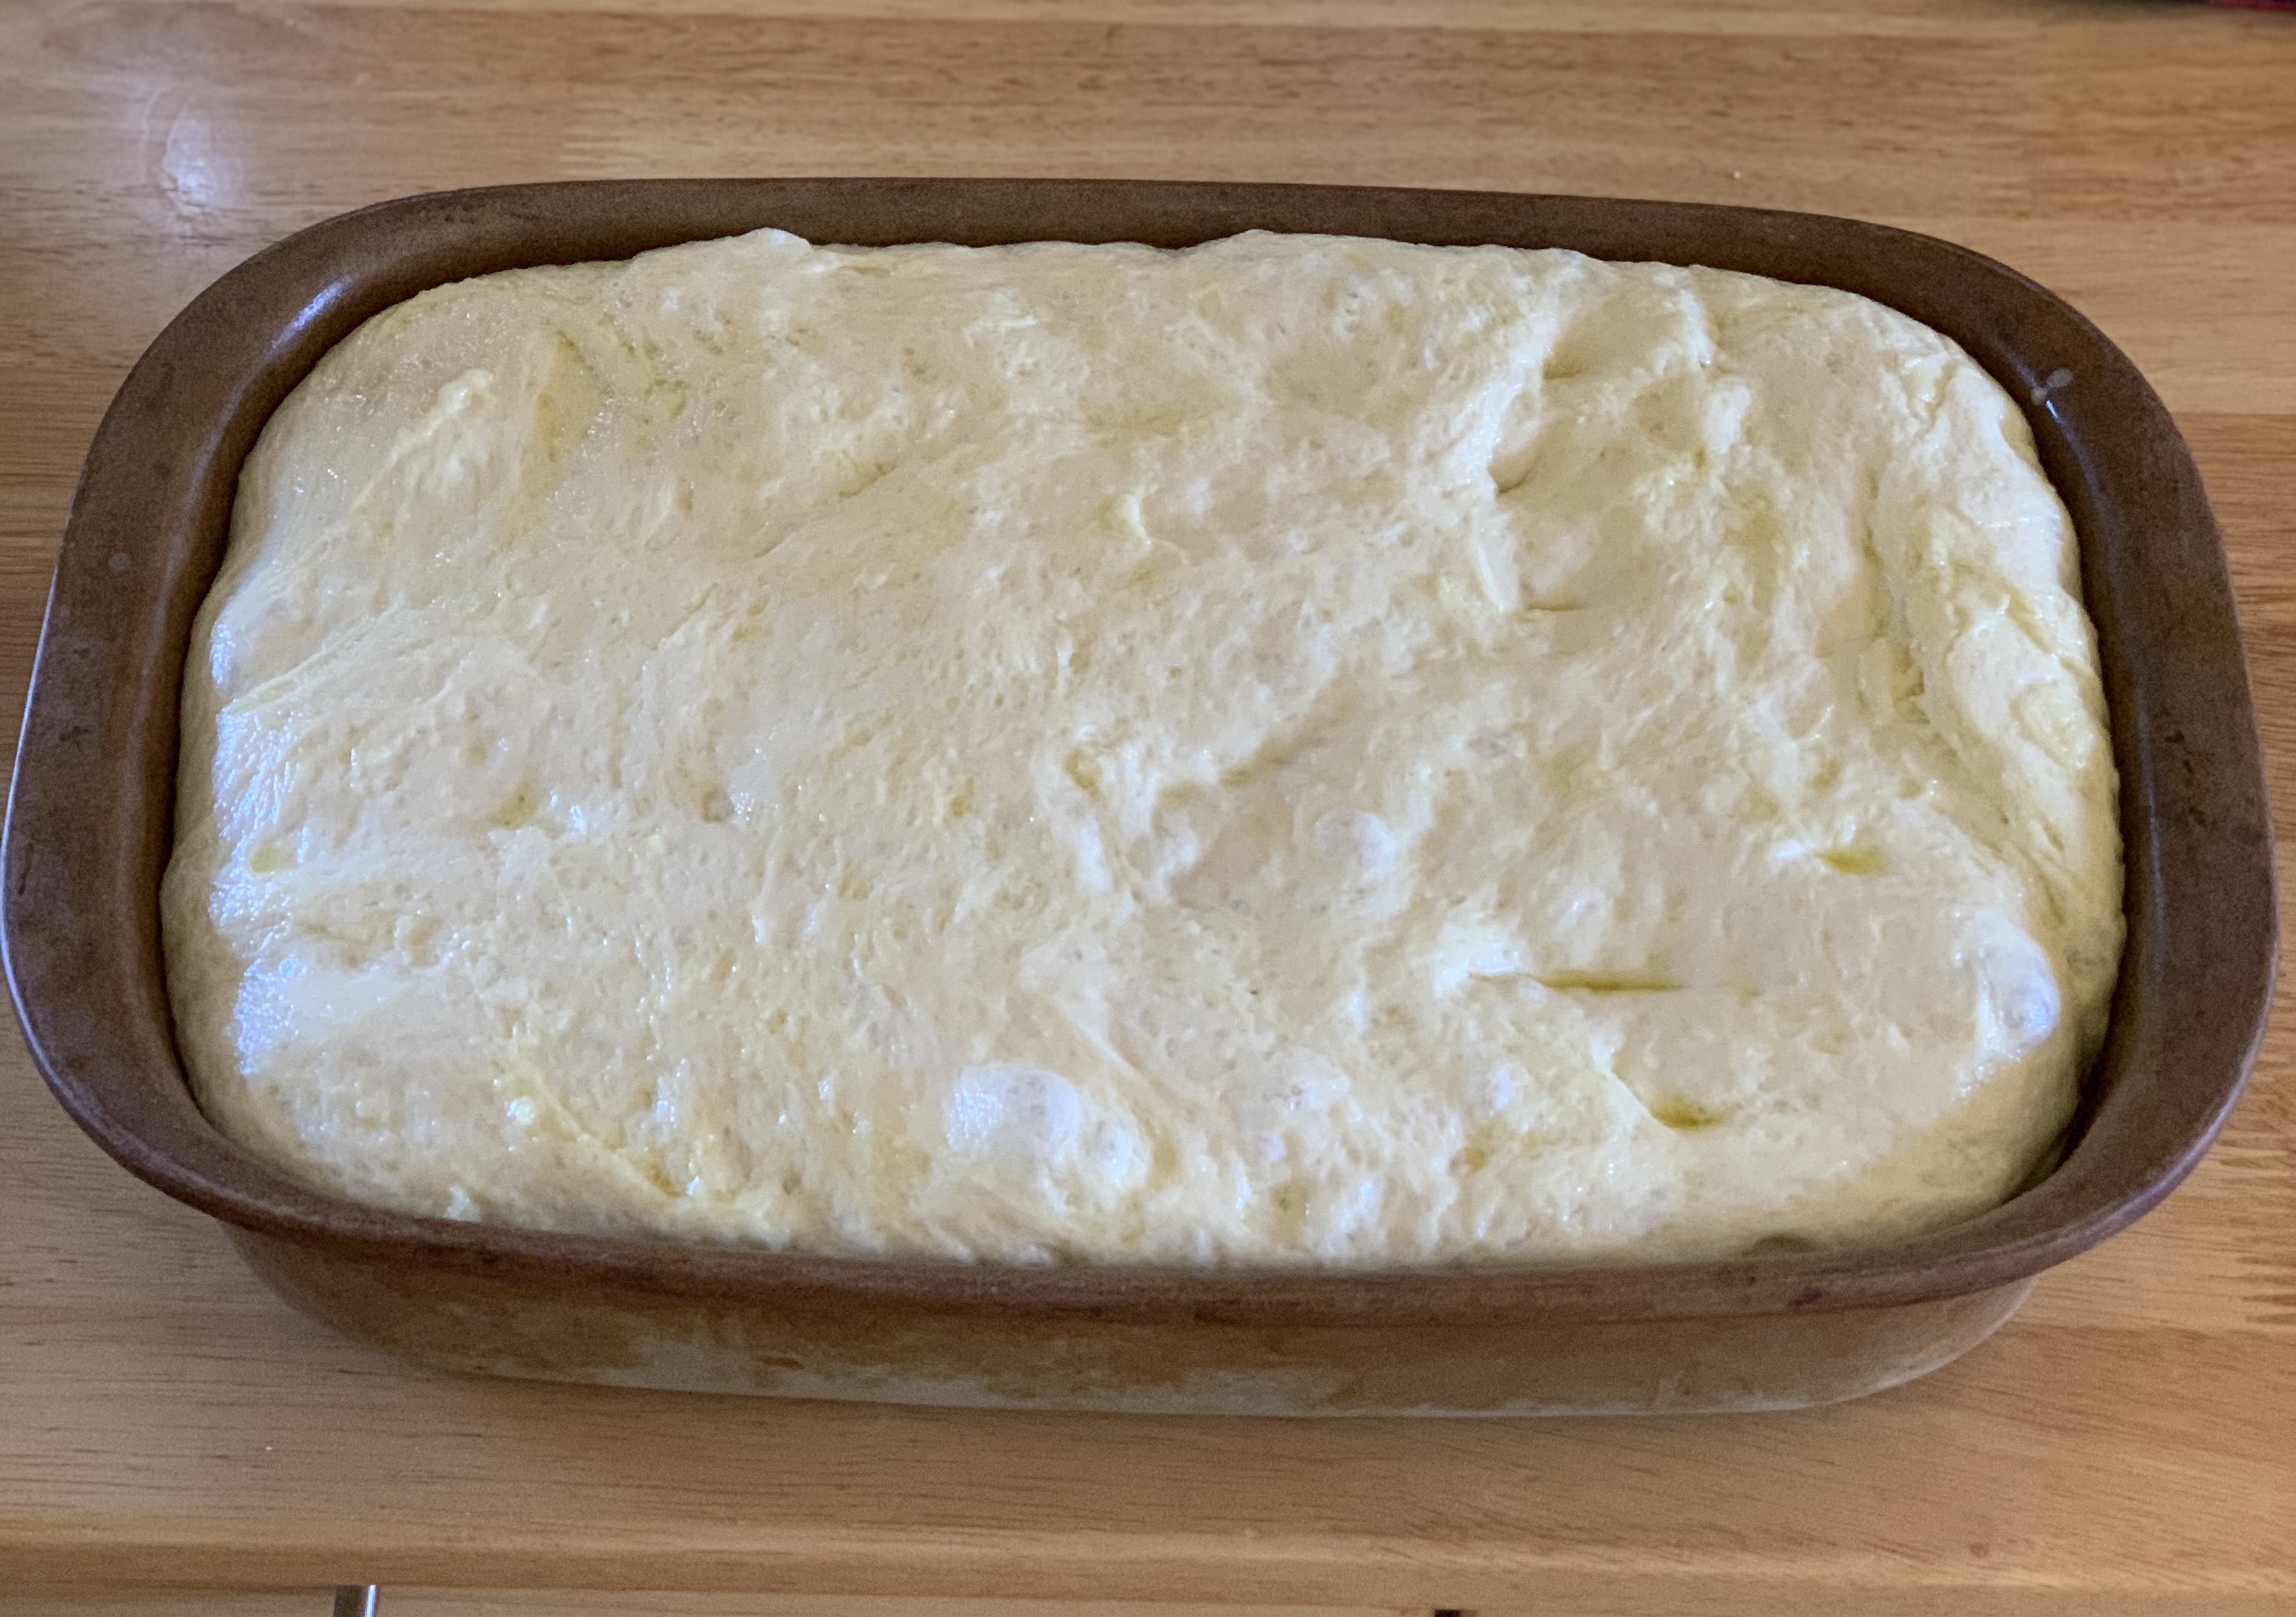
  • Add dough and stretch to fit pan, if dough springs back, let it sit, covered, for 5 minutes and try again.  The rest helps the gluten to relax.
  • Once dough has been stretched enough to fit the baking sheet, allow to rest (covered) for 30 minutes.  Honestly, do whatever time you have – I find this to be fairly forgiving.
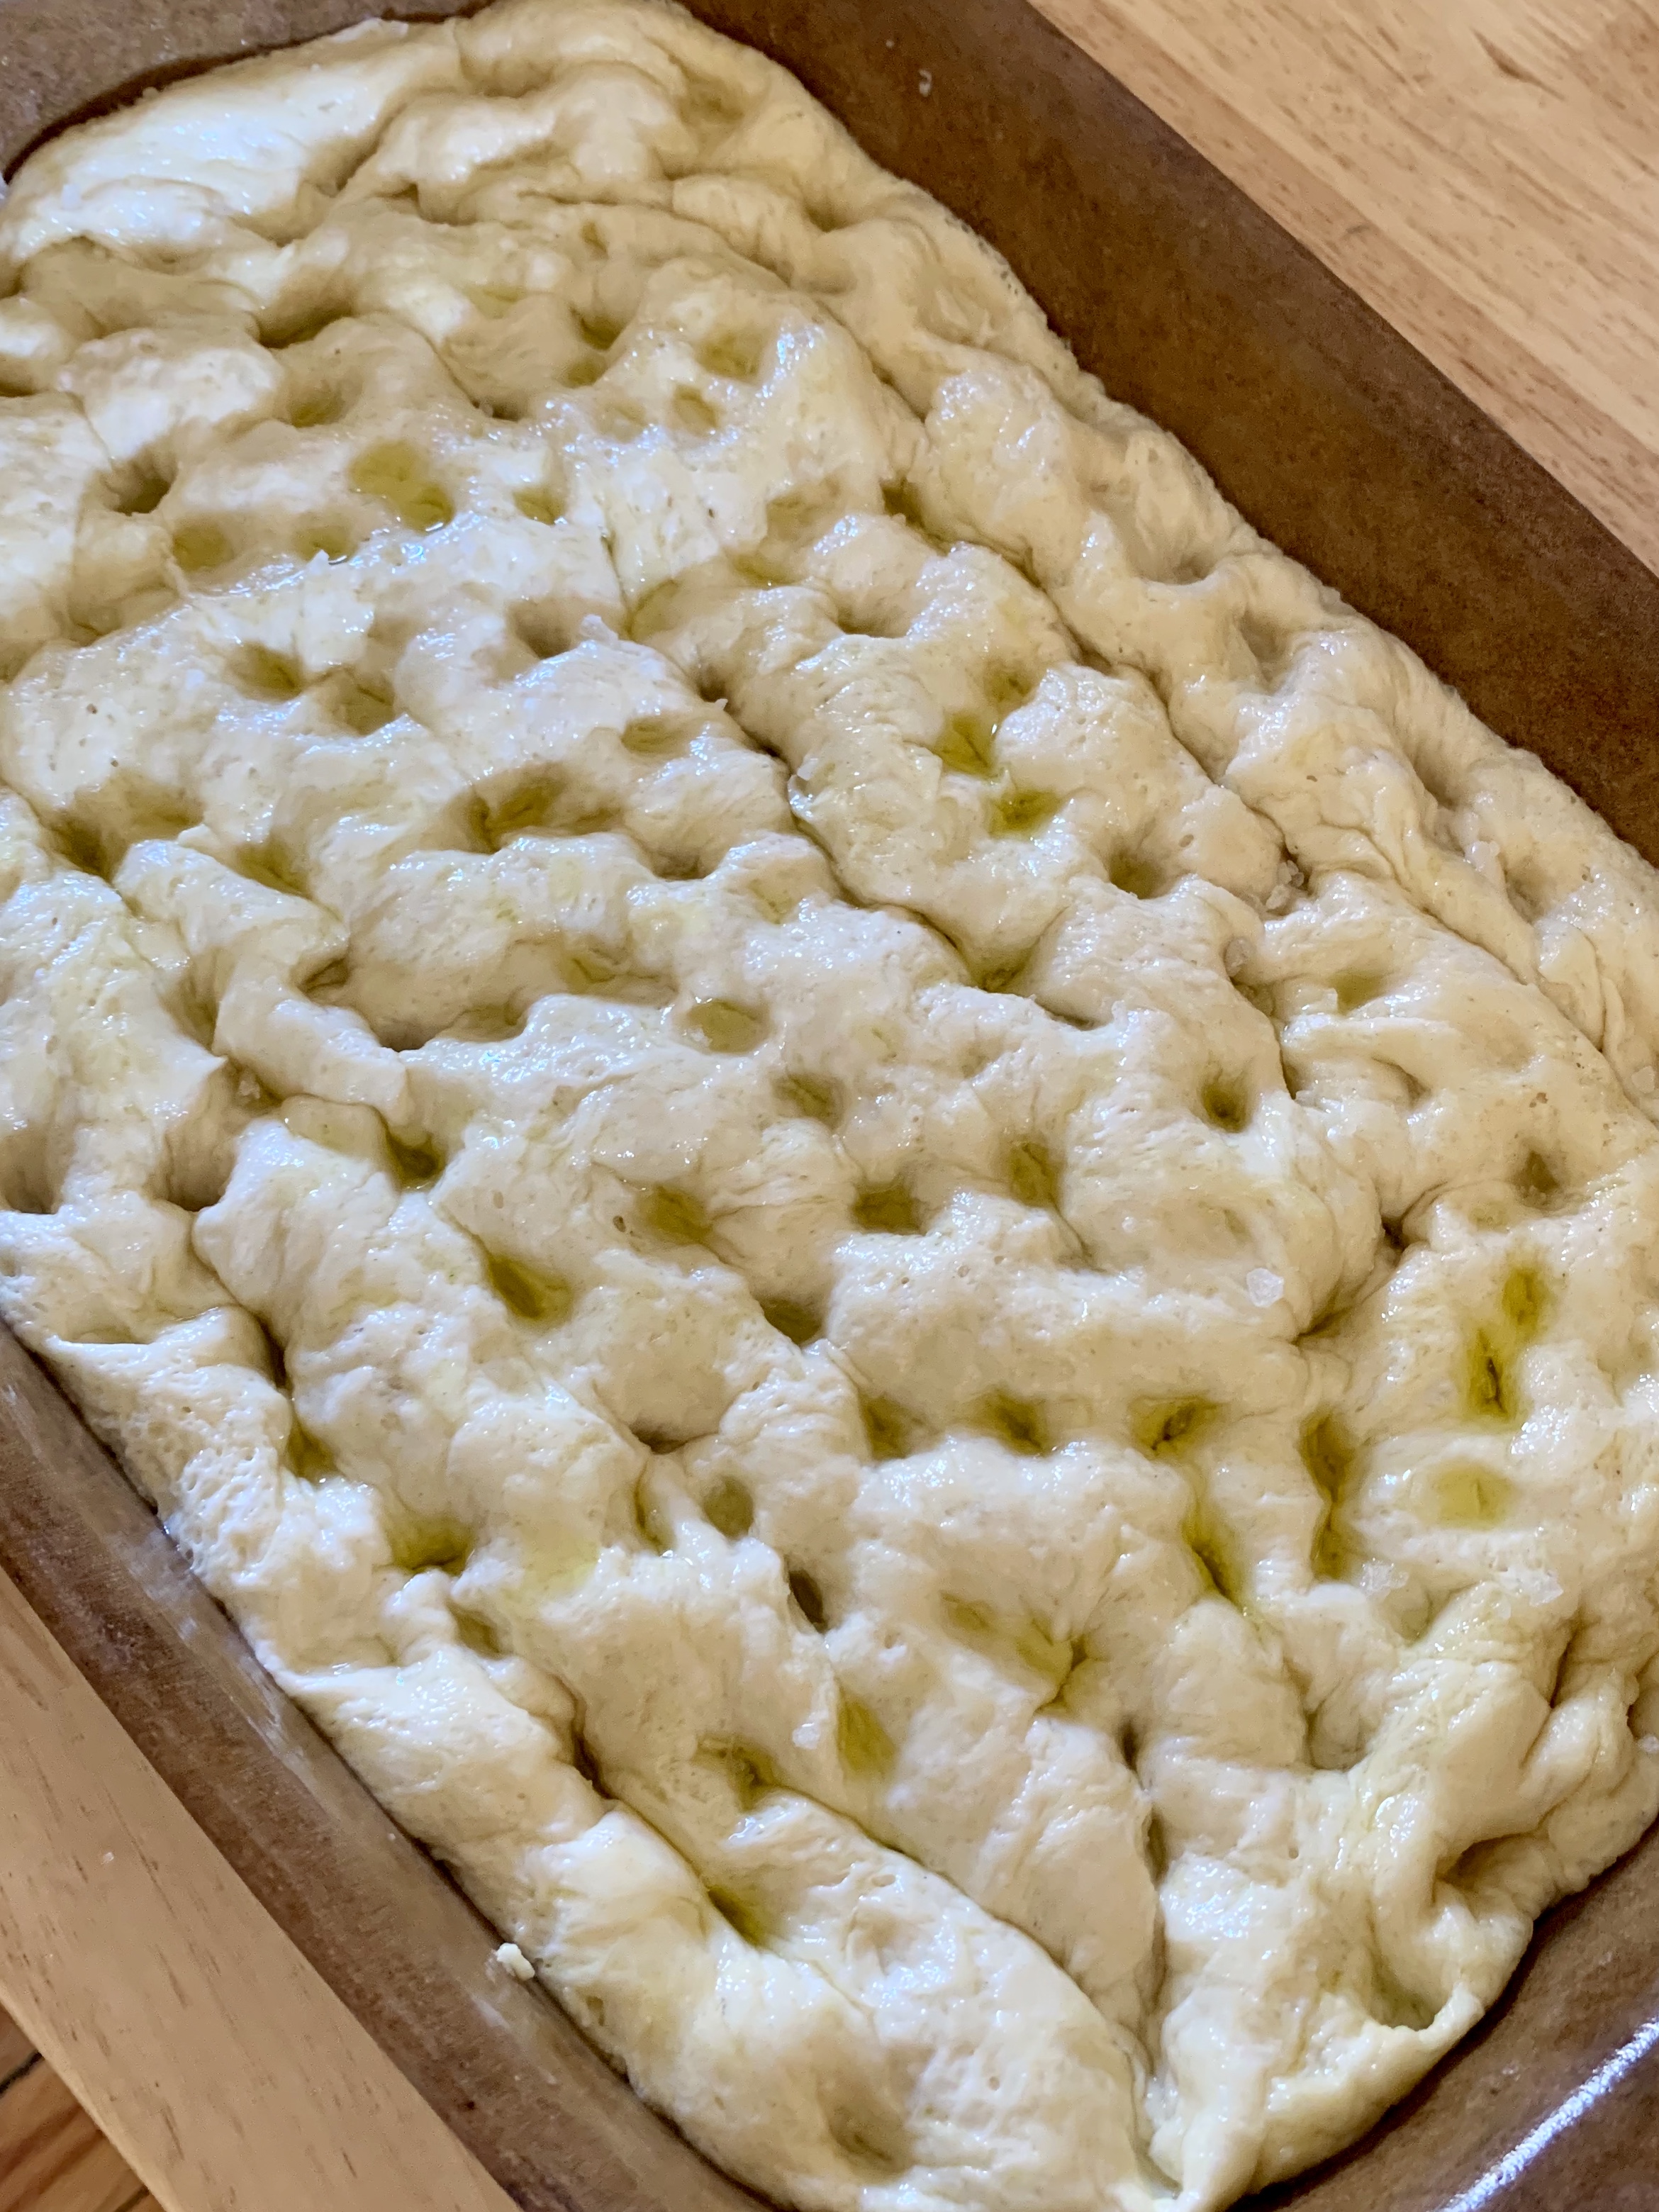
  • Dampen your fingers and dimple the dough like you are playing a piano.
  • Drizzle herbed olive oil over dimpled dough and allow it to fill in the dimples, I like to be generous with the herb oil mixture.
  • Sprinkle on some flaky sea salt and more fresh rosemary that isn’t all minced up.
  • Bake for 15 – 20 minutes or until golden brown.
  • Once out of the oven, allow to rest on a cooling rack to keep the bottom crusty as well.

So many ways you can serve this;

  • Use it as an appetizer with a charcuterie board
  • Fresh out of the oven with simple oil and vinegar
  • Try it with your best olive oil and my dukka recipe, (If you’ve never tried dukka you are in for a treat!)
  • Completes a soup or salad meal
It’s October and this is what my herb garden still looks like!
Ready to go, and this herby oil smells so fresh – today I added in some roasted garlic.
Ready for the oven – love the way those little dimples fill up, I think those pockets of oil help crisp up the top.
You just know how good your house smells – it’s ready to dunk in your soup.

Olive Sourdough Loaf

Okay, my goodness …. you have to try this loaf.  Love kalamata olives any day of the week, but add them to a loaf of sourdough goodness, include some fresh garlic chunks and oregano right out of the garden and you have a sure fire winner.

olive loaf 6

I think it is the combination of sourdough starter with the yeast that creates the perfect crumb and texture for soft and delicious bread.

  • 1 cup (227g) sourdough starter, ripe (fed) or discard
  • 1 1/4 cups (283g) lukewarm water
  • 1/4 cup (50g) olive oil
  • 2 teaspoons instant yeast
  • 1 tablespoon sugar
  • 2 1/2 teaspoons salt
  • 2 cloves garlic, finely chopped
  • 1 tablespoon fresh oregano, finely chopped; or 1 1/2 teaspoons dried oregano
  • 4 1/2 to 4 3/4 cups (539g to 574g) Unbleached All-Purpose Flour
  • 1/2 to 3/4 cup (71g to 142g) drained, pitted, and coarsely chopped kalamata olives
  1. Combine all of the ingredients, except the olives, mixing and kneading to form a smooth dough then fold in the olives.
  2. Cover the dough, and allow it to rise until it’s doubled in size, about 90 minutes.
  3. Gently divide the dough in half; it’ll deflate somewhat.
  4. Shape each piece of dough into a round loaf. Place each loaf on a lightly greased or parchment-lined baking sheet.

olive loaf 3

Knead the olives in until the dough is soft, only slightly sticky to the touch, and smooth.

Olive loaf 1

This loaf came out of the oven looking irresistible.  It was amazing!


olive loaf 4

I was looking for a loaf shape today, so baked them in these pans.

olive loaf 5

Just look!  These olive loaves were absolutely perfect – the texture and flavour can’t be beat.

This recipe came from the King Arthur Flour website, and if you ever have any questions about baking, check out their website, they have everything.


Crazy Good NO Knead Focaccia

No Knead Focaccia 2

You are going to love this … soft, chewy, and the best focaccia you could possible imagine.  Can’t you just smell it from the photo?  Yum.

  • 2 1/2 tsp active dry yeast (or 1 pack)
  • 2 tsp honey
  • 2 1/2 cups lukewarm water
  • 1 tbsp kosher salt
  • 5 cups all purpose flour
  • 6 tbsp extra virgin olive oil – divided
  • 4 tbsp butter
  • flaky sea salt
  • 2-4 garlic cloves

Whisk 1¼-oz. envelope active dry yeast (about 2¼ tsp.), 2 tsp. honey, and 2½ cups lukewarm water in a medium bowl and let sit 5 minutes (it should foam or at least get creamy; if it doesn’t your yeast is dead and you should start again—check the expiration date!).

Add 5 cups (625 g) all-purpose flour and 1 Tbsp. kosher salt and mix with a rubber spatula until a shaggy dough forms and no dry streaks remain.

Pour 4 Tbsp. extra-virgin olive oil into a big bowl that will fit in your refrigerator. This puppy is going to rise! Transfer dough to bowl and turn to coat in oil. Cover with a silicone lid or plastic wrap and chill until dough is doubled in size (it should look very bubbly and alive), at least 8 hours and up to 1 day. If you’re in a rush, you can also let it rise at room temperature until doubled in size, 3–4 hours.

Generously butter a 13×9″ baking pan, for thicker focaccia that’s perfect for sandwiches, or an 18×13″ rimmed baking sheet, for focaccia that’s thinner, crispier, and great for snacking. The butter may seem superfluous, but it’ll ensure that your focaccia doesn’t stick. Pour 1 Tbsp. extra-virgin olive oil into center of pan. Keeping the dough in the bowl and using a fork in each hand, gather up edges of dough farthest from you and lift up and over into center of bowl. Give the bowl a quarter turn and repeat process. Do this 2 more times; you want to deflate dough while you form it into a rough ball.

Transfer dough to prepared pan. Pour any oil left in bowl over and turn dough to coat it in oil. Let rise, uncovered, in a dry, warm spot (like near a radiator or on top of the fridge or a preheating oven) until doubled in size, at least 1½ hours and up to 4 hours.

Place a rack in middle of oven; preheat to 450°. To see if the dough is ready, poke it with your finger. It should spring back slowly, leaving a small visible indentation. If it springs back quickly, the dough isn’t ready. (If at this point the dough is ready to bake but you aren’t, you can chill it up to 1 hour.) Lightly oil your hands. If using a rimmed baking sheet, gently stretch out dough to fill (you probably won’t need to do this if using a baking pan). Dimple focaccia all over with your fingers, like you’re aggressively playing the piano, creating very deep depressions in the dough (reach your fingers all the way to the bottom of the pan). Drizzle with remaining 1 Tbsp. extra-virgin olive oil and sprinkle with flaky sea salt. Bake focaccia until puffed and golden brown all over, 20–30 minutes.

No Knead Focaccia 3

Rising with bits of oil throughout, this little fella has filled the bowl!

No Knead Focaccia 4

It’s pretty darn cold outside today, but this is sitting with the sun streaming in the window and the radiator near …. it rose beautifully.

No Knead Focaccia 1

Just look, 2 hours later it is fluffy and puffed right to the brim.

No Knead Focaccia 5

This is the part where you could get as interesting as you like …. add olives, or rosemary, or little tomato slices ….

I stopped before this last step, just because I wasn’t sure the 12, 9 & 6 year olds at the table wanted the garlic …. but next time!!!

Hold off on this last step until you’re ready to serve the focaccia: Melt 4 Tbsp. unsalted butter in a small saucepan over medium heat. Remove from heat. Peel and grate in 2–4 garlic cloves with a Microplane (use 2 cloves if you’re garlic-shy or up to 4 if you love it). Return to medium heat and cook, stirring often, until garlic is just lightly toasted, 30–45 seconds. (Or, if you prefer raw garlic to toasted garlic, you can grate the garlic into the hot butter, off heat, then brush right away.)

Brush garlic-butter all over focaccia and slice into squares or rectangles.

Focaccia Art 1

Too much time on my hands …. the Covid- 19 Coronavirus has us all hunkered down in our homes …. look what happens when you can’t go anywhere …

Focaccia Art 2

I was afraid how things would look after baking, but it’s pretty good!

I’ve reposted this from Bon Appetit “Basically” as part of their baking series, it is amazing!!!


Beer Bread

Beer Bread 1

Today I created an extra crunchy crust …… first the melted butter, then sprinkled on some grated aged cheddar, and topped with the seasoned sesame seed mixture left from the dregs of the nuts and bolts mixture I made this Christmas – Y U M

This is the easiest, simplest quick bread!  The most difficult part of making this bread is waiting for it to come out of the oven while amazing smells are drifting through the house …..

  • 3 cups all purpose flour
  • 3 tsp baking powder
  • 1 tsp salt
  • 1/4 cup sugar
  • 1 can or bottle of beer
  • 1/4 cup melted butter

Preheat oven to 375 degrees.

Sift dry ingredients together and stir in 1 12 ounce bottle or can of beer – stir just until it all comes together and turn into a greased 9 x 5 inch loaf pan.  (I like to line the pan with parchment paper – it makes it so easy to lift out of the loaf pan.).

Drizzle the melted butter over and bake.

Bake for 1 hour until a tester comes out clean.

Rest for 10 minutes before removing from loaf pan, then let sit for at least 15 minutes before cutting.

Beer Bread 2

Aged white cheddar and Italian seasoning added today.


You can mix this up however you like – add in herbs, grated cheese or some seeds.

My cousin Vivian used dried dill weed in the flour mix, and put olive oil on top … try it!

I’ve had people ask if you can use soda instead of beer ….. not unless you add 2 tsp (or 1 packet) of instant yeast.  It is the beer that helps the bread to rise and not be a heavy lump of dough!

Did you know that you should sift your flour, and SCOOP (using a spoon) into your measuring cup instead of scooping with your measuring cup?  This helps make your flour lighter and in turn, your bread lighter.


Basic Dinner Rolls

Dinner Rolls

Making fresh yeast dough dinner buns might take a little time, but it is so worth it!  The house smells great, the effort is minimal and the pay off at dinner time is an added bonus.

  • Recipe yields about 12 dinner rolls, easily doubles if you are feeding a group or want leftovers!
  • 2 to 2-1/4 cups all-purpose flour
  • tablespoons sugar
  • packet quick or rapid rise yeast
  • 1/2 teaspoon salt
  • 1/2 cup milk 
  • 1/4 cup water
  • tablespoons butter 

Combine 3/4 cup flour, sugar, dry yeast and salt in a large mixer bowl and stir until blended. Combine milk, water and butter in a small saucepan (or microwave safe bowl).  Heat until very warm but not hot to the touch  (120° to 130°F.  Butter won’t melt completely). Add to flour mixture.

Beat 2 minutes at medium speed of electric mixer, scraping bowl occasionally. Add 1/4 cup flour; beat 2 minutes at high speed. Stir in just enough remaining flour so that the dough will form into a ball.

Knead  on lightly floured surface until smooth and elastic and springs back when lightly pressed with 2 fingers, about 6 to 8 minutes. Cover with a towel; let rest for 10 minutes.

Cut dough into 12 equal pieces; shape into balls using your hands. Place in greased  8-inch round or square pan.  Cover with towel; let rise in warm place  until doubled in size, about 30 minutes .

Bake in preheated 375ºF oven for 20 minutes or until golden brown. Remove from pan by running a knife around the edges and invert onto wire rack; brush with additional melted butter, if desired. Serve warm.

French Bread

Making bread at home really isn’t that hard – it just takes a bit of time. An added bonus is just how amazing your home will smell.

The house smells amazing and when you pull this french bread out of the oven you will have a hard time waiting for it to cool down enough to slice.

The house smells amazing and when you pull this french bread out of the oven you will have a hard time waiting for it to cool down enough to slice.

4 cups unbleached all-purpose flour
2 teaspoons salt
1 teaspoon distilled white vinegar
2 teaspoons active dry yeast (from a 1/4-oz package)
1 tbsp sugar
1 2/3 cups warm water (105-115°F)
3 tablespoon olive oil

Dissolve sugar in 2/3 cup of the warm water, stir in yeast. Allow yeast to bloom for 15 minutes. Set aside the other 1 cup of warm water, adding the olive oil and vinegar.

Meanwhile – stir flour and salt together. When yeast has bloomed, stir into flour mixture along with the remaining cup of warm water and olive oil/vinegar mix.

It is pretty easy to do this in either food processor or stand mixer, using the dough hook – allow the machine to do some of the kneading for you – but take the time to finish the kneading yourself to feel the texture. You want a relatively soft,but firm dough.

Place in greased bowl, turning to coat with oil – cover, and allow to rest in a warm, draft free place.

45 – 60 minutes later it should have doubled in size. punch it down, turn again and allow to rise one more time until doubled.

Separate dough in half. Roll out and form loaves. Repeat with the other half. If you happen to have french loaf pans, grease well and allow to rise again in those pans. Most of us however don’t have those pans. I used my roaster, with parchment paper separating the two loaves.

Ready for the oven - if you like, give each loaf a few diagonal slices.

Ready for the oven – if you like, give each loaf a few diagonal slices.

Preheat oven to 425 – on lowest rack place 9 x 13 baking pan full of boiling water (hint – put baking pan in oven first, THEN fill with boiling water). On upper rack place baking tray with bread.

Bake for 20-30 minutes until crunchy and nicely browned.

Allow to cool slightly before slicing.

Panzanella Salad

When tomatoes and basil are this fresh you can’t go wrong with a Panzanella salad, so simple, few ingredients and yet the flavours are just bursting with freshness.

Juicy tomatoes, bursting with flavour, basil out of the garden and naturally, a crisp glass of Pinot Grigio while preparing it all.

Juicy tomatoes, bursting with flavour, basil out of the garden and naturally, a crisp glass of Pinot Grigio while preparing it all.

These amounts are rough, use whatever you have on hand that is fresh:

Grilled bread, cut into bite size pieces (or use home made croutons – well seasoned)
fresh tomatoes, cut into about the same size piece as the bread
1/3 cup kalamata olives, sliced in half
1/4 cup roasted red pepper slices, diced
fresh basil, torn

Dressing:
1 tbsp capers
1/4 cup red wine vinegar
1 small garlic clove, minced
1/3 cup really good quality extra virgin olive oil

Salt and pepper to taste

In serving bowl mix dressing ingredients together, taste and adjust seasonings ….

Stir in all the other ingredients, mix well and allow to sit for 30-45 minutes to allow flavours to blend.

The combination of olives, capers, and fresh tomatoes along with the texture of crispy crunchy bread is absolute summer perfection.

The combination of olives, capers, and fresh tomatoes along with the texture of crispy crunchy bread is absolute summer perfection.

Toasted Crumbs

Do you ever have left over garlic toast? Bread that is past its “best before” date? Or – as has occasionally happened ….. just forget to take the garlic bread out of the oven to serve??? I can relate to all this very well. Don’t throw it out!

The tastiest use of forgotten or leftover garlic bread is to make bread crumbs.  You'll never buy bread crumbs again!

The tastiest use of forgotten or leftover garlic bread is to make bread crumbs. You’ll never buy bread crumbs again!

Allow it to completely dry out by cutting or tearing it into pieces – then spread on a baking tray and just leaving it be. If you want it toastier just put it in a moderate oven (350) and allow to toast a bit more.

When totally dried out, give it a whiz in your food processor, and you have the tastiest bread crumbs – particularly if you are working with leftover or forgotten garlic bread. If you don’t have an immediate use for it, put crumbs in a ziplock bag in the freezer – stays for ages and so handy to have.

~ ~ Melt a little butter in a frypan and crisp the crumbs up – serve sprinkled over pasta!

Torn and Tossed Garlic Bread

Everybody loves the crunchy crust and soft tender bits of garlic bread – why not get more of it?

Torn garlic bread is crunchy and soft all at the same time.

Torn garlic bread is crunchy and soft all at the same time.

I had a loaf of sourdough bread and half a loaf of French bread – rather than tear it I cut it all into approximately 2 inch pieces.

Melt 1/2 cup butter, stir in 2 garlic cloves and 1 small shallot – both chopped fine. Naturally, use more garlic if you feel so inclined (and everybody is eating it…).

In a large bowl combine the melted butter, garlic and shallot mixture – add in the cubed bread, season with salt and pepper and toss well.

This is great made earlier in the day too, just let it sit and absorb all those flavours.

When you are ready to serve, spread cubes on baking sheet – take care not to overcrowd the pieces. Bake at 350 for 15-20 minutes just until the outside is nice and crispy, golden brown.

Sprinkle with fresh parsley and serve – everybody will love it!

Serve this with as any side dish, or with your favorite soup or salad.

Four Star Focaccia

I would give it 5 stars, but I am well known for being humble ….

hot focaccia with fresh rosemary, carmelized red onions, garlic slices - topped with maldon sea salt and freshly cracked pepper

hot focaccia with fresh rosemary, carmelized red onions, garlic slices – topped with maldon sea salt and freshly cracked pepper

2 tsp rapid rising dry yeast

1 cup warm water

2 tbsp sugar

3 1/2 cups flour

1 tbsp coarse salt

1/4 cup olive oil

This recipe is designed for a standing mixer – but you can easily adapt it to do by hand.

Warm the bowl of your standing mixer by letting it sit filled with warm water for a few minutes.  Drain, put in the 1 cup warm water, add 2 tbsp sugar, stir well and add in the yeast.  Give a light stir and let sit for at least 3 minutes, until you see the yeast starting to foam.  Turn on the stand mixer – low setting, and dissolve the salt in a cup with 2 tbsp hot water – when dissolved add to yeast mixture with the olive oil.  Gradually – in a steady but slow stream – add the flour.  Start with 3 1/2 cups of flour, and add a wee bit more if it is too sticky.  Once the dough is holding together, turn the mixer up to medium and allow it to knead for 10 minutes.

Turn onto a lightly floured surface and hand knead it a few times, until you have a smooth, soft, pliable dough.  Grease a bowl lightly, turn the dough to coat and allow to rise in a warm place – covered with a damp tea towel or saran.  When it has doubled in size (aprox 45 minutes) turn onto a clean surface and stretch it lightly to be about 1/2 in thick and an oblong shape.  Allow to rest for a few minutes, and then put that on to an oiled baking sheet (I like clay).  Cover with saran and allow to rest for 15 minutes.

Give the dough a gentle massage with good quality olive oil, and with your fingertips gently press indentations in the surface, then cover with seasonings to complement the rest of your meal:

fresh rosemary

sliced garlicP1100268

carmelized red onions

fresh herbs

parmesan cheese

Then sprinkle with freshly ground pepper and large flake salt.


For this batch I doubled the recipe, and stretched it to be about 3/4-1 inch high before allowing it to rest. 

Bake at 400 for around 15-20 minutes.

This makes the best focaccia I have ever had – the dough is a fantastic texture, and gets so nice and crispy on the outside with the olive oil coating.  Use your imagination with toppings, and it will soon be a hit in your house too.  So easy to make!


Ready for the oven – this one is to go with Cacio el Pepe pasta tonight …. it is studded throughout with green onions and fresh Kampot pepper, then dusted with more green onions, feta, tomatoes and fresh cracked Kampot pepper.