Dr Pepper Glazed Ham

Dr Pepper ham

Got family (or friends that are family) coming for a festive dinner?  Or just a Sunday cook up?  This ham is always moist, juicy and so delicious.  As much as the kids love chicken, when this is on the menu also, they return for more ham!

Ingredients

  • One 10-pound, bone-in smoked ham, skin removed and fat trimmed to 1/4 inch
  • 3 cups Dr Pepper (not diet)
  • 2 cups water
  • 1/2 cup pitted prunes
  • 1/3 cup yellow mustard
  • 1/3 cup light brown sugar
  • 2 tablespoons cider vinegar

1 1/2 teaspoons cornstarch mixed with 2 tablespoons of water

How to Make It

Step 1

Preheat the oven to 325° and position a rack in the bottom third of the oven. Set the smoked ham in a large roasting pan. Score a 1/4-inch-deep crosshatch pattern into the fat at 2-inch intervals. Pour 2 cups of the Dr Pepper and the 2 cups of water into the pan and roast the ham for about 2 1/2 hours, until an instant-read thermometer inserted in the thickest part of the ham registers 120°. Increase the oven temperature to 425°.

Step 2

Meanwhile, in a medium saucepan, simmer the prunes in the remaining 1 cup of Dr Pepper until they are plump and the liquid is slightly reduced, about 10 minutes. Using a slotted spoon, transfer the prunes to a small bowl and cover with plastic wrap. Whisk the mustard, brown sugar and vinegar into the liquid in the saucepan and boil until very thick and syrupy, about 5 minutes.

Step 3

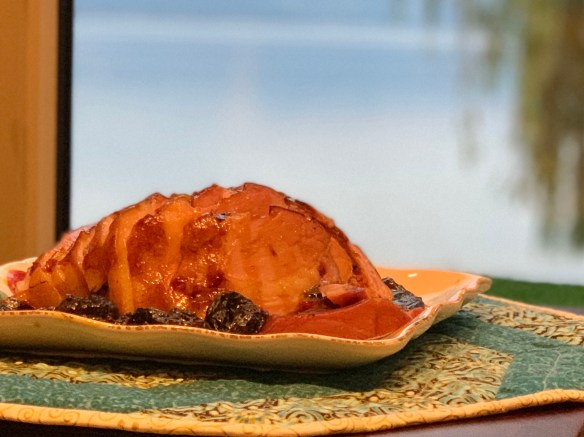
Drizzle the syrupy glaze over the ham and roast until glossy, 20 minutes. Carefully transfer the ham to a cutting board.

Step 4

Pour the pan juices into the saucepan and spoon off the fat. Boil the sauce until reduced to 2 cups, 10 minutes. Whisk in the cornstarch slurry and the prunes and bring to a boil. Simmer the sauce until thickened, 2 minutes. Slice the ham and serve with the Dr Pepper sauce.

Note:  I have a mustard sauce I’ve been making for years, which I also make and combine it with this sauce …. that is the key to having lots of juicy, tasty sauce to drizzle over.

Kathy’s Mustard Sauce:

  1. 1/3 cup white vinegar
  2. 1/3 cup white sugar
  3. 1 tbsp dry mustard powder
  4. 1 tbsp butter
  5. 1 beaten egg, set aside.

In small sauce pan bring vinegar, sugar, mustard and butter to a boil.  Remove from heat and EVER SO SLOWLY drizzle into the beaten egg, whisking as you go.  When it is all incorporated, return to the heat and stir as it thickens.  Remove from heat, and stir into the Dr. Pepper sauce.

Dr Pepper ham 2

Another bonus to this recipe?  Today we had a smaller group so I bought a double smoked boneless ham and cooked it at 275 until the internal temperature was 120.  Carried on with the rest of the recipe, and it was perfect.

Years ago Rob and Mandy gave us a subscription for Food and Wine Magazine … this recipe is from those issues, and I know the ham is a fave in their home too!

Classic Mac …… & cheese

Meals on wheels Mac

Creamy cheesy elbow macaroni hiding under a crispy crackly coating of panko.

Classic macaroni and cheese is one of those comforting dishes for a cool night.  I like to serve this with either cubed ham baked right in with the pasta, or alongside crispy chicken tenders.  Kids love it either way!

I’ve done recipes with the pasta cooked right in with the sauce in the oven; they are great, quick and easy.  But for comfort food, creamy and delicious, it is classic all the way.

You can use skim or whole milk in this recipe, either works just fine.  We used gluten free elbow pasta and it also works just great.

BREAD CRUMB TOPPING

  • 3/4 cup panko crumbs
  • 3 tbsp melted butter
  • 1 tbsp Italian seasoning

Stir crumbs & seasoning into butter until well coated.  Set aside.

MACARONI & CHEESE

  • 1 tbsp (plus 1 tsp table salt)
  • 1 pound elbow macaroni
  • 5 tbsp unsalted butter
  • 6 tbsp unbleached all purpose flour
  • 1 1/2 tsp dry mustard
  • 1/4 tsp cayenne pepper
  • splash Worcestershire sauce
  • 5 cups milk
  • 5 cups shredded cheese, sharp or old cheddar works best

Grease a 9×13 baking dish

Preheat oven to 350

Bring a large pot of water to a boil, add 1 tbsp salt and the macaroni noodles.  Boil until just al dente and strain immediately.

Bechamel

Classic béchamel sauce ….. stir, stir, stir until it is creamy and smooth – so easy to turn into delicious cheese sauce for vegetables or this macaroni and cheese bake.

In the now empty saucepan, melt the butter, and stir in the flour, mustard, cayenne and remaining 1 tsp salt.  Whisk until mixture becomes fragrant and slightly deepens in colour, just around 1 minute.  Gradually add milk, drop in a splash of worcestershire, and keep whisking well so you don’t get any lumps and the milky mixture doesn’t stick to the pan.  Allow to come to a full boil in order for the thickening action to get going.  Reduce heat and allow to simmer, stirring occasionally until mixture has thickened and is the consistency of a thick cream.  Remove from heat, stir well and then add cheese.  Once cheese has been fully incorporated, add the macaroni noodles and combine it well.  (If you are adding ham cubes this is the time to do it)  Give the mixture a generous grind of fresh black pepper, to taste. (my grandkids aren’t crazy about pepper, so when it is for them, I’m lightly seasoning the pasta)

Mac & Cheese

Turn mixture into prepared baking dish and lightly cover with the panko crumb mixture.

Oven ready Mac

Ready for the oven, this classic dish will soon be crispy on top and creamy underneath.

Bake, just until you see the cheese mixture bubbling and the topping has browned.

Remove from oven and allow to rest for 15 minutes before serving.

Pizza Pockets & Hand Pies

fullsizerender-6

Following is the recipe for a basic, soft and easy to work with dough.  I used this recipe for making pizza pockets for my granddaughter Sloan’s first week of Grade 1, and then turned leftover dough into meat hand pies for 93 year old Auntie Elsie, who is kind of tired of cooking these days. Leftover dough you say???  Well I didn’t think 8-10 small pizzas would give me enough dough so I doubled the recipe … which yielded 25 pizza pockets, 10 hand meat pies and 1 pizza for our dinner.  Significant yield!!!

Pizza Crust: (makes 8-10 small pizzettas)
Ingredients:

  • 750 g white flour (use Tipo ’00 flour if you can or a strong bread flour)
  • 200 g semolina flour
  • 2 ½ cups lukewarm water
  • 2 tsp. sugar
  • 1 Tbsp. (or 1 x 8 oz packages) yeast
  • 2 tsp. sea salt
  • 3 Tbsp. olive oil

Directions:

  1. Place your flour(s) and sea salt in a large bowl and whisk together. Create a well in the center.
  2. In a large measuring cup, mix together your lukewarm water and sugar until the sugar dissolves. Sprinkle in the yeast and let it sit for approximately 5 minutes, until the yeast starts to ferment.
  3. Pour the water/sugar/yeast mixture into the well along with the olive oil and stir together with a fork or large spoon until it is well mixed. Once it becomes too difficult to mix together with your fork or spoon, sprinkle extra flour on the dough and your hands and mix with your hands until the dough comes together in a ball.
  4. Place the dough on a well-floured flat surface and knead, pushing the dough using the palms of your hands, for approximately 10 minutes, until the dough looks smooth and stretchy. You may need to add extra flour as you go, being careful not to add too much to keep the dough from being too stiff.
  5. Place the ball of dough in a large bowl coated with olive oil, dust the top of the dough with flour, and cover with a clean dish towel and place in a warm draft-free area for about an hour, until the dough has doubled in size. Punch the dough down.  At this point you can either refrigerate the dough overnight (or up to 2 days, covered with plastic wrap and occasionally punched down) or divide the dough into 4-6 portions (depending on how big you want your pizzas).  I highly recommend making your dough in advance and letting it sit in the fridge as the longer ‘proof’ really makes a difference.   Ensure that your pizza dough comes to room temperature before cooking (bring it out of the refrigerator 1-2 hours before you are ready to cook).
  6. Once ready to cook, heat your oven to the highest heat setting (500F for most ovens) and place your pizza stone in the oven for at least 20 minutes.
  7. Portion the dough into 8-10 balls and place on a well-floured surface. Using your hands, with your knuckles, (dusted with flour, along with the counter to prevent the dough from sticking) form your pizza crust 15-20 minutes before cooking your pizza on a flat surface dusted with semolina flour until it is nice and thin. Keep stretching it with your hands to make a flat pizza base (it doesn’t have to be round or perfect!).
  8. Remove the pizza stone from the oven, lay your rolled dough on the stone, and add your ingredients ….

If you are using this dough for pizza pockets or hand pies, after step 5 skip to step 7 and form circles of dough.

img_9494

For pizza pockets, layer on pizza sauce, your chosen ingredients and cheese, closing the pockets with a fork.  Make sure to prick the top surface with the fork so steam can escape.

img_9496

img_9498

img_9504

img_9503

For the meat pies I used an ice cream scoop to get a consistent amount of the meat mixture – centered on the dough, and then brought up the edges to crimp over the middle of the circle.  Brush with beaten egg and poke with a fork.

Bake pizza pockets or meat pies at 400 until golden brown, about 20 minutes.

FILLING FOR MEAT PIE

1 onion, minced finely

1 garlic clove, grated

2 carrots

2 stalks celery

1/2 cup each frozen corn and peas

1 small zucchini, diced

1 lb ground beef

1 tbsp each dried oregano and basil

Saute the onion and garlic until the onion is lightly carmelized, add the carrots and celery, season with salt and pepper, and cook until vegetables are almost cooked through, then add zucchini and saute for another few minutes.  Remove from heat and place in bowl.  Add frozen corn and peas.  Return pan to heat and stir in ground beef – cooking until lightly browned, seasoning with salt and pepper.

Add beef to vegetable mixture and season with dried herbs, adding more salt and pepper if needed.  At this point, if you feel like it needs a bit more flavour, add 1 tbsp of tomato paste.  Stir well and set in fridge to cool down.  When cool, continue on with forming your hand pies.

These pies are only limited by your imagination – use whatever you feel like to fill the pies, making sure to taste the mixture before filling the dough rounds.  Made in a smaller size they make a great appetizer too.