Gram’s Shortbread Cookies

shortbread 4

Sprinkle with a little coloured sugar, or mini decorations, to fit the season, but don’t overload these delicate little gems.  They really don’t need much of anything.

This is an age old recipe, probably handed down for generations, and all from a box of cornstarch.  I started looking for this recipe as a way to honour Gram Shirley Goldie, and posting it today, on the first anniversary of her passing, seems fitting.  What I didn’t expect in my search through recipes to find her special recipe, is that it was also my mom’s recipe, another much loved and very much missed Gram.  Our very dear Auntie Elsie used the same recipe.  This year when I made the cookies, I felt the need to work the dough by hand, no mixer needed here.  As I watched my hands in the dough, I saw the hands of my mother.  I saw the hands of my mother in law Shirley, and I saw Auntie Elsie’s hands.  I’m posting the recipe to honour them all, and in the hopes that for generations to come, this will be the “go to” Christmas shortbread recipe.

  • 1 cup Canada corn starch (really, you can use any corn starch)
  • 1 cup icing sugar
  • 2 cups sifted all purpose flour
  • 1 1/2 cups butter (softened)

Sift cornstarch, flour & icing sugar together.  Use your fingers and work in the butter until a soft dough is formed.

shortbread

Maybe it was the Christmas season, but I found myself lost in watching my hands and thinking of the hands that taught me so much in the kitchen.

shortbread 2

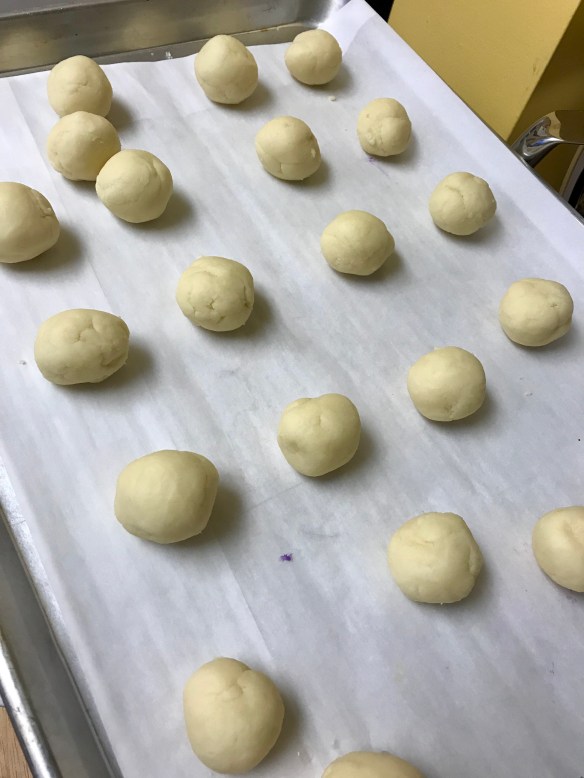
Once the dough is held together nicely it should be soft and supple.  Either put in the fridge to rest at this point, or carry on with simple dough balls.

Shape into 1 inch balls and place on an uncreased cookie sheet.  Flatten lightly with a fork in a crosshatch pattern.

shortbread 3

Bake the cookies at 325 for 10 min or so – watch them, every oven is different.  Remove them the minute they show any colour.  They are very soft when they come out, so I recommend allowing them to cool on the pan so they don’t break.

It is possible to allow the dough to set up in the fridge after forming it into a ball, and use it to roll out and cut shapes.  This is a pretty delicate dough though, so don’t expect it to be as easy as sugar cookie dough.

How easy is this?

Naan

Soft and supple, yet crunchy bits.  Homemade naan can never be totally authentic without a tandoori oven, but you can come pretty close!  I love the feel of this dough, and always make enough for leftovers, they heat up really well.

onion naan 3

naan 5

Just look at the way they puff up in my cast iron pan!

INGREDIENTS

For Dough

  • 2 tsp active dry yeast
  • 1 tsp sugar
  • 1/2 cup water lukewarm
  • 1/4 cup vegetable oil
  • 1 egg large
  • 1/4 cup yogurt plain
  • 2 1/2 cups all-purpose flour
  • 1 tsp salt
  • 1/2 tsp garlic powder

Other

  • 12 tsp olive oil
  • 4 tbsp butter melted
  • 2 tbsp parsley chopped


  • Heat the oven to 200 F degrees.
  • In a medium bowl, combine the yeast, sugar and water. Lightly whisk it all together, then let it sit for about 5 to 10 minutes or until the yeast dissolves and starts to foam.
  • To the same bowl, add the oil, yogurt, egg and whisk well. Set aside.
  • To the bowl of your mixer, combine the flour with the salt and garlic powder. Add the yeast mixture and mix for a couple minutes, until the dough comes clean from the sides of the bowl. If the dough is too wet, add a bit more flour, starting with a tablespoon at a time. The dough should be nice and soft but not sticky.
naan

Your dough should feel soft and smooth, but not too sticky.

  • Place the dough in an oiled bowl and cover it with a clean kitchen towel or plastic wrap. Turn OFF your oven, place the bowl inside and allow to rise for about 30 minutes to 1 hour or until doubled in size. I use this trick all the time to speed up the rising time. Mine only took about 40 minutes, so the time depends on your yeast and your environment.
  • After it rises, cut the dough into 12 equal pieces and shape each piece into a small ball.

naan 1

naan 2

These little dough balls are so soft and supple, they roll out beautifully.

naan 4

onion naan 1

This variation included slivered green onions, we loved it.  Don’t worry about the making the dough balls round, as long as it fits in your pan, and you can handle it, it works!


  • Heat a large cast iron skillet over medium-high heat and add about 1 tsp of olive oil. Roll out one ball at a time until it’s about 1/3 inch thick and about 5 inches in diameter. Add the piece of rolled dough to the hot skillet and cook for about 1 minute, the skillet should be very hot, so you’ll see bubbles forming as you cook the dough on the first side. Flip the dough and cook the other side until the bottom is golden.

onion naan 2

naan 3

  • Repeat with remaining dough until all of the pieces are cooked. Keep the naan covered in a towel so that it doesn’t dry out. When all of them are cooked, brush each one with the melted butter and garnish with some parsley.
naan 6

Keep these covered and warm until ready for service.

Have you checked out the website “Jo Cooks” ??  She has some amazing recipes, and this is where I got this one from, I felt the texture was amazing, but I added just a bit more salt and some garlic powder.

Spanakopita

spanakopita

These little pockets are a great addition to a Greek dinner, or perfect served as appetizers.


I loved making these little pockets of deliciousness.  Once I got into the rhythm of the folding and rolling it went quite quickly and they were fantastic.  The recipe came from Food Network, Mary Sue Millikin and Susan Feniger.  My only addition was the fresh dill.


  • 1/3 cup olive oil
  • 2 pounds spinach, washed and drained
  • 1 bunch scallions, white and green parts, chopped
  • 1/4 cup finely chopped parsley
  • 2 tbsp fresh dill
  • Salt and freshly ground black pepper
  • 1/2 pound feta cheese, crumbled
  • 1 to 2 eggs, lightly beaten
  • 1 cup (2 sticks) unsalted butter, melted
  • 1 pound filo pastry sheets
  1. Heat 1 tablespoon of the oil in a large saute pan, add half of the spinach and saute until spinach wilts, tossing with tongs, about 2 minutes. Remove spinach and squeeze out excess liquid, then chop roughly. Repeat with remaining spinach, using 1 more tablespoon of olive oil. Pour off any liquid from the pan, and add remaining olive oil. Add scallions and saute until soft, about 2 to 3 minutes. Add the spinach to the scallions, along with the parsley, dill, salt and pepper. Cook over low heat for 1 to 2 minutes, then remove from heat to cool. (This part can be done ahead and kept refrigerated).
  2. Stir the feta and as much beaten egg  as needed to moisten the cooled spinach mixture.
  3. Preheat the oven to 350 degrees F. Brush a baking sheet with some of the melted butter.
  4. Unroll the filo dough on a flat surface and keep it covered with waxed paper and a damp towel so it doesn’t dry out and become brittle. Using a sharp knife, cut the filo into 3 by 11 inch strips, and recover with the towel. Use a pastry brush to brush a strip of filo with melted butter. Place a small spoonful of spinach filling 1 inch from the end of the pastry. Fold the end over the filling to form a triangle, then continue to fold up the strip in triangles, like folding up a flag. Continue with remaining strips of dough, placing filled triangles on the baking sheet and keeping them covered with a towel until all are ready to bake.
  5. Brush the triangles lightly with butter, then bake for 20 to 25 minutes, or until golden and crisp. Serve hot. (These may be frozen before baking, layering waxed paper between layers of triangles to keep them from sticking. Bake frozen triangles an extra 10 minutes.)
spanakopita 1

Start with a healthy “dollop” of the spinach mixture, then start folding over into triangles.

spanakopita 3

I quickly discovered that using a healthy amount of the filling made better triangles.

spanakopita 4

spanakopita 5

Ready for baking or at this point you can freeze them for serving later.  Bake from frozen.

Cook’s Note

Variation: Butter a 9 by 13 inch baking pan, and spread 6 sheets of filo, brushing each with butter, on the bottom. Spoon the spinach filling over the filo, then cover with 6 more sheets of filo, buttering each sheet. Score the top 3 sheets with a sharp knife. Bake 40 to 45 minutes, or until top is golden, let stand 15 minutes, then cut into squares and serve warm.

Irresistible Turtle Cheesecake

turtle cheesecake 4

Not sure how a cheesecake can be creamy, delectable and somehow light at the same time.  As an added bonus, it’s easy to make.


3 cups cups finely crushed chocolate wafers (or use a combo of graham and chocolate wafers)

3 Tbsp. butter, melted – use your judgement, may take a little more to get the crumbs to stick together
1/4 cup caramel sauce (plus more for drizzle)
1/4 cup chocolate sauce (plus more for drizzle)
1 cup chopped and roasted pecans
3 pkg. (8 oz. each) Cream Cheese, softened
3/4 cup sugar
1 Tbsp. vanilla
3 eggs
I used a 9 1/2″ springform pan for this cake – depending on the size of your pan, you may need to adjust slightly for the amount of crumb.
Heat oven to 325°F.
Combine cookie crumbs and butter; press onto bottom and 1-1/2 inches up side of 9 1/2 inch springform pan.
Sprinkle toasted and chopped pecans over crust layer, and top with the caramel sauce.
turtle cheesecake 1

I used a combination of chocolate and graham crumbs and really loved the way it turned out,

Beat cream cheese, sugar and vanilla in large bowl with mixer until blended. Add eggs, 1 at a time, mixing on low speed after each one, until really smooth.  Pour over caramel layer in crust.  With an offset spatula smooth the top.
I always like to bake my cheesecakes in a water bath – this makes them even smoother and creamier, as well as less likely to crack on top.
turtle cheesecake 2
TIP – Double wrap your cheesecake pan with foil, then set in large roasting pan.  Put this in your preheated oven, and ONLY THEN fill with hot water until about 1/2 way up the sides of the springform pan.
Bake 1 hour 5 min. to 1 hour 10 min. or until center is almost set. Run knife around rim of pan to loosen cake; cool before removing rim. Refrigerate 4 hours.
turtle cheesecake 3
When the cake is completely cooled, remove from springform pan and sprinkle reserved pecans over.  Then drizzle with both caramel and chocolate sauces.  Irresistible.
turtle cheesecake 5
You can be as creative as you like with both the caramel and chocolate sauces.  They are easy enough to make, but if you are inclined to take it easy on yourself, just buy them.

Creamiest Hummous

Hummus 1

Drizzle the finished hummus with your best olive oil and a sprinkling of paprika.  A few toasted sesame seeds would be a great addition also. (I just didn’t think of it until I looked at my photos!)

  • 1 (15-ounce) can chickpeas or 1 1/2 cups (250 grams) cooked chickpeas
  • 1/4 cup (60 ml) fresh lemon juice (1 large lemon)
  • 1/4 cup (60 ml) well-stirred tahini
  • 1 small garlic clove, minced
  • 2 tablespoons (30 ml) extra-virgin olive oil, plus more for serving
  • 1/2 teaspoon ground cumin
  • Salt to taste
  • 2 to 3 tablespoons (30 to 45 ml) ice water
  • Dash ground paprika, for serving

UPDATE:  SINCE posting this originally, I’ve discovered a few more tricks.  

If you don’t have free hands for peeling the chickpeas, boil with 1/2 tsp baking soda per can for 20 minutes.  Drain well and rinse with cold water – ready to go.  

If you soak your garlic in the lemon juice for 10 minutes, and process that with the tahini at the first blending stage your garlic will have a much more mellow, smooth taste.  

DIRECTIONS

In the bowl of a food processor, combine the tahini and lemon juice and process for 1 minute, scrape the sides and bottom of the bowl then process for 30 seconds more. This extra time helps “whip” or “cream” the tahini, making the hummus smooth and creamy.

Add the olive oil, minced garlic, cumin, and a 1/2 teaspoon of salt to the whipped tahini and lemon juice. Process for 30 seconds, scrape the sides and bottom of the bowl then process another 30 seconds or until well blended.

Open, drain, and rinse the chickpeas. Add half of the chickpeas to the food processor and process for 1 minute. Scrape sides and bottom of the bowl, then add remaining chickpeas and process until thick and quite smooth; 1 to 2 minutes.

peeled chickpeas

I know, you are thinking “what goof peels chickpeas?”  Me.  Especially after Stella raved about the creamiest hummus she’d ever had.  At 5 years old, this girl knows food.  After that, how could I not peel my hummus.  After all, even if it takes you 20 min to peel that can of chickpeas, haven’t you ever wasted 20 min on something less interesting??

Most likely the hummus will be too thick or still have tiny bits of chickpea. To fix this, with the food processor turned on, slowly add 2 to 3 tablespoons of water until you reach the perfect consistency.

Taste for salt and adjust as needed. Serve hummus with a drizzle of olive oil and dash of paprika. Store homemade hummus in an airtight container and refrigerate up to one week.

Hummus 2

We served the hummus today with fresh vegetables as well as                                                            lightly seasoned and toasted pita wedges.


I heard a rumour that hummus made at home could be creamy, dreamy & simple, but every time I tried it I was less than satisfied.  Sure, it was tasty …. but dreamy?  No.  So I hit the blogs looking for a trick, and “inspired taste” provided it.  Look up the blog – Adam and Joanne have some amazing photos and descriptions, plus tips for cooking your own chickpeas and many other great ideas.  I’ve made this recipe a few times now, exactly as written (except that I am that weirdo that doesn’t mind a 10 minute mindless activity like skinning chickpeas).

Hummus 3

A few days later, my grand daughters Sloan and Stella were here, asking for a snack …. when I produced the vegetables I got a look ….. “Well Nana ……..do you have any of that amazing peeled chickpea hummus left?  Could we please have some of that too?”                                                       That, my friends, is how foodies are born.

Grilled Cauliflower & Shrimp with Romesco Dipping Sauce

Cauliflower & Shrimp with Romescu

Grilling the shrimp in the shell protects them from the searing heat of the barbecue, and is definitely worth doing.  Serve this as an appetizer and nobody minds getting in with their hands!


romescu

Go ahead and make a big batch of this, it goes really well with any cooked fish or chicken dish.

Romesco Sauce:

  • 1 jar (300 mL) roasted red peppers , including juices
  • 1/4 cup prepared tomato sauce
  • 3 tablespoons almond butter or 1/4 cup toasted slivered almonds
  • 2 teaspoons red wine vinegar
  • 1 teaspoon smoked paprika
  • 1/4 teaspoon cayenne pepper

Romesco Sauce: In blender, purée together red peppers including juices, tomato sauce, almond butter, vinegar, paprika and cayenne pepper until smooth. Season to taste with salt, if needed.  Transfer to small saucepan, and set aside.

  • 1 head cauliflower , cut in large florets
  • 1/4 teaspoon salt
  • 450 g unpeeled jumbo shrimp (21 to 25 count)
  • 1 tablespoon vegetable oil
  • 1 bunch green onions

Shrimp and Vegetables: Plunge cauliflower pieces into boiling salted water for just about 2-3 minutes, and then immediately drop into ice water bath.

This can easily be turned into a vegetarian dish by omitting the shrimp, just use an assortment of vegetables.

In bowl, toss together shrimp, oil and remaining salt.

Thread shrimp onto metal or soaked wooden skewers. Place shrimp and cauliflower on greased grill over medium-high heat; close lid and grill, turning once, until shrimp are pink and cauliflower is charred, about 8 minutes. Add green onions during last 3 minutes of grilling.

Heat Romesco Sauce, stirring frequently until warm, 1 to 2 minutes. Serve cauliflower, shrimp and green onions on large platter with sauce on the side for dipping.  Add some crusty fresh French bread and you’ve got a great appetizer!

Honey Garlic Chicken

I saw this recipe on “RecipeTin” and knew right away I would have to make it.  As promised, it is quick and easy, although definitely not as quick as listed.  I never find 15 minute recipes to actually take me that long ….. not sure if it is my common home stove (not gas) or my slow moving self … but nevertheless this was quick enough and the house smelled amazing!  Moist inside, sticky outside and with the best drizzle you can imagine.

honey Garlic Chicken 4

I made this tonight without a trip to the store.  Everything is something you probably have on hand.  If we weren’t trying to clean out our fridge before a holiday I would have had some cilantro, or green onions, or parsley to sprinkle on top and that would have looked so pretty!

  • 1 lb chicken breast or thighs,  boneless and skinless 
  • Salt and pepper
  • 1/4 cup flour
  • 3 1/2 tbsp unsalted butter (or 2 1/2 tbsp olive oil)
  • 2 garlic cloves , minced
  • 1 1/2 tbsp apple cider vinegar (or white or other clear vinegar)
  • 1 tbsp light soy sauce
  • 1/3 cup  honey (or maple syrup)
Instructions
  1. Cut the breasts in half horizontally to create 4 steaks in total.  If using chicken thighs, you don’t need to do anything to them!  Sprinkle each side with salt and pepper.
  2. Place flour in a shallow dish. Coat chicken in flour and shake off excess.
  3. Melt most of the butter in a large skillet over high heat – hold back about 1 tsp for later.
  4. Place chicken in skillet and cook for 2 – 3 minutes until golden.
  5. Turn and cook the other side for 1 minute.
  6. Turn heat down slightly to medium high.
  7. Make a bit of room in the pan and add garlic and top with remaining dab of butter. Stir garlic briefly once butter melts.
  8. Add vinegar, soy sauce and honey. Stir / shake pan to combine. Bring sauce to simmer, then simmer for 1 minute or until slightly thickened.
  9. Turn chicken to coat in sauce. If the sauce gets too thick, add a touch of water and stir.

  10. Remove from stove immediately. Place chicken on plates and drizzle over remaining sauce.
Honey Garlic Chicken 1

Don’t overcrowd your chicken in the pan or it will just steam instead of developing a lovely crust.

Honey Garlic Chicken 2

Turn once the first side has this lovely crispy, crackly golden crust.  Yes, you sure could do this without the flour to make it gluten free and it would taste delicious, just without that “crust”.

Honey Garlic Chicken 3

When you pour in that mixture of vinegar, soy and honey be ready for this rich, dark sauce to immediately start bubbling and smell tantalizing!  Allow it to thicken slightly, spooning sauce over just until chicken is cooked through.

Fajita Seasoning

Fajita Seasoning 1

Having this seasoning mix on hand makes dinner easy breezy!  (lemon squeezy??) Make a double batch and you can keep it for months in a cool, dry spot.  Use it on vegetables, fish or meat alike, these flavours go so well together and make dinner quick and simple.

  • 1 tbsp chili powder
  • 1 tsp ground cumin
  • 1 tsp smoked paprika
  • 1/4 tsp cayenne pepper (or to taste)
  • 1 tsp sea salt
  • 1 tsp ground black pepper

How easy is this? just toss it all into a bowl and thoroughly mix.  Do yourself a favour and make lots.

Fajita Seasoning

Just looking at this, you can tell it’s tasty, right??

This works with anything your imagination can come up with …. salad dressing or vegetable dip or seafood bake …. you let me know if you come up with more!


For fajitas:

  • protein (or not to make it vegetarian)
  • onions
  • peppers


To make fajitas, simply generously sprinkle slivered chicken (or any meat, seafood of your choice) and toss in fry pan until just cooked through.

Cook sliced peppers and onions separately so they don’t overcook.

Serve with:

  • lime crema (sounds fancy, but it’s just a squeeze of lime juice with sour cream and a bit of salt)
  • salsa
  • avocado
  • lime wedges
  • chopped cilantro
  • toasted pepitas (pumpkin seeds)
  • tortillas

You can so easily turn this into what is crazy popular right now,  power bowls!  Just serve with cooked quinoa or grain of your choice.

Turn it into a sheet pan dinner, also featured everywhere right now, just generously sprinkle everything with the seasoning and toss it into a hot oven (?400?).

Yes, you are welcome, you didn’t know dinner could be so quick, easy, healthy and delicious, did you???


Taco Seasoning Mix

Taco Seasoning 1

How pretty is this colourful group of seasoning?

Ever noticed how many ingredients you can’t spell or pronounce on those premade taco seasoning packs??  Stop the madness with this mixture.  A little bit of flour makes the ground meat have a wee bit of a saucy texture.  Don’t stop at ground meat for goodness sake (pun? word play?)..  Sprinkle this over vegetables and roast them up – drizzle with a little lime crema and you’ve got an amazingly tasty dish.

Ingredients

  • 1 tablespoon flour
  • 1 tablespoon chili powder
  • 1 tablespoon smoked paprika
  • 2 teaspoons salt
  • 1/2 teaspoon garlic powder
  • 1/2 teaspoon onion powder
  • 1 teaspoon turmeric
  • 1/2 teaspoon cumin
  • 1 teaspoon cayenne powder (use less if you aren’t keen on the heat)
  • 1/2 teaspoon oregano

Mix all this up in a small bowl, and then have it on hand to season meat or vegetables.  You’ll be so glad you took a few minutes to get this ready.

Taco Seasoning 2

To use this for ground meat tacos, brown your meat in a fry pan, then add 2 tbsp mixture for each pound of ground meat and add about 2 tbsp water, stir and cook just until meat is cooked through.

If you want to leave the flour out altogether that is just great, that makes it even more versatile:

Salad Vinaigrette:  1 tbsp mix to 2 tbsp lime juice and 7 tbsp olive oil.

Vegetable (or chip!) Dip: 1 tbsp (or to taste) with 1/4 cup each plain yogurt and good mayonnaise.

Grilled Shrimp:   Sprinkle a generous amount over shrimp before grilling.

Taco Seasoning 3

I like to mix up 3 x this recipe and just keep it on hand.  Try it, you’ll do the same thing!

Laksa

Laksa 5

Ready to be garnished with a squeeze of fresh lime juice, bean sprouts, maybe some cilantro sprigs and a few fresh sliced hot peppers – then drizzle more sauce over top and enjoy!

Laksa …. or Thai curry noodle soup …. whatever you call this, you are going to L O V E the exquisitely well balanced flavours in this noodle bowl.  This dish is so versatile and can be a completely vegetarian or even vegan dinner with a few tweaks.


  • 1 tbsp vegetable oil
  • 10 prawns/shrimp , peeled and deveined 
  • or
  • 1 chicken breast, finely sliced
  • 2 garlic cloves , finely grated
  • 2 tsp ginger , finely grated
  • 1 stalk lemongrass , peeled, finely grated 
  • 1 tbsp brown sugar
  • 1 1/2 tbsp fish sauce
  • 1 tbsp Penang curry paste
  • 1 tsp coriander powder
  • 2 tsp chilli garlic paste or other chilli paste , adjust to taste 
  • about 4-5 cups of fresh vegetables – sliced and ready to be added to the broth
  • 400 g/14oz coconut milk
  • 2 cups /500ml chicken broth (or vegetable)
  • 3 kaffir lime leaves
  • 2 slices fresh galangal
  • 2 tsp lime zest (1 lime)
  • 200 g / 7 oz fresh egg noodles, prepared per packet (although really you can use any noodle)
  • Big handful bean sprouts
Laksa 2

Have everything ready to go before you start cooking, and it will all come together quickly.

Toppings / for serving:
  • Lime wedges
  • Fresh coriander/cilantro leaves
  • Sliced red onion or scallions
Laksa 1

Did you even know lemongrass could be grated?  So easy and quick!


Instructions
Heat oil in a large saucepan over high heat. Add prawns or chicken and sear both sides until light golden (doesn’t need to cook inside). Remove onto plate.
Turn heat down to medium. If pot is looking dry, add a touch of extra oil.
Add garlic, ginger and lemongrass. Saute for 20 seconds until garlic is golden.
Add sugar and fish sauce. Stir and cook for 30 seconds – it should look like caramel.
Laksa 3


Add chilli paste, coriander and curry powder. Stir and cook for 30 seconds.
Add chicken broth and coconut milk. Stir and bring to simmer, add lime leaves and galangal.
Simmer for 2 minutes, then add lime zest and return prawns and chicken into broth, heat just until cooked through.
Laksa 4

Tonight’s bowl of laksa included mushrooms, snap peas, sweet peppers, zucchini & cauliflower.

Serving:
  1. Place noodles in bowl. Ladle over soup.
  2. Top with bean sprouts and coriander, plus toppings of choice (chilli, red onion, Asian fried shallots).
  3. Squeeze over lime juice to taste.

This recipe came from a great food blog – RecipeTin Eats – pop on over to her blog for some more great recipes.