Scallion Pancakes

Scallion Pancake 9

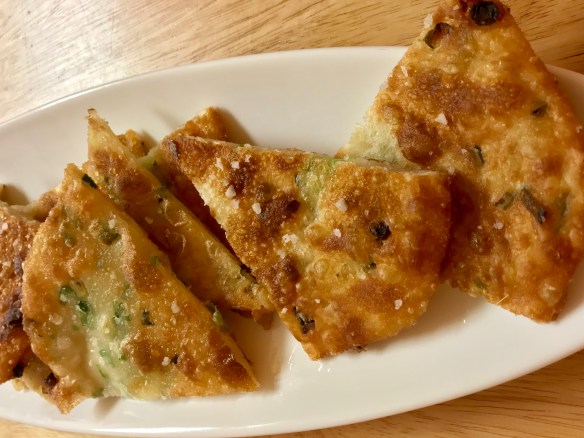
Crispy, flaky and little crunches of salt – perfection.

We fell in love with Scallion Pancakes at Mad Mango Cafe in Kelowna, served with an amazing laksa.  That’s a little bite of heaven.  Ever since, I’ve looked up a few recipes, and never quite had the courage to try making them.  Tonight’s menu included a chicken laksa, and just on a whim, decided to give these scallion pancakes a go.  I found this recipe on the “Serious Eats” website, and I didn’t change a thing.  They were far quicker and easier to make than I thought, and FAR exceeded our expectations.  If you have fun playing with dough, make sure to give this a try.

Ingredients

  • 2 cups all-purpose flour, plus extra for dusting work surface
  • 1 tsp kosher salt
  • 1 cup boiling water
  • Up to 1/4 cup toasted sesame seed oil
  • 2 cups thinly sliced scallion greens
  • flaky sea salt

Oil for frying

Salt for garnish

Directions

Place flour & salt in bowl of food processor. With processor running, slowly drizzle in about 3/4  cup of boiling water. Process for 15 seconds. If dough does not come together and ride around the blade, drizzle in more water a tablespoon at a time until it just comes together. Transfer to a floured work surface and knead a few times to form a smooth ball. Transfer to a bowl, cover with a damp towel or plastic wrap, and allow to rest for 30 minutes at room temperature, or up to overnight in the fridge.  (If you don’t have a food processor, just mix the dough together by hand and knead until smooth and soft)

Divide dough into four even pieces and roll each into a smooth ball. Working one ball at a time, roll out into a disk roughly 8-inches in diameter on a lightly floured surface.

Scallion Pancake 1

Okay, so my dough ball isn’t exactly a perfect circle, but that’s okay, it will get there.

Using a pastry brush, paint a very thin layer of sesame oil over the top of the disk. Roll disk up like a jelly roll, then twist roll into a tight spiral, tucking the end underneath. Flatten gently with your hand, then re-roll into an 8-inch disk.

Scallion Pancake 2

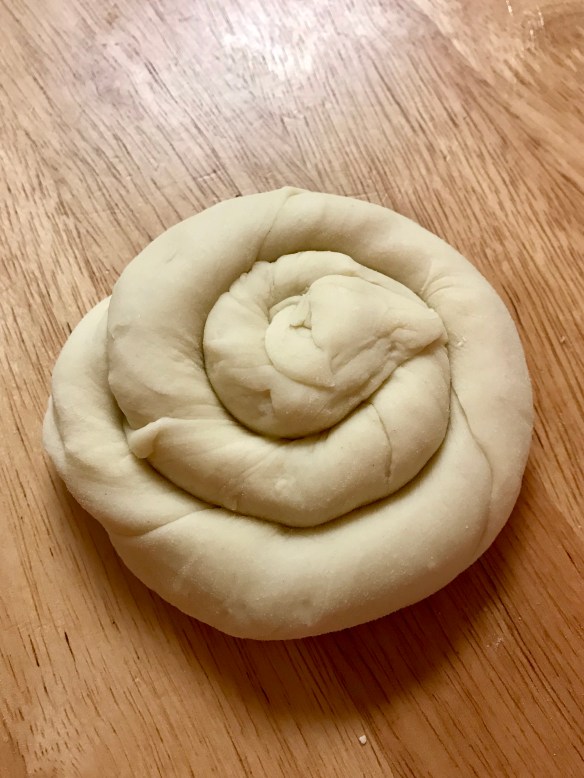
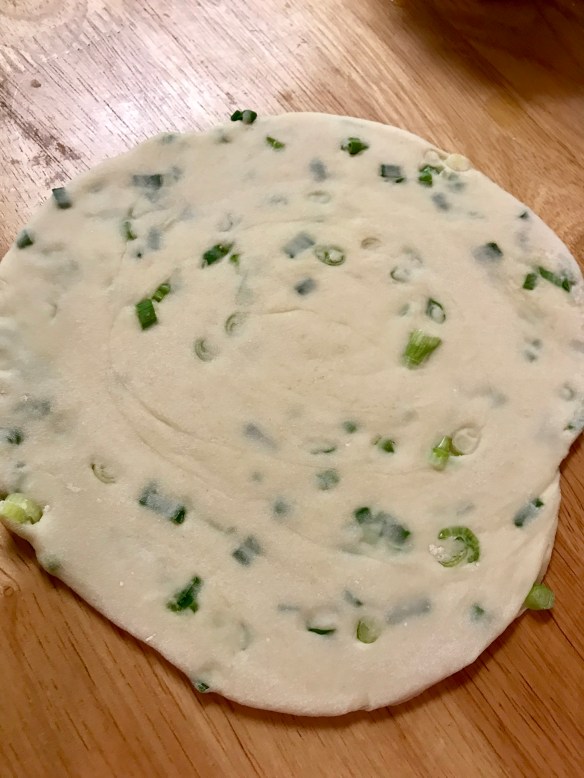
See?  What did I tell you, looks like a circle now!  Gently flatten with your hand, then start to roll.

Paint with another layer or sesame oil, sprinkle with 1/2 cup scallions, a sprinkle of flaky sea salt, and roll up like a jelly roll again. Twist into a spiral, flatten gently, and re-roll into a 7-inch disk. Repeat steps two and three with remaining pancakes.

Scallion Pancake 3

Scallion Pancake 4

Scallion Pancake 5

Make sure to brush on just a very delicate layer of sesame oil – if you get too much on there the oil will start to pop out when you roll the dough.

Heat oil in an 8-inch nonstick or cast-iron over medium-high heat until shimmering and carefully slip pancake into the hot oil. Cook, shaking the pan gently until first side is an even golden brown, about 2 minutes.

Scallion Pancake 6

Scallion Pancake 7

Just look at that flaky crust!

Scallion Pancake 8

As soon as you remove the pancake from the oil, immediately sprinkle with a little sea salt.

Carefully flip with a spatula or tongs (be careful not to splash the oil), and continue to cook, shaking pan gently, until second side is even golden brown, about 2 minutes longer. Transfer to a paper towel-lined plate to drain. Season with salt, cut into 6 wedges. Serve immediately with sauce for dipping.  Repeat with remaining 3 pancakes.

Dipping Sauce

  • 2 tablespoons soy sauce
  • 2 tablespoons Chinkiang or rice wine vinegar
  • 1 tablespoon finely sliced scallion greens
  • 1/2 teaspoon grated fresh ginger
  • 2 teaspoons sugar

Combine all ingredients, and set aside at room temperature.

Tartar Sauce


Tartar Sauce 1

I got this recipe from one of Ina Garten’s collections, and it is certainly my go to.  It can’t be much easier, which is always a good thing.  Just through everything into a food processor and give it a good whiz.  Set in fridge to allow the flavours to develop and you are done.  Of course, if you don’t have a small food processor, just chop and blend by hand, still an easy tartar sauce recipe.

  • 1/2 cup good mayonnaise
  • 2 tablespoons small-diced pickles or cornichons
  • 1 tablespoon Champagne or white wine vinegar
  • 1 tablespoon capers
  • 1 teaspoon coarse-grained mustard
  • Pinch kosher salt
  • Pinch freshly ground black pepper

Tartar Sauce

Sesame Maple Vinaigrette

An amazing trick to get complex flavour in a vinaigrette is to use more than one acid and more than one oil.  In this case, I’ve used balsamic vinegar and red wine vinegar for the acidic hit and sesame oil combined with a light grapeseed oil but you can also use a really good quality olive oil.

Sesame Maple Dressing

If your garlic cloves are home grown like these beauties, you may only want to use 1, unless you are trying to ward off a cold……

  • 2 tsp Dijon mustard
  • 2 garlic cloves, minced
  • 2 tbsp pure maple syrup
  • 2 tbsp sesame oil
  • 2 tbsp balsamic vinegar
  • 2 tbsp red wine vinegar
  • 1/4 tsp red chili flakes
  • 1/4 tsp salt
  • 1/2 cup vegetable oil (or olive oil)

Put all ingredients in jar and give it a whiz with your immersion blender, or put it in a blender.  Slowly add the oil while blending to emulsify it and make a delicious creamy dressing.

Serve with your favourite tossed green salad, or it goes equally well with warm roasted vegetables.

Summer Salad

Braised Lamb Shanks

The fall days just make me think of hearty, wholesome meals and this lamb shank is the best way to celebrate staying indoors and getting cozy.  The added bonus is that your house will smell dreamy while they slowly roast.

Lamb shank 5

  • 4 lamb shanks
  • salt & pepper
  • all purpose flour
  • olive oil
  • 2 yellow onions, diced
  • 3 celery ribs, diced
  • 2 carrots, diced
  • 2 cups red wine (make sure you use good wine, something you want to sip while the lamb is roasting)
  • 1 cup beef stock
  • 3 garlic cloves, crushed
  • 2 bay leaves
  • 2 ancho chiles, rehydrated in hot water for 20 minutes
  • 2 sprigs fresh rosemary
  • 1 tbsp smoked paprika
  • 1 14 ounce tin of good canned tomatoes

Garnish:  1 minced garlic clove, 1 small diced chili, and a small handful of parsley, all chopped and mixed.

Season lamb shanks with salt and pepper, then dust with flour.

Preheat oven to 300

Heat oil in braising pan, large enough to hold all 4 shanks in one layer.  Brown shanks all over, taking care not to overcrowd the pan.  You may have to do this in stages.

Remove shanks to keep warm while you reheat the pan, add a bit more oil and saute the onions, carrots & celery until they have softened.

Lamb shank 1

Deglaze the pan with red wine, stirring to get all the bits of goodness off the bottom.  Add beef stock, garlic cloves, ancho chili (stem and seeds removed), rosemary, paprika and tomatoes.  Stir well and nestle the lamb shanks back into the mixture.  Cover tightly and put in the oven.

Lamb shank 2

Relax with that wine …… enjoy the aromas coming out of the kitchen ….

This recipe is so forgiving – if you have more time roast at a lower temperature, if you are short, move the temperature up to 350 or 375 and shorten your cooking time.

Check for doneness and as soon as cooked through remove the lamb shanks from the braising liquid and set aside.

Lamb shank 3

The lamb is cooked, but not yet falling off the bone tender, and that is what you are looking for.

Lamb shank 4

At this point, if you want a clear stock, strain the solids off.  If you don’t mind a more rustic stock use your immersion blender or standard blender (if using a standard blender BE SURE to leave the lid off or some place for steam to escape … trust me on this).

Nestle those lamb shanks back into the liquid and continue to roast until the meat literally falls off the bone.

When ready to serve, sprinkle the garnish over top and prepare to enjoy the feast.


Chicken Pot Pie

Chicken Pot Pie 2

See the sauce bubbling out the side?  That’s what you are looking for.  Crust is golden, now just try and wait while it sets up a bit …. no judgement if you can’t!  I promise it is delicious.

Fall ….. it just makes me want to bake, and roast, and toast.  This chicken pot pie recipe is a staple around here.  You can make it as easy as “pie” by purchasing pre-made pastry shells or make your own – either way, this pie is flaky, tender and bursting with bites of chicken and vegetable goodness.  Serve with a tossed salad and dinner is ready.

Preheat oven to 400

  • 2 pastry shells
  • 2 cups cooked chicken (use leftovers or a rotisserie chicken for simplicity)
  • olive oil
  • 1 small onion
  • 1 garlic clove
  • 2 tbsp flour
  • 1/4 tsp pepper
  • 1 tsp salt
  • 2 cups chicken stock
  • diced vegetables – your choice and about 2 cups worth of:
  • sweet peppers
  • celery
  • carrots
  • peas (not in my house, neither of us like cooked peas)
  • zucchini
  • corn
  • green beans
  • a generous handful of herbs, I like thyme, basil, oregano and parsley
  • salt and pepper

Brush one pie shell with beaten egg white, sprinkle with sea salt and bake at 400 for 8-10 minutes, just until starting to turn golden brown.  Remove from oven and allow to cool.

pie shell

I find if you pre-bake the bottom crust, brushed with beaten egg white, the pastry stays flaky.  Sprinkle a little sea salt on for that extra bit of crunch.  I think you can see here that my bottom crust was in the freezer, thank you Tenderflake pastry!

In saucepan heat olive oil, then stir in onion.  Stir until just translucent and add in the garlic clove.  If celery is one of your chosen vegetables, add it now too.  Allow to saute for a few minutes until just starting to become tender.  Add the flour and create a thick paste, letting the flour cook for a minute in order to remove that “floury” taste.  Gradually stir in the chicken stock, just a bit at a time until it is all incorporated and your sauce is starting to thicken.  Stir in the rest of your vegetables, taste and season with salt and pepper, and set aside.

Pour the chicken & vegetable mixture into the prebaked pie shell, and cover with the 2nd pastry shell.  If you’ve purchased pre made pastry, just squish and squiggle it around a bit and play with the edges, nobody will ever know you didn’t make it!

chicken pot pie

The top crust was a pastry shell I had in the freezer, probably leftover from an apple pie day!

TIP:  If you are vegetarian, or just feel like a vegetarian meal, this is so easy to do!  Just omit the chicken and use a LOT more veg.  Instead of chicken stock use a vegetable stock.  Your results will be ever so delicious …. you’re welcome!

Sprinkle the top with a bit more salt and pepper, some Italian herbs and either paprika or a bit of dried roasted red pepper.  (yes, we do our own dried seasonings with the surplus of vegetables in the field)

Put the whole pie in the oven (I’ve learned to have a foil dripping sheet below it…..) and cook for 15 minutes at 400, then lower the oven to 350 and cook for about 40-50 minutes, until you see the sauce bubbling out the side and the pie looks golden brown.

If your pie is looking golden brown, but not yet bubbling out the sides, loosely lay a sheet of tin foil over the pie until you see that bubbling action.

Make sure you let it sit for 15-20 minutes after it comes out of the oven, that allows it to set a bit.  Not that it tastes any less wonderful if it is running all over your plate ……..

chicken pot pie 3

See what I mean?  We couldn’t wait the 15 minutes, but it was delicious.  By the time we came back for seconds it had set up and made nice even slices.  Amazing either way!

Butternut Squash Salad

Roasted squash, crunchy pepitas, salty feta, and tart pickled red onions.  This salad has it all, and can be served warm or cold.  Make a big batch it keeps so well.

Butternut Squash Salad


1 butternut squash (about 2 pounds)

5 to 6 tablespoons olive oil, divided
Salt and freshly ground black pepper, to taste

1 cup cooked barley

Barley

1 cup chopped fresh kale, massaged well until it is bright green

Kale, massaged

Look how much brighter the massaged kale is, compared to the kale at the bottom of the photo.  Massaged kale is more tender and easy to digest also.

1/3 cup toasted salted pepitas (pumpkin seeds)
3 ounces feta cheese
1 tablespoon sherry vinegar
1 tablespoon water
1/2 teaspoon table salt
1/2 teaspoon granulated sugar
1/2 small red onion, finely chopped

preheat oven to 375

Peel squash and cut into bite size pieces.  Toss with olive oil, sprinkle with salt and lots of freshly ground pepper, and roast until tender, about 30-40 minutes.

To cook barley put 1/2 cup dry barley into saucepan with 2 cups water (or chicken stock for extra flavour).  Boil for 5 minutes, then turn off the heat and allow to sit for 1 hour.  Drain well.  You can easily do this a day ahead.

Dice red onion finely, and set aside in small bowl or jar.  Combine the sherry vinegar, water, salt and sugar and stir until well dissolved.  Pour over onions and allow to sit for at least 30 minutes.  You can also do this ahead of time, in fact I often have a jar of these in my fridge as they are amazing on salads, sandwiches and of course tacos!

Pickled red onion

Just love the bright colour pickled red onions get, with a gorgeous pink vinaigrette.  Yum.

The pumpkin seeds I have on hand all the time aren’t salted, so I toasted them in a little bit of olive oil, with a sprinkle of fresh sea salt.  They were so delicious I kept nibbling at them, good thing I ended up with enough for the salad.

When squash is ready, toss in a large bowl with all the other ingredients and about 3 tbsp  olive oil.

Butternut squash salad prep

Get everything ready ahead of time, and once the squash is roasted toss it all together.

Credit for this amazing salad goes to Smitten Kitchen, Deb used faro and I used barley but you can use any grain you like.  The kale was my idea too, had some in the fridge and thought it would add a nice pop of colour and texture, it did!

Roasted Broccoli with Lemon Tahini Drizzle

Roasted broccoli gets some really nice crackly bits, which just means more flavour.  This recipe stands on it’s own for a vegetarian dish, by treating the stalks with my pulled pork dry rub before roasting.

Roasted Broccoli with Tahini Drizzle

I forgot this time, but the broccoli looks even better with a sprinkle of toasted sesame seeds.


Tahini Drizzle

  • Salt and black pepper
  • 1 tbsp tahini
  • 1½ tsp honey
  • 2 tsp lemon juice
  • 1 small garlic clove, peeled and crushed
  • 1/2 tsp roasted sesame oil
  • 1 tbsp olive oil


Dry Rub (I usually like to keep a jar of this ready made, for all sorts of uses)

1 tbsp ground cumin
1 tbsp garlic powder
1 tbsp onion powder
1 tbsp chili powder
1 tbsp cayenne pepper
1 tbsp salt
1 tbsp ground pepper
1 tbsp paprika
1/2 cup brown sugar

Wash broccoli and separate into stems.  Give broccoli a generous shake of the dry rub.

Roast at 400 degrees just until you see little crispy bits appearing, turn and roast a bit more.  At 400 this should take about 20 minutes, but you can adjust with any temperature you need your oven at.  If you are like me, with only one oven, sometimes it is working extra hard to produce dinner!

Arrange broccoli on serving platter and drizzle with tahini sauce.

Massaman Curry

I’ve had a bit of a love for Penang curry lately, but tonight Massaman won the battle.  In no way is this totally authentic, since I wasn’t planning to put either carrots or potatoes in and those are both always found in Massaman curry.  Served with Sticky Thai chicken wings and jasmine rice this made a fantastic dinner, quick and easy but oh so tasty.

Massaman Curry

Tonight this was a vegetarian dish with cauliflower, broccoli and bok choy but you could easily add a protein if you like.  In Thai lessons we learned to add thinly sliced meat and then NOT stir it until it is cooked through.

Thai chicken curries are so simple to make, and come together very quickly.

Get everything ready first and when its time to cook it will happen before you know it!

  • 1/2 cup onion, roughly chopped (in Thailand, every cooking class I took had us cutting 1/2 an onion into 6 pieces)
  • 1 large garlic clove, sliced
  • 1 tbsp each minced ginger and lemongrass
  • 2 tbsp Massaman curry paste
  • 1 can coconut milk (don’t use the lite version)
  • 3-4 cups assorted vegetables, in bite size pieces

Mix together and set aside: 2 tbsp each fresh lime juice, fish sauce and brown sugar

Heat peanut oil in saucepan until shimmering and add onion pieces, stir until slightly softened and add garlic, ginger, lemongrass and curry paste.  Saute to bring out the flavours in the curry and aromatics.  Add coconut milk and stir well.  Add vegetables and cook just until crisp tender.  Stir in the lime juice, fish sauce and brown sugar.

Thai food should have a great balance of sweet, spicy, salty & tangy.  If this doesn’t yet, keep making adjustments until it does!


Sticky Thai Chicken Wings

Thai Chicken Wings

Not my first Thai chicken recipe, and I’m sure it won’t be the last, but loved the tart, slightly sweet and hint of spice these wings provided.  Get out the napkins!

3 pounds chicken wings, drums and tips separated

1/2 tbsp sea salt flakes

MARINADE

  • 3/4 cup Thai sweet chili sauce
  • 3 tbsp brown sugar
  • 1/4 cup soy sauce
  • 4 tbsp rice wine vinegar
  • 3 tbsp fish sauce
  • 2 tbsp lime juice
  • 1 tbsp minced or grated garlic
  • 1 tbsp minced or grated ginger
  • 1 tbsp minced lemongrass
  • 1 tbsp sesame oil

GARNISH

  • fresh cilantro, roughly chopped
  • sesame seeds
  • green onions, sliced

Mix all marinade ingredients together and pour half over chicken wings.  Allow to marinate for 30 minutes, up to overnight.  Put the rest of the marinade in a small saucepan and bring to a boil over medium heat.  Reduce by about half and set aside.

Preheat oven to 400

Lightly grease, or line a baking sheet with parchment paper.  Put wings on baking sheet in a single layer.

Roast for 20 minutes, then remove and toss in a bit of reduced marinade.  Sprinkle sesame seeds & sea salt over and roast for a further 20 minutes until shiny and crispy.

Garnish with cilantro, green onion and more sesame seeds.

Roasted Marinated Sweet Red Peppers

It’s true, going through all the steps to grill and prepare these peppers does take a little bit of time.  Pick a sunny day and the sweet smell of them grilling will be enough payback.  Do enough for a dinner side dish also!  In the middle of winter when you open a jar you will immediately be transported back to that summer day.  I love using these in so many different appetizers, slivered in a salad or pasta or just served with a grilled steak.

Red pepper 4

These sweet peppers are an amazing way of capturing the tastes and smells of summer in a jar.

4 pounds firm, fresh and cleaned red bell peppers

Lightly oil peppers and sprinkle with salt and pepper.  Grill until charred in spots and softened.  Put in bowl, cover tightly and allow to sit for 15 minutes until you can easily slip the skins off.   If you don’t have a barbecue you can also do this over an open flame or in your oven with the broiler unit.

Red pepper 1

MARINADE

  • 1 cup bottled lemon juice
  • 2 cups white vinegar
  • 1 cup olive oil
  • 2 cloves garlic, quartered
  • 1 1/2 tsp salt

Bring all marinade ingredients to boil in a saucepan.

Red pepper marinade 2

In most cases I would suggest squeezing fresh lemon juice, but in this instance the consistency and acidic content of bottled lemon juice is what you need.

If you want to use these within a few weeks, just fill the jars with peppers and pour the boiling marinade over.

Red pepper 3

Seal and keep in the fridge.

SEALING AND PRESERVING

Scald jars in boiling water and heat canning lids and sealers in boiling water.  Fill jars with peppers, immediately fill to within 1/2 inch of the top.  Quickly close the jars with lids and sealers and boil in canner for 15 minutes.