Garden Fritters

IMG_5383

Make enough of these and it is a total meal, or use as an appetizer or side dish, either way, you are going to love these intense vegetable fritters.


I’m having a fritter moment.  It seems like a magical way of getting pounds of vegetables eaten up in record time, just when it is all at the peak of freshness, and who doesn’t love that?  I had to call these garden fritters, due to the tangle of grated zucchini, the wilted swiss chard, the crunchy pop of corn kernels fresh off the cob ….  Now just add to that a bunch of herbs, some garlic and a bit of cheese.  In today’s version I used feta and a bit of cumin.

If you make fritters just a few times you will quickly realize you don’t really need a recipe, but here is my general guideline:

  • 4 cups of vegetables
  • 1 clove of garlic (completely variable depending on your garlic love)
  • 1 egg
  • 1/2 cup flour
  • 1/2 tsp baking powder
  • salt, pepper and seasonings to taste

Now – once you’ve got  this far, just use your imagination with seasonings, and/or any cheese you decide to add.  Cheese certainly isn’t necessary, just adds another level of tasty goodness.

IMG_5380

These fritters have grated zucchini, lightly wilted swiss chard, corn kernels cut off a fresh cob, and herbs of parsley and chives.  One garlic clove and a bit of cumin with some feta cheese crumbled in created an intensely mouthwatering fritter.

A cast iron frying pan works best but any non stick pan will work well.  Lightly coat with oil, and on medium heat drop in dollops of the mixture.  Fry until golden brown and cooked through, about 3-4 min per side.

IMG_5381

HEAD’S UP – these delicious little kernels of corn will actually pop and sizzle like crazy in the oil – be prepared for the splatter.

I served these with a dip resembling tsatsiki:

  • 1/2 cup mayonnaise
  • 1 garlic clove
  • 1/3 cup grated cucumber
  • 1 tsp basil
  • 1 tsp dill weed
  • 1 tsp lemon juice
  • salt & pepper to taste

Zucchini Fritters

This recipe came directly from Smitten Kitchen (another wordpress site) and strangely enough (for me) I didn’t change it!

Zucchini Fritters 2

Crispy craggy bits of zucchini are a great contrast to the creamy aioli dip.


1 pound (about 2 medium) zucchini
1 teaspoon coarse or Kosher salt, plus extra to taste
2 scallions, split lengthwise and sliced thin
1 large egg, lightly beaten
Freshly ground black pepper
1/2 cup all-purpose flour
1/2 teaspoon baking powder
Olive or another oil of your choice, for frying

Preheat oven to 200 degrees. Have a baking sheet ready.

Trim ends off zucchini and grate them either on the large holes of a box grater or, if you have one, using the shredding blade of a food processor. The latter is my favorite as I’m convinced it creates the coarsest and most rope-like strands and frankly, I like my fritters to look like mops.

Zucchini fritters 3

In a large bowl, toss zucchini with 1 teaspoon coarse salt and set aside for 10 minutes. Wring out the zucchini in one of the following ways: pressing it against the holes of a colander with a wooden spoon to extract the water, squeezing out small handfuls at a time, or wrapping it up in a clean dishtowel or piece of cheese cloth and wringing away. You’ll be shocked (I was!) by the amount of liquid you’ll lose, but this is a good thing as it will save the fritters from sogginess.

Return deflated mass of zucchini shreds to bowl. Taste and if you think it could benefit from more salt (most rinses down the drain), add a little bit more; we found 1/4 teaspoon more just right. Stir in scallions, egg and some freshly ground black pepper. In a tiny dish, stir together flour and baking powder, then stir the mixture into the zucchini batter.

In a large heavy skillet — cast iron is dreamy here — heat 2 tablespoons of oil over medium-high heat until shimmering. Drop small bunches of the zucchini mixture onto the skillet only a few at a time so they don’t become crowded and lightly nudge them flatter with the back of your spatula. Cook the fritters over moderately high heat until the edges underneath are golden, about 3 to 4 minutes. If you find this happening too quickly, reduce the heat to medium. Flip the fritters and fry them on the other side until browned underneath again, about 2 to 3 minutes more. Drain briefly on paper towels then transfer to baking sheet and then into the warm oven until needed. Repeat process, keeping the pan well-oiled, with remaining batter. I like to make sure that the fritters have at least 10 minutes in the oven to finish setting and getting extra crisp.

Zucchini Fritters 1

Creamy Lemon Aioli

  • 1/2 cup good quality mayonnaise
  • 1 tbsp fresh squeezed lemon juice
  • 1 tbsp minced basil
  • salt and pepper to taste

Blend it all together, and allow to sit in the fridge until fritters are ready.

Summer Mexican Cobb Salad

Mexican Cobb Salad

Chipotle Chicken and Cilantro Vinaigrette give this one dish dinner a real taste of Mexico.

Combine the taste of cilantro dressing with fresh and lively salad crunch, and top it with grilled spicy chipotle chicken – you’ll have the best summer salad … this one will be on repeat.

CHIPOTLE CHICKEN MARINADE

  • 3-4 chicken breasts, or 8 boneless, skinless thighs
  • 2 chipotles in adobo sauce, minced
  • 1 tsp garlic powder
  • 1 tsp cumin
  • 1/2 tsp Mexican oregano
  • 1/2 tsp black pepper
  • 1/2 tsp sea salt
  • 2 tbsp vegetable oil
  • 2 tbsp fresh lime juice

Blend all ingredients until smooth, and pour over chicken.  Marinate for at least 1 hour, and up to overnight.

Grill until cooked through, and set aside.  Do not slice until chicken has rested at least 15 minutes.

CILANTRO VINAIGRETTE

  • 1 huge bunch cilantro – chopped up
  • 1/2 cup olive oil
  • 2 tbsp white wine vinegar
  • 1 loved garlic, minced
  • 1 tsp sea salt
  • 1/2 tsp red pepper flakes
  • 1 tsp dijon mustard

Put all ingredients in blender and process until smooth.

This vinaigrette is delicious!  Use it on a salad, or as a topping for your steak ….. dip your prawns into it …. the list is endless.

SALAD

Summer Salad

include any number of ingredients to create texture, bright, crispy crunchy fresh vegetables as well as creamy avocado, tasty fruit and toasted nuts


  • salad greens
  • spinach
  • cucumber
  • sweet peppers
  • snap peas
  • corn, grilled and sliced off the cobb
  • avocado
  • sliced strawberries
  • cooked bacon
  • toasted nuts

Toss salad ingredients together, and drizzle with cilantro vinaigrette.

Top with sliced chicken and drizzle a little more vinaigrette over the chicken.


Korean Bibimbap

Quick disclaimer here …. this is unapologetically inauthentic!  At Fat Boy Moves in Mexico City we ate Bibimbap a couple of times and this is my version of trying to replicate that in my own kitchen, minus of course the stone bowl to serve it in….

Bibimbap

What’s missing you say?  Any authentic Bibimbap will have a soft egg on top!

In terms of recipes, this is more of a guideline.  I’m sure you can find lots of real, true Korean Bibimbap recipes out there, but for my own preferences, in my kitchen, this was pretty delicious.  I think it is key to have either a cast iron frying pan or a stainless steel pan to get the rice nice and crusty.

First, make a sauce:

  • 1/4 cup soya sauce
  • 2 tbsp roasted sesame oil
  • 1 tbsp chile garlic sauce
  • 1 tbsp gojuchang

Taste the sauce, I can’t say that enough, make sure it is delicious …. each of those components will be slightly different by brand so hit a balance you like.

Second, make pickled cucumbers:

  • cut about a 4 inch piece of cucumber in half, lengthwise
  • scoops out seeds and slice very thinly

Put cucumbers in a bowl, and sprinkle with 1/2 tsp each of salt and sugar.  Sprinkle with 2 tbsp rice vinegar and mix well.  Set aside.

To assemble you will need:

  • cooked rice
  • protein (if you like, easy to just make it vegetarian also)
  • stir fried veg
  • pickled cucumbers
  • sesame seeds
  • cilantro
  • slivered chives

Thinly sliver nori sheet and toast until crispy

If you are using a protein, cover your steak, chicken or prawns with a light bit of gojuchang and allow to marinade for an hour.  Grill, and once rested, slice into bite size pieces.

Prepare the vegetables you are going to use, today I used coloured sweet peppers, onions, snow peas, bok choy and cabbage.

Heat fry pan until very hot, add neutral oil and sauce some ginger and garlic.  Add in vegetables and stir fry just until tender.  Set aside.

Reheat the pan, barely cover the bottom with sesame oil and then cover the bottom with the rice.  Allow to sit undisturbed until the rice is heated through and the bottom develops a nice golden brown crust.

Centre your cooked vegetables on the rice, scatter the protein around the edge and garnish with the pickled cucumber, toasted nori and sesame seeds.  Drizzle over the prepared sauce and enjoy!


Peanut Noodle Salad

Peanut Sesame Noodles

PLAY WITH YOUR FOOD, you won’t be sorry!

YES, I mean it, get in there … play with this noodle dish.  Experiment with textures and colours, and then when its time to mix with the dressing your hands are the best tools in your kitchen, a great time to get the kids to help ….. (after they’ve washed up).

  • 1/4 cup peanut oil
  • 1/2 cup raw peanuts
  • 1 small jalapeño, minced
  • 1 small garlic clove, halved
  • One 1/4-inch slice of fresh ginger, peeled and chopped
  • 1/2 tsp sea salt
  • 1/2  cup thinly sliced scallions
  • 2 1/2 tablespoons soy sauce
  • 2 tablespoons water
  • 1 1/2 tablespoons rice vinegar
  • 1 tablespoon chili garlic sauce
  • 1 tablespoon black bean sauce
  • 1 tablespoon sugar
  • 1 teaspoon Asian sesame oil


Heat peanut oil in sauce pan, and add peanuts.  Heat until golden brown and allow to cool slightly.

Grind garlic, jalapeno and ginger with a 1/2 tsp of sea salt with mortar and pestle.  (Yes, you can use a food processor if you have one and would rather!)  Add sliced scallions.  Pour warm peanuts (with oil) over top.  The warmth allows the flavours to bloom.  Add the rest of the ingredients and blend well.  I can’t say this strongly enough but taste it!  Taste, taste, taste.  Everybody has a different brand of each ingredient, and that will make the overall taste slightly unique in every household.  Get a balance that you like, in other words, when you realize you are still tasting just to eat it ……

Soften rice noodles according to package instructions.

Thinly slice coloured sweet peppers, celery and any other vegetables you are inclined to add – this is so forgiving and just allows you to express yourself.

Asian noodles

Toss everything together until well blended.  Serve warm or at room temperature.

This noodle dish is easy to turn into a main dish, or one dish meal by adding chicken or seafood.  Keep it the way it is for a vegetarian meal or add some cubed, fried tofu.

KFC – Korean Fried Cauliflower

KFC

Slightly spicy, slightly sticky and a world of deliciousness.  Welcome to KFC.

I can tell you right now, this is worthy of the time investment.  Hayley had mentioned this dish to me years ago, when she and Andrea had it in Vancouver.  I was intrigued at that point, and tried it in a few restaurants, without feeling the love.  (at least not the love Andrea and Hayley expressed)   We finally did experience that, in Mexico City of all places!  Fat Boy Moves is the name of a Korean restaurant there, and it had such amazing reviews we had to try it out.  We went twice.  This cauliflower is the one item that makes Grant say he could be vegetarian … me too.  Once we got home I went on the search.  There are lots of recipes out there, but none of them had the steps or the ingredients I thought it would take to get that taste experience you just can’t get enough of.  Finally, with a recipe sourced out of “Carbon Bar” (restaurant in Toronto) I think I’ve nailed it.  The sauce makes more than you will need, so just enjoy that, and use it on whatever you feel like.

(sidebar here …. I have no idea if this is authentically Korean, but we had it in a Korean restaurant, so I’m calling it Korean!)

1 head cauliflower

green onions (for garnish)

Cauliflower

BUTTERMILK MIXTURE

  • 2 cups buttermilk
  • 1/8 tsp cayenne pepper
  • 1/8 tsp ground nutmeg
  • 2 sprigs finely chopped fresh thyme leaves

FLOUR MIXTURE

  • 2 cups all purpose flour
  • 1 tbsp black pepper
  • 1/2 tbsp kosher salt
  • 1/2 tbsp baking powder

KFC SAUCE

  • 1 cup gochujang (Korean fermented chili paste)
  • 3/4 cup rice vinegar
  • 1/2 cup brown sugar
  • 1/3 cup soy sauce (I use reduced sodium)
  • 1/4 cup water
  • 1/4 cup mirin (Japanese cooking wine)
  • 1/4 cup vegetable oil
  • 1 tsp garlic powder
  • 1/2 tsp onion powder


Bring a pot of water to a boil, salt it and add cauliflower florets.  Cook for only 1 minute, then shock in ice water bath and allow to drain completely.

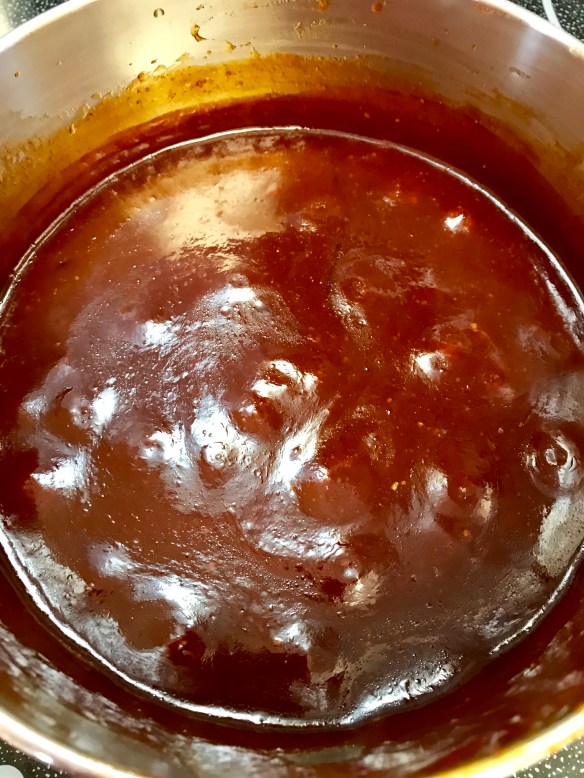
To make the KFC sauce, combine all ingredients in heavy bottom saucepan and stir until it comes to a boil.  Reduce heat and continue to stir occasionally until it reduces slightly and becomes somewhat like a syrup.  (Should take about 15 min) Remove from heat and allow to cool to room temperature.  This keeps well in the fridge for 10-14 days in a covered container.

KFC Sauce

Whisk buttermilk with cayenne pepper, nutmeg and thyme.  Refrigerate for at least an hour or up to 4 days to allow seasonings to permeate buttermilk.

Whisk flour and dry ingredients together.

If you have a deep fryer, set it to 350, if not use a heavy bottom, deep saucepan and about 8 cups of vegetable oil for frying.  If you don’t have a thermometer, stick a chopstick into the oil … if little bubbles form around the chopstick you are ready to go!

Put your buttermilk mixture, and your flour mixture into separate large bowls.

Toss handfuls of florets into flour mixture and shake off excess flour.  Using a slotted spoon, dip cauliflower into buttermilk and again, let excess drip off.  Roll wet cauliflower back in flour mixture again, to coat.  Place on plate.  Repeat until all florets have been coated.

In small batches, carefully place florets in hot oil.  Do not overcrowd your pot or the temperature will drop and the florets will stick together.  You don’t want either to happen!  Fry until golden brown, about 3-4 minutes.  Remove with slotted spoon to a paper towel line plate.

In large bowl toss fried cauliflower with about 3/4 cup of the KFC sauce until each is covered lightly and evenly.  Garnish with the green onions and serve immediately.

Prepare to be licking your fingers, looking for more, and already planning the next time you’ll make it.

Messy kitchen

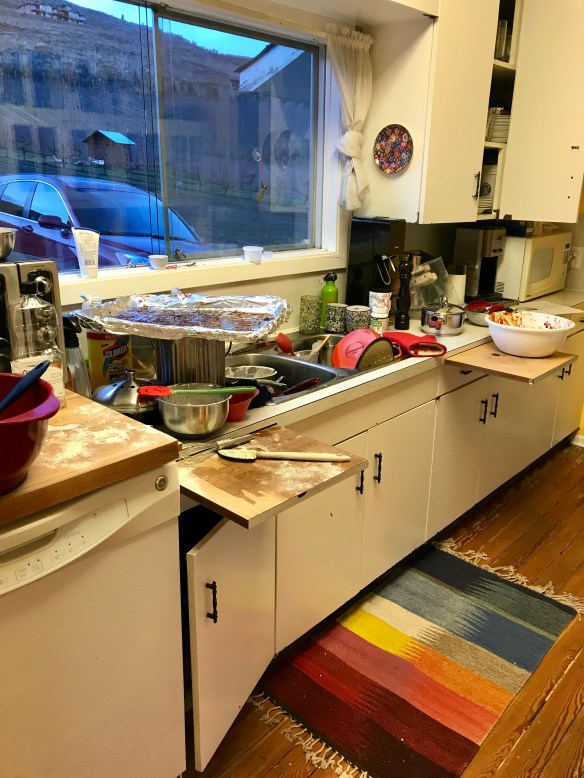
Sadly, this is what my kitchen looked like by the time I finished. Was it worth it?  You bet, a thousand times yes, and I’ll be doing it again soon.  (and, I have no idea why the reflection out the window looks more like an apartment building and not like the tomato field it is …..)

Pickled Mexican Vegetables

Pickled Veg

I don’t know if any dinner featuring the tastes of Mexico would be complete without this dish … in Mexico it is often found sitting on tables just waiting for you to nibble.

This keeps for weeks in your fridge and is a great accompaniment to sandwiches or burgers and always perfect for tacos.

Like many pickled recipes, this is just a guide.  Use whatever vegetables are fresh and ready at hand.  Today’s version included garden fresh cauliflower, zucchini, green & yellow beans, carrots and sweet Walla Walla onions.  Prepare vegetables in bite size portions, i.e., cauliflower florets, wedges of zucchini, carrots sliced on diagonal … you get the idea.  I like to prepare everything ahead of time, and have them ready on the cutting board so I can see the colours and shapes together to make sure it is a pretty picture.  (yep, I’m that weirdo)  If you like a bit of spicy kick, slice up a jalapeño or two as well.

Start by heating up some good olive oil, (a generous portion – more than you would normally use to sauce) sauté onions until soft.  Add garlic, carrot, and any veg you think might take a while to soften.  You are only looking for crisp tender as your finished product, not soft and overcooked veg.

Add:

2 1/2 cups white vinegar

1 tbsp salt

1 tsp cumin seeds

1 tsp peppercorns

1 tbsp dried mexican oregano

4 bay leaves

Simmer just until heated through and remove from heat.  Store in glass jar (or non reactive container) in the fridge for weeks!


Basil Chive Vinaigrette

Nothing smells like fresh basil – definitely my favourite herb.  Summer is the only time of year I make this vinaigrette, when the basil is plentiful and salads grace every meal.

Basil Vinaigrette 1

  • 2 garlic cloves, minced
  • 1 1/2 tbsp Dijon mustard
  • 2 tbsp honey
  • 1/4 cup red wine vinegar
  • 1 tbsp balsamic vinegar
  • 1 1/2 oz (45 g) fresh basil leaves (about 2 cups leaves)
  • 1/4 cup chopped fresh chives
  • 1 tsp salt
  • 1 tsp freshly cracked black pepper
  • 1 cup really good quality extra virgin olive oil

Blend all ingredients, except for the olive oil.  Give it a good whiz, until all the herbs are bright flecks of green, then slowly drizzle in the olive oil until creamy and smooth.

Basil Vinaigrette 2

I really think this needs either an immersion blender or food processor to get the consistency.  If you don’t have either, chop herbs very fine and whisk it all up.

This will yield about 1 pint jar, and I’d suggest trying it in a variety of ways …

Basil Vinaigrette 3

salad dressing   ~   vegetable dip   ~   blend with cream cheese for a spreadable bread topping   ~   toss with zucchini ribbons   ~   brush over grilled chicken or seafood


Red Wine Vinaigrette


Making your own salad dressings is so easy that it never makes sense to buy them!  Forget the packaged dressings and give it a try.  I made enough of this for our Family Reunion this year and it was a hit.  Remember to taste as you go ….. I ended up eating a lot of lettuce before I got the balance right – hard to do with such a large quantity.

P1110070

  • 1/4 cup red-wine vinegar
  • 1 tablespoon Dijon mustard
  • 1 teaspoon sugar
  • 1 garlic clove, minced
  • Salt and black pepper, to taste

Blend well, stirring until sugar has dissolved.

  • 1/2 cup extra-virgin olive oil

Slowly whisk in the olive oil until it is emulsified.

Variations:  This is my basic “house” vinaigrette …. and you can switch it up any way you like, during the summer I like to add in fresh herbs.


Creamy Buttermilk Ranch Dressing & Dip

This smooth, creamy and herb packed dressing packs a bunch of flavour into any salad – don’t use as much buttermilk and it doubles as a fan fave for vegetable dip (or chips, but who would do that????…)

P1090588

Served this year at the Wittal/Steli Family Reunion 2017, and it was a real hit.

1/2 cup sour cream

1/2 cup buttermilk

1/4 cup mayonnaise (use the best quality you can find)

2 minced garlic cloves

1 tsp kosher salt

1/2 tsp pepper

1 – 2 tsp fresh minced parsley

1 – 2 tsp fresh chopped dill

1 – 2 tsp fresh chopped basil

1 tsp dry mustard

1 tsp Worcestershire sauce

2 tsp freshly squeezed lemon juice

just a few dashes of hot sauce

Taste and adjust for seasonings ….. everybody has different condiments, and the level of freshness of your herbs will also affect the taste.  I think I went through a whole serving of salad dipping lettuce leaves in and adjusting for taste!


Blend everything together really well and allow to rest in the fridge for a couple of hours before using.  This keeps really well for a week or so in the fridge.