Unknown's avatar

About Chatty Kathy

Living in the beautiful Okanagan Valley in BC, we have an abundance of fresh food to cook with, and believe me, I do! We have 5 daughters, 3 grand daughters, and lots of honorary daughters ...I love cooking for family and friends and they all keep me busy in the kitchen. Here is hoping that this blog will allow my entire family to access those recipes they ask for, and maybe even enjoy a few travel photos!

Phnom Penh

Our first time to Cambodia, and we are loving it.  Until we arrived I didn’t realize we’ve been mispronouncing Phnom ….. that is not a silent P!!

pp6

The marathon travel is over!  Arriving in Phnom Penh and climbing into our first tuk tuk of many for our Asian adventure.

What a chaotic city.  Anyone who has ever travelled with us knows that we walk and walk and walk …. 5 blocks anyone??  Mexico City has often seemed challenging for walking, you are so often looking up, down and all around for obstacles.  Well, Phnom Penh is insanity compared to that!  At first we thought maybe they don’t have sidewalks, but technically they do ….. it’s just that their purpose is for parking, small businesses or restaurants and even scooter or motorcycle driving (in any direction).  In fact even in the lanes of the road, the direction of traffic is ONLY a mere suggestion.  Pedestrians, walk at your own risk!  Every time we crossed a street we breathed a sigh of relief.

pp3

If this was a video you would see that guys head swivelling in all directions as he tried to cross, at a crosswalk!  There is no way I even got a photo of us crossing or walking anywhere, just too perilous, each walk was dangerous ….

They do however, have a beautiful walk way along the Tonle Sap river which is wide, well lit and very busy.

pp14

Wats and feral cats everywhere!  I’ve never seen so many stray cats of every description. They don’t bother you at all though, certainly no begging for food or attention.

pp7

These salted snails cooked with lemongrass and lime leaves with chili are a very common snack. No, we didn’t try them …. always a wee bit leery of seafood sitting in the sun (plus Reid tried them and said the texture was off putting).  Well maybe that isn’t the word he used but you get the idea.

pp12

These mangos though!!!  Outstanding and so very plentiful.  We ate them in salads, for breakfast and just for snacks.

pp16

Love the way two different factions of buddhism are side by side in Cambodia.  They have a strong influence from both Chinese and Indian.

pp20

pp11

pp9

Always monuments!  This was in the centre of another pedestrian walkway.  It is obviously the only place for safety in activity as entire families were out there walking, joggers were jogging, badminton games and roller skating – the place for it all.

pp8

In order to recover from our arduous journey we went for a traditional Khmer massage.  Was it relaxing???  Not on your life it wasn’t.  Grant had plans to nap, as he usually does in a massage.  Not a chance of that happening as we both moaned and groaned and yelped throughout the entire hour.  (ever had a aThai massage? ha ha ha) By the time it ended we were absolutely glowing however, and enjoyed our relaxing cup of tea with the hand stimulator going.  Even two days later our calves were still tender from the experience, but we’d do it again!

pp5

Loved staying at Corner 9 Bassac Hotel …. an oasis in the middle of a very hustling bustling city.  The rooms were quiet and comfortable and it was great to have the pool to relax with.  Their breakfasts were the best we’ve had.

The best breakfast were delicious ….. they bring the ingredients for your noodle bowl and you put it together as you like.  The pork with rice had a dipping sauce that was a bit sweet, spicy and salty … so good.  And, have you ever had rice fresh from harvest?  It is incredibly tasty.

PP 22

We did go to the Genocide Museum in Phnom Penh.  This peaceful garden was once a secondary school before Pol Pot took over with the Khmer Rouge and their horrific methods of removing any citizens that were scholars, artists and effectively wiping out generations of Cambodians.  Cambodia is still struggling with recovery.  This is the only photo I took there, where it is now once again a peaceful garden with monks gathering alongside people coming to learn about the genocide that took place as well as pay respects.
pp4

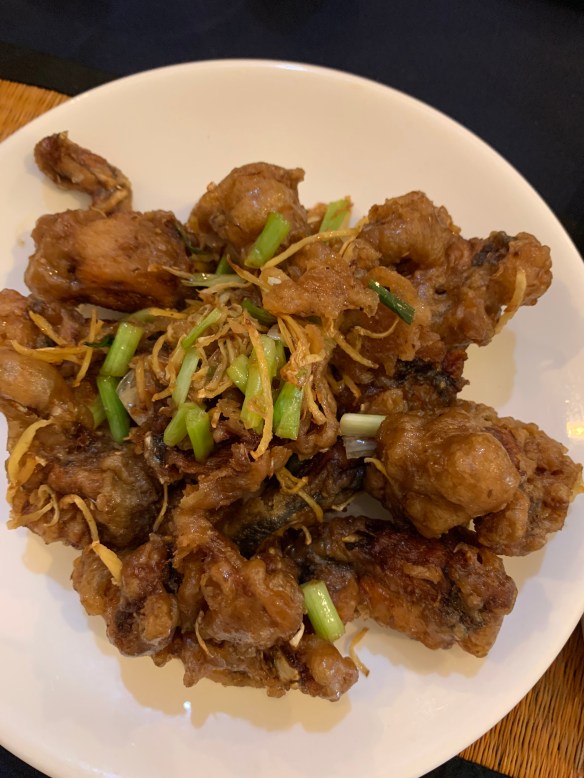
FROG!  and not just frog legs.  Marinated and fried, then tossed in a ginger lemongrass sauce that was finger licking good.  

PP1

Betel leaves wrapped around marinated beef with peanut dusting as well as a lime pepper dipping sauce.  The pepper is so fresh (grown in Kampot, Cambodia) which means it is fragrant and very tasty without being overwhelmingly hot.  Just look at all that pepper in the dipping bowl, and yet it wasn’t too spicy.

We ate at Mok Mony 3 times over our few days in Phnom Penh, it was that good.  The owner Peter was very entertaining, and I loved his philosophy.  Go ahead and order whatever you want to try, if you don’t like it (for whatever reason) he simply takes it back.  At the end of the night they reheat all the leftovers, make rice and serve it to the homeless.  This was our first taste of Cambodian food and we were immediately hooked. We actually hadn’t heard much about the Cambodian food culture like we do for Thailand and Vietnam so this was a real bonus in our books.


pp17

The streets around the Royal Palace are for pedestrians only, and you will be sure to spot plenty of monks around.

pp19

This old colonial building is for sale or rent ….. just a wee bit of a fixer upper.

pp13

This old abandoned building has been taken over by squatters, and is full of families.

Phnom Penh has been great, a busy hustling and bustling city that was our introduction to Cambodia.  Now on to smaller areas as we make our way up to Siem Reap.
 

Moist Delicious Corn Bread

corn bread 2

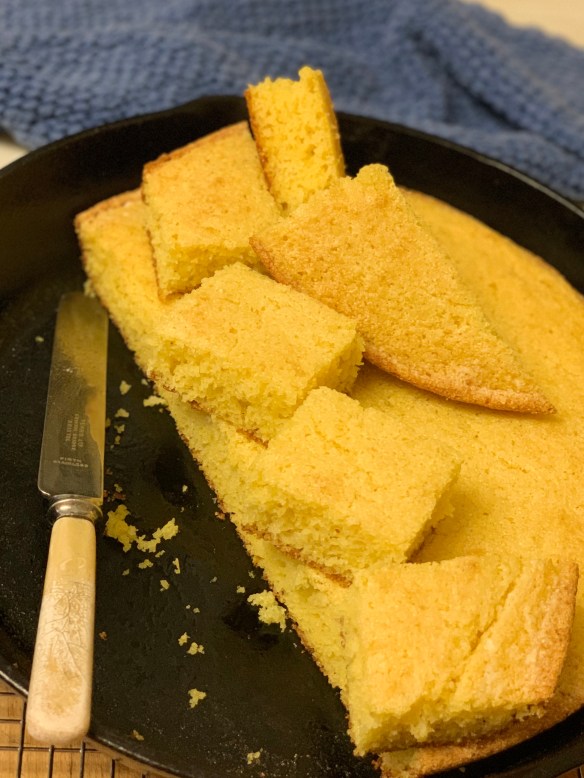
Easily the quickest of quick breads, moist and tender …. this is absolutely delicious and one you must try.  Just another fantastic use for your cast iron skillet.  Serve this alongside some hearty chili or stew and you’ll have such a comforting meal.

  • 1 1/4 cups cornmeal
  • 3/4 cup all purpose unbleached flour
  • 1/4 cup sugar
  • 1 tbsp baking powder
  • 1 tsp baking soda
  • 1/4 tsp salt
  • 1 1/3 cups buttermilk
  • 2 large eggs, lightly beaten
  • 8 tbsp unsalted butter, melted
  1. Preheat oven to 425 and place a 12 inch cast iron skillet in to heat up while you make the batter.
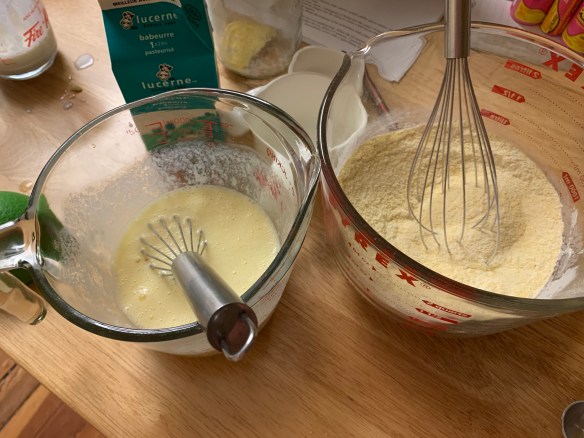
  2. In a large bowl whisk together the dry ingredients.  In a separate bowl whisk up the buttermilk, eggs, and 7 tbsp of the melted butter.
  3. Reduce the oven temperature to 375 and remove the skillet.  CAREFULLY … remember it is hot.
  4. Coat the skillet with the remaining tbsp of melted butter.  Pour the batter in the skillet and place it in the oven.  Amazing to watch …. it right away starts to puff up around the edges.
  5. Bake for 20-25 minutes until firm, and a tester comes out clean.  Let cool for 15 minutes before serving.
corn bread 3

This comes together so quickly – whisk up dry and wet ingredients separately and then quickly combine them.  Stir until you don’t see any lumps, but don’t over mix the batter.

Corn bread 4

As soon as the batter hits the hot pan it starts to smell amazing and I loved the way it puffed up around the edges of the cast iron.

Corn bread 1

It might be difficult, but let it sit for 15 minutes after removing from the oven.  Still warm enough to melt butter but holds together like a dream ….. try it, and I bet you love it.

Have you checked out http://www.jocooks.com ??  I got this recipe from her blog and it is most assuredly the best cornbread I’ve tried.  In fact, I think every recipe I try of hers I love!

Buttermilk Ranch Dip or Dressing

Veg

Vegetables first!  The kids absolutely love a big platter of fresh vegetables, but this ranch dressing really makes it a favourite.  Ready for them to arrive from the ski hill today and this platter will disappear in minutes.

This is the best creamy dressing to have on hand for those hungry moments. .. … or when the kids are arriving home from school or the ski hill.  In general, we prefer vinaigrette’s for salad dressing, but this is so comforting and delicious we love it too.

  • 1/3 cup mayonnaise
  • 1/3 cup sour cream
  • 1/3 cup buttermilk (you could use regular milk but I like the tang from buttermilk)
  • 1 tsp dill weed
  • 1/2 tsp each dried basil, oregano & parsley (in the summer of course fresh is best)
  • 1/2 tsp garlic powder
  • 1/4 tsp onion powder
  • 1-2 tsp lemon juice (according to your own taste)
  • salt and pepper to taste

Give the whole thing a good mix and allow to sit long enough for all the seasonings to fully wake up and join the party.  This is perfect as a dip, for a salad dressing I would thin it out a bit with either a bit more buttermilk or even a touch of water.


Beer Bread

Beer Bread 1

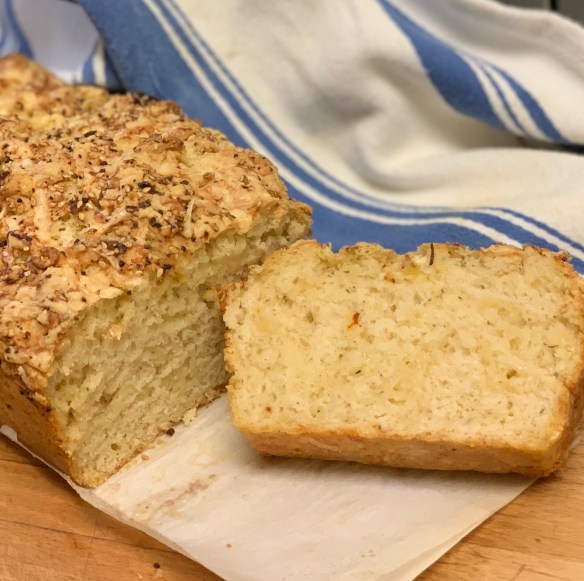
Today I created an extra crunchy crust …… first the melted butter, then sprinkled on some grated aged cheddar, and topped with the seasoned sesame seed mixture left from the dregs of the nuts and bolts mixture I made this Christmas – Y U M

This is the easiest, simplest quick bread!  The most difficult part of making this bread is waiting for it to come out of the oven while amazing smells are drifting through the house …..

  • 3 cups all purpose flour
  • 3 tsp baking powder
  • 1 tsp salt
  • 1/4 cup sugar
  • 1 can or bottle of beer
  • 1/4 cup melted butter

Preheat oven to 375 degrees.

Sift dry ingredients together and stir in 1 12 ounce bottle or can of beer – stir just until it all comes together and turn into a greased 9 x 5 inch loaf pan.  (I like to line the pan with parchment paper – it makes it so easy to lift out of the loaf pan.).

Drizzle the melted butter over and bake.

Bake for 1 hour until a tester comes out clean.

Rest for 10 minutes before removing from loaf pan, then let sit for at least 15 minutes before cutting.

Beer Bread 2

Aged white cheddar and Italian seasoning added today.


You can mix this up however you like – add in herbs, grated cheese or some seeds.

My cousin Vivian used dried dill weed in the flour mix, and put olive oil on top … try it!

I’ve had people ask if you can use soda instead of beer ….. not unless you add 2 tsp (or 1 packet) of instant yeast.  It is the beer that helps the bread to rise and not be a heavy lump of dough!

Did you know that you should sift your flour, and SCOOP (using a spoon) into your measuring cup instead of scooping with your measuring cup?  This helps make your flour lighter and in turn, your bread lighter.


Yams with Miso Tahini Sauce

Slow roasting yams bring them to another flavour level entirely!  The skin gets lightly charred in spots, and the insides get creamier and smoother than ever.  Normally I love yams with just a simple touch …. butter, salt and pepper.  Lately I’ve been seeing recipes for a version that included a Miso Tahini dressing in place of the butter.  Given that I love all three ingredients, I decided to give it a taste test.  Instant winner – so delicious.

Miso Tahini

I had some cilantro around so tossed a bit of that over top as well.

How easy is this?  Dead simple.

Mix with a fork in a small bowl until smooth.

  •  2 Tbsp. tahini
  • 2 Tbsp. miso (I used white)
  • 2 tsp. rice vinegar
  • 1 Tbsp. water
  • 1/2 tsp sesame oil

Garnish:

  • thinly sliced scallions
  • toasted sesame seeds

Wash and poke yams with a fork.  Give them a little love by massaging them with olive oil – season with salt and pepper.  Cook yams at 375 degrees until super soft and lightly charred.  (how long will depend on the size, have you ever noticed the variance??). You could also cut them into a few irregular pieces, toss in olive oil and bake on a tray, which would be faster.  Count on at least an hour though.

When deliciously soft, split open, season again with salt and pepper – scoop on the sauce and sprinkle over the scallions and sesame seeds.  Absolutely satisfying.

Candy Cane Sugar Cookies

Just in time for Christmas!  I bought a small bag of crushed candy canes at Bulk Barn, probably about $2.00 worth …. thinking it would be great for decorating the sugar cookies we make every year.  Well, Sloan had a different idea and decided they should go in the cookies, so that’s what we did.  What a hit!

Peppermint cookies 1

  • 3/4 cup soft butter
  • 1 cup white sugar
  • 2 beaten eggs
  • 1/2 tsp vanilla
  • 2 1/2 cups all purpose flour
  • 2 tsp cream of tartar
  • 1 tsp baking soda
  • 1/4 tsp salt
  • 1/4 cup crushed candy canes

Preheat oven to 375 degrees.

Cream together butter and sugar.  When light and fluffy add in eggs and vanilla and beat until creamy and smooth.

Sift dry ingredients together and stir into butter mixture.  It will be a stiff mixture, so you may end up using your hands, we usually do.

Last, stir in the crushed candy cane.

Knead lightly until you have a workable dough, then cover tightly and put in the fridge for at least an hour.  (you can do this days ahead or even freeze it at this stage)

Roll out dough on lightly floured board and cut into desired shapes.

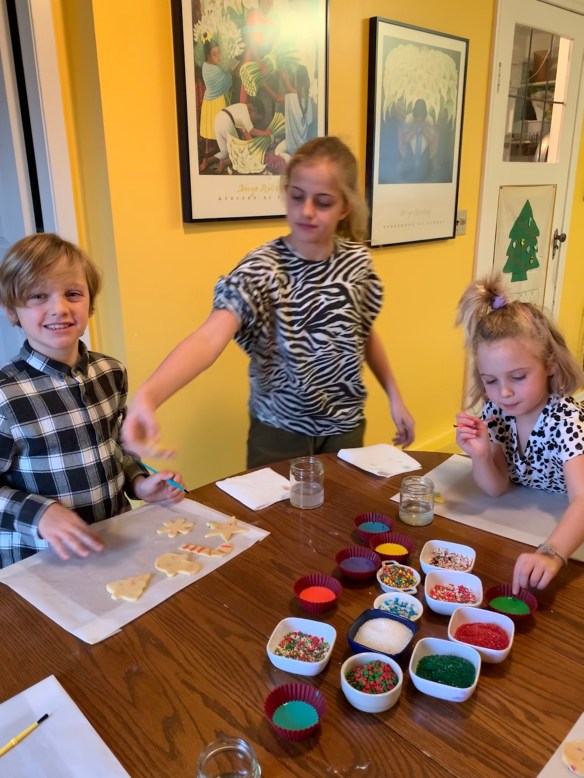
We always decorate our cookies before baking them, in place of the added sugar you get with decorating with icing.

I used to use raw egg, but find I get better results using evaporated milk and gel food colouring.  Just put a little milk in a cup and stir in enough food colouring to get the colour you want.

Bake at 375 for 8-10 minutes, watching carefully – every oven is different.


peppermint cookies 4

Get your kids involved!  Sloan is 9 and has been rolling and cutting dough for years now.

peppermint cookies 2

So many fun sugars and sprinkles available now for decorating the tops.

Peppermint Cookies 3

We do a  cooking class on Fridays – these four work so well together, and we have a great time with Pearl and Leo joining Sloan and Stella.

peppermin cookies 3

Each of the kids made their own dough & we baked up two batches – each family got to take one batch home for baking another day.

Peppermint cookies 5

Pearl has this tray ready to go in the oven, love all the vibrant colors.

Peppermint cookies 7

The most important part is taste testing ….


Stay tuned – more cooking classes to come!


Flour Tortillas with bacon fat

Flour tortillas 1

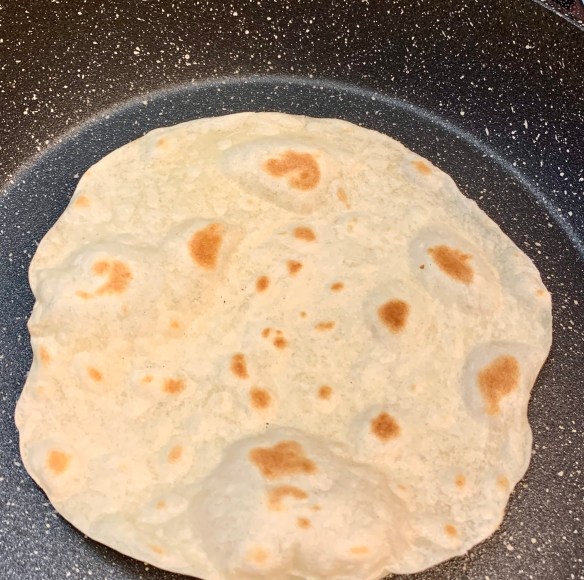
Sunday dinner.  Warm, fresh tortillas. Life is good.

Yes, that’s right.  BACON FAT.  So good, you will wonder why you haven’t done it before.  In Mexico pork is featured in so many ways, all good.  (Ever had carnitas??). Well, these tortillas are so darn good Stella told me that I needed to get them on the blog right away, as this is the 2nd time (in her 6 L O N G years) that she has been instrumental in the whole rolling/cooking process and if a 6 year old can do this – so can you!  Effort vs reward is huge.  Stella gets the rolling going and Sloan (at 9) is in charge of the stove and cooking them.  They both know just when to turn the tortillas with the right amount of bubbling and browning going on.

SO EASY!

  • 3 cups all purpose flour
  • 1 1/2 tsp salt
  • 1/4 cup bacon fat (cold)\
  • 1 cup warm water

Stir flour and salt together, then work in the cold bacon fat with your fingers.  Slowly add the water and work until a cohesive dough forms.  Not sticking together?  Add a bit more water.  Too sticky?  Add a bit more flour …. You get it.  Knead until you have a soft but firm dough – cover and allow to rest for 30-60 minutes.  (or as long as you need it to)

Divide this into 12-14 pieces and roll into balls.  Let sit for a few minutes to allow the dough to rest – this makes it much easier to roll.  (keep covered)

Roll until super thin – and cook on a dry hot skillet.  Every stovetop is different and you may sacrifice the first couple to the frypan, but thats okay, once you realize your perfect temperature you are good to go.

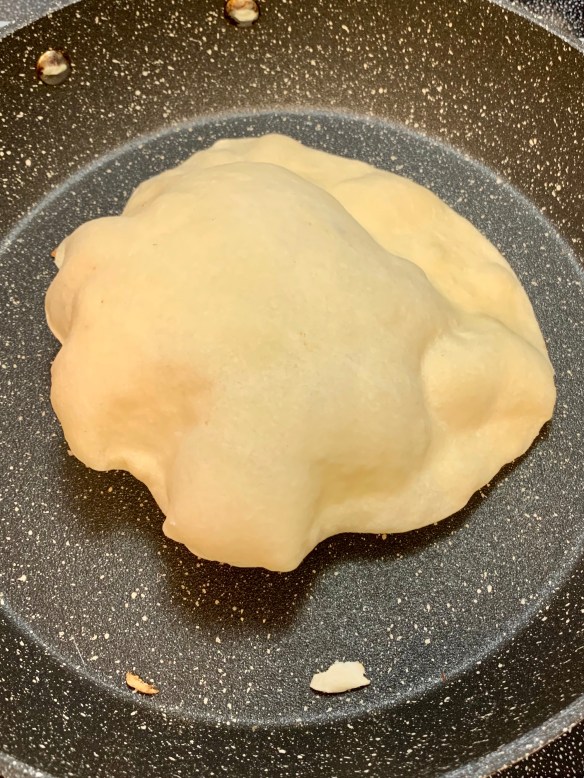
Cook for approximately 1 minute on the first side and you will see bubbles form.  Only flip when you peek underneath and see brown spots appearing.  Flip it over and continue cooking until you get more of those lovely brown spots.  On my stovetop (flat ceramic) I can’t cook it higher than 5 (or medium) otherwise things burn before cooking through but experiment with your own surface.

Keep warm in a covered container as the steaming also helps with the cooking process.

This recipe serves 6.  If you aren’t feeding 6, then just keep the dough in the fridge and pinch off enough to make yourself a couple tortillas a day!

Flour tortillas 3

Stella is 6 and she’s already done this a couple of times, at her insistence this recipe is going on the blog so we all remember it.  Big sister Sloan is making the guacamole in the background before stepping over to the stove to keep the cooking going.

Flour tortillas 4

Just look at those bubbles forming – we all get excited!  (yes, I know, kitchen geeks)

Flour tortillas 2

This is exactly what you are looking for.  Heaven in a wrap.

Tonight we served carne asada with these tortillas, and it was amazing.

Honestly …. you really don’t like pork?  (sorry Meg & Amy). Use store bought lard or shortening.

Apple Crumble Muffins with Vanilla Glaze

If you are looking for a quick weekend baking project with a little sweetie, this is perfect!

Apple crumb muffins 1

Moist and delicious, these muffins are fantastic.  That crumb topping tho ….. :o)

Crumble

  • 1/3 cup packed brown sugar
  • 1 tbsp white sugar
  • 1 tsp ground cinnamon
  • 1/4 cup unsalted butter, melted
  • 2/3 cup all purpose flour

Muffins

  • 1/2 cup unsalted butter
  • 1/2 cup packed brown sugar
  • 1/4 cup white sugar
  • 2 large eggs
  • 1/2 cup Greek yogurt
  • 2 tsp pure vanilla extract
  • 1 3/4 cup all purpose flour
  • 1 tsp baking soda
  • 1 tsp baking powder
  • 1 tsp cinnamon
  • 1/2 tsp salt
  • 1/4 cup milk
  • 1 1/2 cups peeled, chopped apple

Vanilla Icing

  • 1 cup powder icing sugar
  • 3 tbsp cream
  • 1/2 tsp pure vanilla extract

Ingredients:

  1. Make the crumb topping: In a medium bowl, combine both sugars, the cinnamon, and melted butter. Using a rubber spatula, stir in the flour. The crumb topping will be thick and crumbly. Set aside.
  2. Preheat oven to 425°F (218°C). Spray a 12-count muffin pan with nonstick spray or line with cupcake liners. You may need a 2nd pan as this recipe makes up to 14 muffins, though you can always bake in batches using 1 pan. Set aside. *See note about jumbo size muffins.
  3. Make the muffins: Using a handheld or stand mixer fitted with a paddle attachment, beat the butter and both sugars together on high speed until smooth and creamy, about 2 minutes. Scrape down the sides and bottom of the bowl as needed. Add the eggs, yogurt, and vanilla extract. Beat on medium speed for 1 minute, then turn up to high speed until the mixture is combined and uniform in texture. Scrape down the sides and bottom of the bowl as needed.
  4. Whisk the flour, baking soda, baking powder, cinnamon, and salt together in a medium bowl. Pour the dry ingredients into the wet ingredients, add the milk and apple, and mix on low speed until everything is combined.
  5. Spoon the batter evenly into each cup or liner, filling each all the way to the top. Press a handful of the crumb topping into the top of each; crumble it with your hands to make some big chunks.
  6. Bake for 5 minutes at 425°F (218°C) degrees, then keeping the muffins in the oven, lower the oven temperature to 350°F (177°C) and bake for 15-17 more minutes or until a toothpick inserted in the center comes out clean. The total time these muffins take in the oven is about 20-22 minutes.
  7. Make the icing: whisk all of the ingredients together and drizzle over warm muffins.
  8. Muffins stay fresh stored at room temperature for a few days– then transfer to the fridge for up to 1 week.
apple crumb muffins 2

3 year old Liv is the best helper!  So glad we could do a little baking together while she was here.

apple crumb muffins 3

How can you not love such a cute little helper?

Have you tried the website:  Sally’s Baking Addiction?  I’ve tried a few recipes and they are all great, this one came from her – let me know if you try it.  Or better yet, let Sally know!!

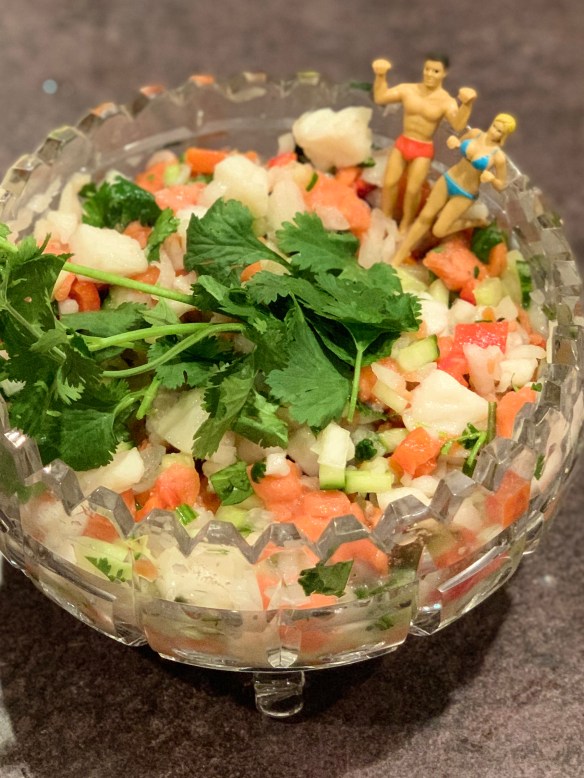
Ceviche

Step 1

In a 1 1/2-quart glass or stainless steel bowl, combine the fish, lime juice and onion. Use enough juice to cover the fish and allow it to float freely; too little juice means unevenly “cooked” fish. Cover and refrigerate for about 4 hours, until a cube of fish no longer looks raw when broken open. Drain in a colander.

Step 2

In a large bowl, mix together the tomatoes, green chiles, cilantro, olives and optional olive oil. Stir in the fish and season with salt, usually about 1/2 teaspoon. Add the orange juice or sugar. Cover and refrigerate if not serving immediately. Just before serving, gently stir in the diced avocado.

Make Ahead

Working ahead: The fish may be marinated a day in advance; after about 4 hours, when the fish is “cooked,” drain it so that it won’t become too tangy. For the freshest flavor, add the flavorings to the fish no more than a couple of hours before serving.
This recipe came courtesy of my Food and Wine Magazine – another superb recipe from Rick Bayless.

Empanadas

Most cultures have a pastry/hand pie like this one ….. empanadas are famous in many countries, but I’ve only had the pleasure of eating them in Mexico so that is what I have fashioned these after.  They can be deep fried, but I prefer baking them for fluffy, flaky pastry and creamy filling.  Extra bonus points for the way your house smells while they are baking!

Empanada 1

In today’s version I used chicken, onion & red pepper, topped with a chunk of jalapeño havarti.  The tomatillo salsa was delicious for dipping!

Empanadas are such a treat.  These will give you flaky pastry, and a creamy tasty filling.

Make sure when you roll out your dough that you do it a little thinner than you would for a pie – you want to make sure you have a good ratio of filling to crust.

Empanada 2

Saute onions and garlic until softened, then add red pepper and cook for only a couple more minutes.  Stir in cooked shredded chicken and season to taste.  In this version, I added a couple of tablespoons of tomatillo salsa, and then topped with jalapeño havarti cheese for an extra bit of kick and creaminess.

Other suggestions for empanada filling:

  • ground meat seasoned with taco spices, topped with Oaxaca string cheese
  • leftover pulled pork and pickled red onions
  • wilted spinach, sautéed mushrooms and feta cheese
  • go sweet with fruit, cinnamon and a bit of vanilla

I’ve included my pastry recipe here, but if you aren’t into making your own pastry go ahead and use a prepared frozen pie shell.  Just take it out and roll it a bit thinner.

Cut your pastry into rounds, brush beaten egg around the outside and then put about a tablespoon or two of filling in the middle, add some cheese on top.  You will want enough filling so that your ratio of stuffing to pastry is tasty.  Fold edges up together and press to seal.  Set them on a baking sheet and pinch/crimp the top to make sure it is well sealed.

Brush beaten egg over the top of the sealed empanada, and then poke a hole so steam can escape and the pastry doesn’t leak too much of your goods outside the shell.

Bake at 375 for 25-30 minutes until golden brown.  You can also freeze them on a cookie sheet at this point and bake later, from frozen.  Just bake a little longer.

Empanada 3

Oh, these were G O O D.  Before baking season the tops with salt and pepper.

Everybody loves flaky pie crust – but people are divided on whether to use shortening, lard or butter.  Through trial and error, I think I have found the best of them all – by combining lard and butter.  Try it ….. so light and flaky – you will love it.

  • 1 egg
  • 1 tbsp vinegar
  • 3/4 tsp salt
  • 3 cups white flour
  • 3/4 cup cold vegetable lard or (if you prefer) shortening
  • 3/4 cup cold butter
  • 5 tbsp very cold water
  • Lightly beat egg and vinegar

Whisk flour and salt

Using a pastry blender or 2 knives, cut in lard/butter until pea sized.  Add very cold water to egg and vinegar mixture.  Make a hole in the center of the flour blend and stir in the egg/vinegar/water combination.  Work just until pastry comes together – adding slightly more liquid if it doesn’t, and if it is too wet, add a wee bit more flour.  Work together just until it all comes into a solid mass.  Knead very lightly on floured surface.  Wrap tightly and put in the fridge for at least 40 minutes.

Roll on lightly floured board until just thin enough to use for pie dough.

This recipe makes enough for 1 smaller pie (top and bottom) or a large deep dish pie crust bottom.