Gazpacho, Morelia style

The gazpacho we encountered in Morelia was unlike anything we had tried before.  Certainly not cold tomato soup.  We loved that each bite hit all the notes we were looking for; sweet, sour, spicy, salty and refreshing.  Versatility is key here, and in my opinion, so is hand chopping the fruit and vegetables.  Sure, a food processor would make short work of it all, but you might not get such great flavour in every spoonful.

mercado-frutas

We first tasted this in Morelia, Mexico – where everything is fresh and delicious!  Even at home though, we have loved the refreshing dish.  Try serving it in small dishes as a palate cleanser for a Mexican fiesta ….

Everything finely diced:

2 cups jicama

2 cups cucumber

1 cup watermelon

1 cup mango

1/2 – 2/3 cup red or white onion

I say 1/2 – 2/3 cup of onion because it will depend on how pungent your onion is, and how much you love onion flavour, play with it.

1 tsp chile flakes

1/2 tsp salt

juice of 1 lime

juice of 1 orange

Stir this all together, and taste!!!  Every little bit of fruit and vegetable should be in each bite and you should love the way it all comes together.  If not – adjust!

gazpacho-morelia-style

As you can tell, this is no small bite!  – Small version in the market in Morelia.


Pizza Pockets & Hand Pies

fullsizerender-6

Following is the recipe for a basic, soft and easy to work with dough.  I used this recipe for making pizza pockets for my granddaughter Sloan’s first week of Grade 1, and then turned leftover dough into meat hand pies for 93 year old Auntie Elsie, who is kind of tired of cooking these days. Leftover dough you say???  Well I didn’t think 8-10 small pizzas would give me enough dough so I doubled the recipe … which yielded 25 pizza pockets, 10 hand meat pies and 1 pizza for our dinner.  Significant yield!!!

Pizza Crust: (makes 8-10 small pizzettas)
Ingredients:

  • 750 g white flour (use Tipo ’00 flour if you can or a strong bread flour)
  • 200 g semolina flour
  • 2 ½ cups lukewarm water
  • 2 tsp. sugar
  • 1 Tbsp. (or 1 x 8 oz packages) yeast
  • 2 tsp. sea salt
  • 3 Tbsp. olive oil

Directions:

  1. Place your flour(s) and sea salt in a large bowl and whisk together. Create a well in the center.
  2. In a large measuring cup, mix together your lukewarm water and sugar until the sugar dissolves. Sprinkle in the yeast and let it sit for approximately 5 minutes, until the yeast starts to ferment.
  3. Pour the water/sugar/yeast mixture into the well along with the olive oil and stir together with a fork or large spoon until it is well mixed. Once it becomes too difficult to mix together with your fork or spoon, sprinkle extra flour on the dough and your hands and mix with your hands until the dough comes together in a ball.
  4. Place the dough on a well-floured flat surface and knead, pushing the dough using the palms of your hands, for approximately 10 minutes, until the dough looks smooth and stretchy. You may need to add extra flour as you go, being careful not to add too much to keep the dough from being too stiff.
  5. Place the ball of dough in a large bowl coated with olive oil, dust the top of the dough with flour, and cover with a clean dish towel and place in a warm draft-free area for about an hour, until the dough has doubled in size. Punch the dough down.  At this point you can either refrigerate the dough overnight (or up to 2 days, covered with plastic wrap and occasionally punched down) or divide the dough into 4-6 portions (depending on how big you want your pizzas).  I highly recommend making your dough in advance and letting it sit in the fridge as the longer ‘proof’ really makes a difference.   Ensure that your pizza dough comes to room temperature before cooking (bring it out of the refrigerator 1-2 hours before you are ready to cook).
  6. Once ready to cook, heat your oven to the highest heat setting (500F for most ovens) and place your pizza stone in the oven for at least 20 minutes.
  7. Portion the dough into 8-10 balls and place on a well-floured surface. Using your hands, with your knuckles, (dusted with flour, along with the counter to prevent the dough from sticking) form your pizza crust 15-20 minutes before cooking your pizza on a flat surface dusted with semolina flour until it is nice and thin. Keep stretching it with your hands to make a flat pizza base (it doesn’t have to be round or perfect!).
  8. Remove the pizza stone from the oven, lay your rolled dough on the stone, and add your ingredients ….

If you are using this dough for pizza pockets or hand pies, after step 5 skip to step 7 and form circles of dough.

img_9494

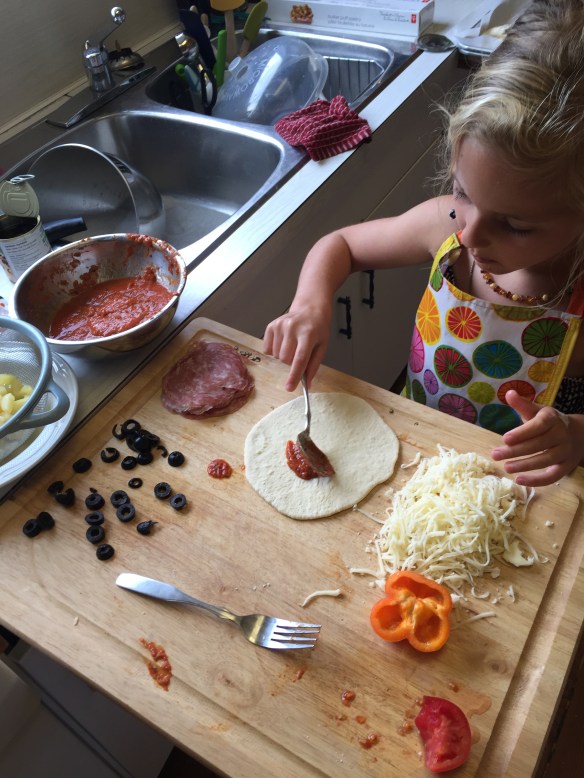
For pizza pockets, layer on pizza sauce, your chosen ingredients and cheese, closing the pockets with a fork.  Make sure to prick the top surface with the fork so steam can escape.

img_9496

img_9498

img_9504

img_9503

For the meat pies I used an ice cream scoop to get a consistent amount of the meat mixture – centered on the dough, and then brought up the edges to crimp over the middle of the circle.  Brush with beaten egg and poke with a fork.

Bake pizza pockets or meat pies at 400 until golden brown, about 20 minutes.

FILLING FOR MEAT PIE

1 onion, minced finely

1 garlic clove, grated

2 carrots

2 stalks celery

1/2 cup each frozen corn and peas

1 small zucchini, diced

1 lb ground beef

1 tbsp each dried oregano and basil

Saute the onion and garlic until the onion is lightly carmelized, add the carrots and celery, season with salt and pepper, and cook until vegetables are almost cooked through, then add zucchini and saute for another few minutes.  Remove from heat and place in bowl.  Add frozen corn and peas.  Return pan to heat and stir in ground beef – cooking until lightly browned, seasoning with salt and pepper.

Add beef to vegetable mixture and season with dried herbs, adding more salt and pepper if needed.  At this point, if you feel like it needs a bit more flavour, add 1 tbsp of tomato paste.  Stir well and set in fridge to cool down.  When cool, continue on with forming your hand pies.

These pies are only limited by your imagination – use whatever you feel like to fill the pies, making sure to taste the mixture before filling the dough rounds.  Made in a smaller size they make a great appetizer too.

Lamb Meatballs with Tomato Olive Sauce and Mint

lamb meatballs


These meatballs are tender and delicious – the sauce is rich and that mint sauce is a perfect taste to brighten it all up. If you aren’t a big fan of lamb, then use minced pork.

You could buy lamb merguez sausage to make these meatballs, but if that isn’t available to you, this is an easy fix and tastes amazing.

1 pound lean ground lamb

1 tsp salt

1/4 tsp fennel seeds

1 tsp ground cumin

1/2 tsp cinnamon

1/2 tsp ground coriander

1/4 tsp turmeric

3 cloves minced garlic

2 tbsp harissa

1 tbsp tomato sauce

Grind salt and fennel together until smooth, then add the rest of the spices and stir together.  Add in garlic, harissa and tomato sauce to make a paste.  Lightly toss paste with ground lamb, until well blended.

For the best flavour, allow to sit over night but they are great if made into meatballs right away too.

Form balls about 1″ in diameter.  Heat oil until shimmering, then cook meatballs until just crispy on the outside and


Meanwhile ….. on roasting pan in moderate oven (375) toss in olive oil:

3 tomatoes, chopped

1 onion, chopped

3 garlic cloves

1/2 cup black olives


Roast until vegetables are tender, and blend with enough olive oil to make a smooth sauce.  Season to taste with salt and pepper.

Toss meatballs with tomato sauce and serve with mint sauce.

Mint Sauce

Blend fresh mint leaves with a drizzle of honey, freshly squeezed lemon and olive oil just until smooth – season to taste with salt.

Olive Tapenade

If you love olives …. why haven’t you tried tapenade?? This is more simple than you can even imagine, and absolutely delicious.

pretty hard to make a pile of minced olives look good …… but try it out and taste it, you will love it - every taste is packed with flavour

pretty hard to make a pile of minced olives look good …… but try it out and taste it, you will love it – every taste is packed with flavour

1/2 pound olives (go ahead, mix it up – kalamata, green, stuffed, whatever you have on hand)
2 anchovy fillets (rinsed)
1 small clove garlic, minced
2 tbsp capers
1 tbsp fresh lemon juice
2 tbsp really good quality extra virgin olive oil
1 tbsp each fresh parsley and basil, chopped

Toss it all into a food processor and whiz it up – taste and season with salt and pepper.

Serve with crackers, fresh baguette, or crisp pita triangles.

Tomato Thyme Bacon Tart

Fresh garden tomatoes and thyme combined with bacon and cheese

Fresh garden tomatoes and thyme combined with bacon and cheese

Nothing screams summer like tomatoes! This tart is quick and easy to make, allowing the tomato to be the star of the show. Today’s tart was made with heirloom tomato – such a big tomato that it only took 3 slices along with a few cherry tomatoes to fill in the gaps.

This works amazingly well as either an appetizer or side dish.

Roll out 1 thawed puff pastry sheet in to 10 x 14 rectangle on lightly floured surface. Transfer to parchment lined baking sheet.

Sprinkle on 1 1/2 cups cheese (gruyere, gouda and cheddar are good choices). Leave a 2 inch border on the long sides……

Crumble cooked, crumbled bacon over the cheese (4 slices)

Slice tomatoes and layer across bacon/cheese.

Sprinkle with fresh thyme, salt and pepper.

Fold the long sides over to create a border, and fold in the short ends to create a seal.

Using a sharp knife, cut vent holes in the pastry and brush with beaten egg.

Bake at 400 until golden brown, about 30 minutes.

Sprinkle with fresh basil for serving.

Hot Layered Bean Dip

I know, we all have a layered bean dip recipe …. but this one is hot, creamy and delicious! Serve it with taco chips or toasted pita chips. Thanks to Lorellei for sharing this one – a brilliant addition to Sloan’s 5th birthday party.

Any time you have a crowd to please, go for this hot bean dip!

Any time you have a crowd to please, go for this hot bean dip!

1 tin refried beans
2 avocadoes (soft and ripe)
juice of 1 lemon
1 tbsp hot sauce
1/2 cup sour cream
1/2 cup mayonnaise
1 tsp chili powder
1 tsp cumin
1 crushed garlic clove
1 tsp paprika
1 tsp salt
1 tsp pepper
3/4 cup grated cheddar
3/4 cup grated mozzarella
1/2 cup sliced green onions
1/3 cup cilantro, chopped
1/2 cup pitted kalamata olives, halved

Grease a 9 x 11 baking/serving dish.
Spread out beans on the bottom of dish
Mash avocado, lemon juice and hot sauce – spread on top of bean layer
Mix sour cream, mayonnaise, garlic and spices – spread over avocado layer
Mix cheeses together and sprinkle over sour cream layer
Top with halved olives, then scatter with green onions and cilantro

Bake at 350 for around 25 minutes, until cheese is golden, bubbly and looking delicious.

This can be made ahead of time and kept in the fridge until ready to heat.

Crab Cakes with Horseradish Aioli

Crab cakes are one of our favourite appetizers to get when eating out …. this is an easy to create appetizer at home, or make slightly larger – serve with a great big tossed salad – amazing bread, and you have a complete meal.

Delicious crab cakes, served with horseradish aioli.

Delicious crab cakes, served with horseradish aioli.

1/4 cup mayonnaise
1/4 cup finely sliced green onions (green and white bits)
2 eggs, beaten
1 tsp Worcestershire sauce
1 tsp dry mustard
1/2 tsp sea salt
1/2 tsp cayenne pepper
Blend well together, and gently stir in:
1 pound lump crabmeat (take care to pick through it to make sure it is shell free)
1/4 cup panko bread crumbs

In separate bowl combine:
3/4 cup panko bread crumbs
1 tsp Old Bay seasoning
1 tsp dried Italian seasoning
Sprinkle of salt and pepper

1 pound of crab meat should make about 16 small cakes (appetizer size) or 8 larger cakes.

Form crab meat mixture into balls, and press each ball into the panko crumbs to coat.

Set aside in fridge to allow them to set up.

The crab cakes can be done to this stage, and kept in fridge until the next day.

Heat fry pan, and add 2 tbsp butter, 2 tbsp vegetable oil. When foam has subsided, add crab cakes and heat through for 2-3 minutes per side, flipping gently. Do not crowd the pan, fry in batches if necessary.

Horseradish Aioli

1 cup good quality mayonnaise
1 tbsp dijon mustard
1 tbsp balsamic vinegar
1 tbsp horseradish
1/2 tsp smoked garlic powder (or roasted garlic)
1 tbsp freshly squeezed lemon juice

Blend all ingredients well, and allow to sit in the fridge so that the flavours develop.

Serve crab cakes with aioli, sprinkled with a few cilantro sprigs.

Shrimp Cocktail

I love shrimp cocktail, and this version puts lots of flavour into the shrimp as well as the cocktail sauce – sure to be a hit at your next dinner or appetizer party.

Make sure to use raw shrimp and poach them in this broth - it really does make a difference.

Make sure to use raw shrimp and poach them in this broth – it really does make a difference.

Poach the shrimp:
3 cups water
1 cup your favourite white wine (preferably crisp, light, fruit – think pinot grigio)
juice and zest of 1 lemon
1 onion, sliced
2 cloves garlic, sliced
2 bay leaves
2 tsp kosher salt
1 1 pound bag of frozen RAW shrimp

Put all ingredients, save the shrimp, into a medium saucepan and bring to a gentle boil – allow to simmer for about 20-30 minutes to allow flavours to develop, and then turn to a gentle simmer. Add the shrimp, cover with a tight fitting lid and turn off the heat. Let sit for 10 min. Remove shrimp and allow to cool.

COCKTAIL SAUCE

1 cup ketchup
1/2 cup horseradish
1 tbsp soy sauce
1 tbsp Worcestershire sauce
juice and zest of 1 lemon

Combine all sauce ingredients and allow to sit

Serve shrimp with cocktail sauce and sit back to enjoy the compliments – way better than any shrimp cocktail you buy!

Nuts and Bolts/Bits and Bites

nuts and bolts 4

Whatever you use here is up to your families interests!  This year we made it peanut free for Liv, who is allergic, but pecans, cashews and coconut flakes added lots of interest.

This is our families favourite savoury Christmas treat … we only make it at this time of year for some reason, and we all love it. The butter makes it a treat you shouldn’t have often, but enjoy when you do!

Remember – use your own families favourite ingredients, whether it is the cereal aspect or the nuts – make it your own to enjoy.

1 cup butter
2 tbsp worcestershire sauce
1 tbsp garlic powder
1 tbsp onion salt
1 tbsp celery salt

Melt and stir until seasoning is well mixed. Dip a Bugle, or or shreddie or something in it at this point and make sure you can taste the seasoning – if it needs more flavour, add a bit of each. Remember – critical – taste!! Everybody has different seasoning, and each brand is different in it’s level of flavour. (and freshness)

Nuts and bolts 1

If you taste it enough you might end up with less to cook………

4 cups Cheerios
4 cups Life cereal (or Shreddies)
1 package pretzels
1 package Bugles (4-6 cups depending on your preference)
1 bag  cheese crackers (goldfish) (3 cups)
2 cups peanuts
1 cup pecans
1 cup walnuts

Stir the melted butter/spice mix over the dry ingredients – mix well and bake in the largest roaster you have – it makes a lot.

nuts and bolts 2

Bake at 250 for 1 & 1/2 hours, stirring frequently.

Cool completely and store in an airtight container. (at least, try to store it – doesn’t last long….)

Pumpkin Hummus Recipe with toasted pumpkin seeds

Crunchy carmelized pumpkin seeds and a drizzle of chile oil make this creamy hummus a fabulous appetizer!

Crunchy carmelized pumpkin seeds and a drizzle of chile oil make this creamy hummus a fabulous appetizer!

I roasted quite a bit of pumpkin this fall, when in season, and this hummus recipe is a great way to use it – pumpkin isn’t just for scones!

Chile Cilantro Oil

1/4 cup grapeseed oil
2 tbsp minced fresh cilantro
1 tbsp minced seeded chile pepper (your fave – Jalapeno if you want a mild heat..)
salt to taste

Pumpkin Seeds
1/4 cup pumpkin seeds
2 tsp grapeseed oil
1 tbsp brown or raw sugar
pinch of cayenne
salt to taste

Hummus
1 15 ounce can chickpeas – rinsed and drained
1 cup pumpkin puree (thawed if previously frozen)
1/4 cup tahini
3 – 4 tbsp fresh squeezed lemon juice
3 – 4 tbsp water
2 small garlic cloves, minced
1/2 tsp ground cumin
salt to taste

To make the chile oil – using a small saucepan heat the oil until hot (about 3-5 min). Pour into a small bowl and add the cilantro and chile. Let cool before tasting and seasoning with salt.

To make the pumpkin seeds – in a small frypan toast the seeds in the oil JUST until they start to brown and puff up – around 5 minu7tes. Add the sugar, cayenne and and about 1/4 tsp salt. Continue to cook, tossing as the sugar melts and the seeds continue to brown. When they are a toasty brown, turn them out on to a plate to completely cool.

Finally – the hummus! Simply toss all the ingredients (except salt) into a food processor – I would start with 3 tbsp each of the lemon juice and water and check for consistency – adding more if necessary. Give it all a good whir until smooth and creamy. Taste and adjust with more liquid, adding salt if you like.

Serve with pita crisps, tortilla chips, rice crackers or vegetables! A winner all around.