Indian Vegetable Pakoras

Don’t even think twice about giving these a try – super easy and more flavour in every bite than you can imagine.

Pakoras 1

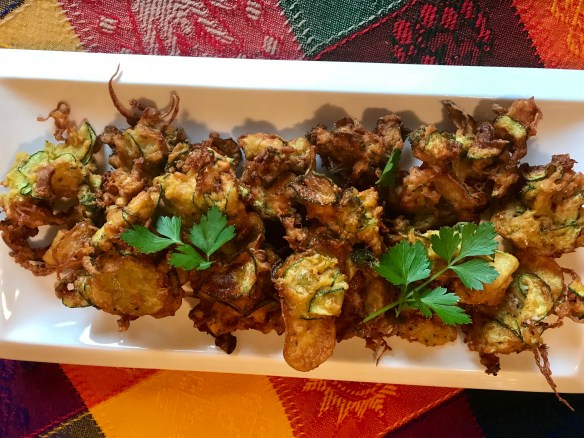
Look at the bits of craggy onion strips, potato shreds, broccoli bits and moist zucchini – how can you not love this?

I’ve been wanting to try making pakoras for some time now, they are one of my top five Indian dishes to order in a restaurant.  These hit it out of the park on my first try!!  So delicious, full of intense flavour, you can use as much or little of the spice as you like.  Crispy, craggy and loaded with fresh vegetables, you can make it just the way you like.


Ingredients

  • 1 cup chickpea flour or besan
  • 1/2 tsp baking powder


  • potatoes, cut into thin, small fingers/chips/cubes and washed
  • cauliflower, or broccoli, broken into small florets or chopped (or other vegetables)
  • onion, peeled and chopped
  • spinach leaves, washed and chopped
  • 2 tbsp coriander leaves, chopped (optional)
  • 2 tbsp mint leaves, chopped (optional)
  • 2 tbsp fresh fenugreek or methi leaves, chopped (or use 1/2 tbsp. dry methi leaves)
  • 1-2 green chillies, chopped finely. Omit if you like the pakoras to be mild

Use your imagination for the vegetables, these are only suggestions.  For this amount of spice, and the chickpea flour you will need a total of 4 cups vegetables.

  • 1 1/2 tsp salt, adjust to taste
  • 1 tsp  chili powder, adjust to taste
  • 1/4 tsp coarsely crushed coriander seeds
  • 1 tsp coriander powder or the spice blend, Chat Masala
  • 1/2 tsp turmeric powder
  • 1/2 tsp cumin seeds
  • Oil for deep frying
IMG_5513 2

Todays mixture included broccoli, zucchini, potato and onion – use whatever is fresh (or you need to use up). :o)

Instructions

  1. Place all vegetables in a bowl and sprinkle salt, as well as all the spices over the vegetables, and toss to combine.  Allow to sit for about 30 min so the water drains out of the vegetables.
  2. Add sifted (sift to remove lumps) chickpea flour/besan & baking powder slowly and make a slightly stiff mix of vegetables and besan, just enough to hold the vegetables together.  Usually, no additional water is required, as there is enough water released from vegetables. If the mix is too stiff, sprinkle a little water, so that all vegetables are bound lightly by besan.
  3. Heat oil in a wok. The oil is correct temperature, when a test pakora dropped in it sizzles and rises to the top of the oil quickly. The oil should not be smoking hot. Pakoras are crisper when cooked in medium hot oil.
  4. Drop small blobs of this mix into the hot oil gently, about 1- 1 1/2 tbsp. at a time. Wait until they sizzle to the surface and then turn them over. Continue turning intermittently, until all Pakoras are evenly golden brown and crisp on all sides.
  5. Rest to drain on an absorbent kitchen paper.
  6. Continue this way until all pakora mix is used up.
  7. If you need to keep them warm, put them in your oven at 200, perfect temp to keep them crispy and not overcook them.
  8. Serve immediately with chutney.
IMG_5530 2

Served tonight with chicken korma over rice, homemade naan bread (surprisingly easy) and these intensely flavoured pakoras.

Sparkle Birthday Cake

It is Stella’s 5th birthday today and she wanted a horse cake.  Hmm.  A horse cake?  Well, Hayley found a photo to work with, and I found an amazing cake recipe on “smittenkitchen”, so we were off to the races.  A few hours later and I think we are all really happy with the results!

IMG_5445

Our original inspiration photo had more of a smooth finish, but we wanted this to look like the horse Stella rides – Artie.  Pretty confetti sprinkles inside and it’s a perfect 5 year old birthday cake for a very special grand daughter.

If you haven’t been to the Smitten Kitchen website yet, do yourself a favour and hop on over for a visit.  Deb Perelman has great recipes, both her own and sourced from other cookbooks, they never fail.  She calls this one confetti birthday cake, and it is easy to see why.  Those little bursts of colour just make the cake look like a party already!

IMG_5463

So hard to believe Stella is 5 already!

IMG_5450

Even the bridle turned out really well!

IMG_5447

We were suitably impressed with how well Hayley created the mane.

IMG_5438

It’s working, this is looking pretty good!


All right, sorry, enough of the horse cake photos, you are no doubt looking for the recipe! We just had so much fun creating it.  One of the joys with this recipe is that you only use one bowl, and it takes about 5 minutes to put together.


IMG_5481

This time, I used 1 whole egg instead of egg whites, and used the batter for filling ice cream cone cups, they bake up perfectly into 9 hand held cake cones.  Gently fold in the sprinkles.

CAKE
  • 1/2 cup (115 grams or 4 ounces) unsalted butter, at room temperature
  • 2/3 cups (130 grams) granulated sugar
  • 1/2 teaspoon kosher salt
  • 2 large egg whites
  • 1/2 teaspoon vanilla extract
  • 1/2 cup (120 ml) buttermilk
  • 1 teaspoon baking powder
  • 2 tablespoons (16 grams) cornstarch
  • 1 cup (130 grams) all-purpose flour
  • 1/4 cup rainbow sprinkles

Preheat oven: To 350 degrees F. Line the bottom of an 8×8-inch square or 9-inch round cake pan with parchment paper and coat the bottom and sides with nonstick spray or butter.

Make cake: Beat butter, sugar, and salt together in a medium bowl. Add egg whites, one at a time, beating until combined and slightly fluffy. Add vanilla and buttermilk and beat to combine. The mixture will instantly look like cottage cheese and you will be sure it’s ruined but I promise it is not. Add baking powder and cornstarch and beat very well to combine. Scrape down sides of bowl and beat one second more. Add flour and mix just until it disappears. Use a rubber scraper to gently fold in sprinkles.

IMG_5424

It’s definitely a help to have a baker as cute as this 5 year old.


Bake cake: Spread batter in prepared pan and smooth the top. Bake for 20 minutes, or until a toothpick inserted into the center of the cake comes out batter-free. Let cool in pan on cooling rack for 5 minutes, then run a knife around the side to loosen the cake, flip it out onto the cooling rack, and slide the cooling rack into the freezer until cake is cool, about 10 to 15 minutes.

(If you don’t have buttermilk, just put 1 tsp lemon juice or vinegar into a 1/2 cup measuring vessel and fill to that mark with milk – allow to sit for 10 min and gently stir.)

IMG_5482

I used a whole egg for these instead of egg white, just because I wasn’t really concerned about pure white batter.  Simply stand the empty cones in a muffin tin and scoop in the batter.  Bake for 18-20 minutes at 350.

IMG_5483

Look at them puffing up so nicely in the cones – kids love these and they are perfect for a birthday party.

IMG_5485

All baked up and ready to be topped with either icing or ice cream, a hit with the kids either way.


Garden Fritters

IMG_5383

Make enough of these and it is a total meal, or use as an appetizer or side dish, either way, you are going to love these intense vegetable fritters.


I’m having a fritter moment.  It seems like a magical way of getting pounds of vegetables eaten up in record time, just when it is all at the peak of freshness, and who doesn’t love that?  I had to call these garden fritters, due to the tangle of grated zucchini, the wilted swiss chard, the crunchy pop of corn kernels fresh off the cob ….  Now just add to that a bunch of herbs, some garlic and a bit of cheese.  In today’s version I used feta and a bit of cumin.

If you make fritters just a few times you will quickly realize you don’t really need a recipe, but here is my general guideline:

  • 4 cups of vegetables
  • 1 clove of garlic (completely variable depending on your garlic love)
  • 1 egg
  • 1/2 cup flour
  • 1/2 tsp baking powder
  • salt, pepper and seasonings to taste

Now – once you’ve got  this far, just use your imagination with seasonings, and/or any cheese you decide to add.  Cheese certainly isn’t necessary, just adds another level of tasty goodness.

IMG_5380

These fritters have grated zucchini, lightly wilted swiss chard, corn kernels cut off a fresh cob, and herbs of parsley and chives.  One garlic clove and a bit of cumin with some feta cheese crumbled in created an intensely mouthwatering fritter.

A cast iron frying pan works best but any non stick pan will work well.  Lightly coat with oil, and on medium heat drop in dollops of the mixture.  Fry until golden brown and cooked through, about 3-4 min per side.

IMG_5381

HEAD’S UP – these delicious little kernels of corn will actually pop and sizzle like crazy in the oil – be prepared for the splatter.

I served these with a dip resembling tsatsiki:

  • 1/2 cup mayonnaise
  • 1 garlic clove
  • 1/3 cup grated cucumber
  • 1 tsp basil
  • 1 tsp dill weed
  • 1 tsp lemon juice
  • salt & pepper to taste

Zucchini Fritters

This recipe came directly from Smitten Kitchen (another wordpress site) and strangely enough (for me) I didn’t change it!

Zucchini Fritters 2

Crispy craggy bits of zucchini are a great contrast to the creamy aioli dip.


1 pound (about 2 medium) zucchini
1 teaspoon coarse or Kosher salt, plus extra to taste
2 scallions, split lengthwise and sliced thin
1 large egg, lightly beaten
Freshly ground black pepper
1/2 cup all-purpose flour
1/2 teaspoon baking powder
Olive or another oil of your choice, for frying

Preheat oven to 200 degrees. Have a baking sheet ready.

Trim ends off zucchini and grate them either on the large holes of a box grater or, if you have one, using the shredding blade of a food processor. The latter is my favorite as I’m convinced it creates the coarsest and most rope-like strands and frankly, I like my fritters to look like mops.

Zucchini fritters 3

In a large bowl, toss zucchini with 1 teaspoon coarse salt and set aside for 10 minutes. Wring out the zucchini in one of the following ways: pressing it against the holes of a colander with a wooden spoon to extract the water, squeezing out small handfuls at a time, or wrapping it up in a clean dishtowel or piece of cheese cloth and wringing away. You’ll be shocked (I was!) by the amount of liquid you’ll lose, but this is a good thing as it will save the fritters from sogginess.

Return deflated mass of zucchini shreds to bowl. Taste and if you think it could benefit from more salt (most rinses down the drain), add a little bit more; we found 1/4 teaspoon more just right. Stir in scallions, egg and some freshly ground black pepper. In a tiny dish, stir together flour and baking powder, then stir the mixture into the zucchini batter.

In a large heavy skillet — cast iron is dreamy here — heat 2 tablespoons of oil over medium-high heat until shimmering. Drop small bunches of the zucchini mixture onto the skillet only a few at a time so they don’t become crowded and lightly nudge them flatter with the back of your spatula. Cook the fritters over moderately high heat until the edges underneath are golden, about 3 to 4 minutes. If you find this happening too quickly, reduce the heat to medium. Flip the fritters and fry them on the other side until browned underneath again, about 2 to 3 minutes more. Drain briefly on paper towels then transfer to baking sheet and then into the warm oven until needed. Repeat process, keeping the pan well-oiled, with remaining batter. I like to make sure that the fritters have at least 10 minutes in the oven to finish setting and getting extra crisp.

Zucchini Fritters 1

Creamy Lemon Aioli

  • 1/2 cup good quality mayonnaise
  • 1 tbsp fresh squeezed lemon juice
  • 1 tbsp minced basil
  • salt and pepper to taste

Blend it all together, and allow to sit in the fridge until fritters are ready.

Spicy Sweet & Sticky Asian Pork Chops

Spicy Sweet Sticky Pork Chops

Grill just until cooked through, these juicy pork chops hit all those notes of spicy, sweet and sticky – get out the napkins!


  • 8 thin cut pork chops, pounded lightly until uniform thickness
  • 1/2 cup soy sauce
  • 1/3 cup honey
  • 1 1/2 inch piece of fresh ginger grated
  • 2 garlic cloves minced
  • 1 tsp Thai red curry paste
  • 1 chilli finely chopped (seeds removed if needed)
  • juice of 1 lime
  1. To make the pork chops, combine the soy sauce, honey, ginger, garlic, curry paste chilli & lime juice in a bowl and mix well.  Taste, and adjust if necessary – especially for heat.  If you like it hotter, add more!
  2. Place the pork chops in a ziploc bag and pour over the sauce. Close the bag and allow to marinade for 20 minutes or up to 2 hours.

Grill over high heat until just cooked through.

Noodles 2


We served these with a crunchy Thai noodle salad.

Miso Glazed Scallops and Greens

Scallops

Tender scallops, browned delicately and served over bok choy.  Yum.  In fact, you could use any greens, however the bok choy looked too good to pass by.

Ready for a 15 minute dinner?  This was so quick I couldn’t believe it.  If you want to make a full meal, just serve over rice.  In fact, by the time your rice is ready, the rest of this tasty dinner will be too. Dripping with the goodness of ginger and garlic the miso glaze adds the perfect amount of sauce to golden scallops.

  • 1 tbsp yellow miso
  • 1 tbsp seasoned rice vinegar
  • 1 tbsp mirin (sweet Japanese rice wine)
  • 1/2 tsp fresh grated ginger
  • 1/2 tsp fresh grated garlic
  • 1/2 tsp toasted sesame oil
  • 2 baby bok chow, quartered lengthwise
  • 10 large sea scallops, patted dry (make sure to remove the side muscle)

GARNISH

  • thinly sliced green onions
  • toasted sesame seeds

Whisk first 4 ingredients and 1 tbsp water in a small bowl to blend.  Set sauce aside.

Heat 1 tsp vegetable oil, and sesame oil in nonstick skillet over med-high heat.  Add bok choy and cook until just wilted and browned lightly in spots, turning often.  Remove bok choy to serving platter.

To the same skillet, add a bit more of both oils.  Season scallops with salt and pepper and add to skillet.  Sear scallops until brown and just opaque in center, about 1 1/2 minutes per side.  Pay attention, there is nothing sadder than an overcooked scallop. :o(

Remove pan from heat and nestle the scallops in with the bok choy.

Add miso sauce to skillet, stir just until warm, about 3-5 seconds.  If it seems too thick add a bit more water.

Drizzle sauce over scallops and bok choy.  Sprinkle with green onions and sesame seeds.

I think it took about as long to type this as to cook it ……

Strawberry Rhubarb Galette

The perfect way to celebrate the arrival of summer weather is when the rhubarb is ripe at the same time as strawberries!  Take the tartness of rhubarb with the sweetness of the strawberry and you have a winning combination.

Galette 1

I used my flaky pastry recipe (with egg and vinegar) to create this one … and in case you are wondering what the threads of lighter colour are …. I had a soft apple in the fridge so it got added to the pie.  Delicious!

Have you ever made a galette?  It’s really just a fancy name for a very easy, lazy way of making a pie.  If you aren’t a fan of making your own pastry dough, then just buy a frozen pre made pie crust, tip it out of the tin pie plate and carry on …. if you roll over the edges to take away that little crimped evidence of a premade shell you don’t even have to admit this to anyone!

Preheat oven to 400.

Line a large baking sheet with parchment paper.  On a lightly floured surface roll out your pastry to about 1/8″ thickness.  Place on baking sheet (it will hang over the edge).  Put this in the fridge for about 10 minutes while you prep the fruit.

  • 1 pint strawberries, thickly sliced
  • 1 pound very refresh rhubarb stalks, cut into 1/2″ thickness (or frozen sliced rhubarb)
  • 1/2 – 3/4 cup sugar, to taste
  • 2 tbsp flour
  • 2 tsp fresh lemon juice
  • 1 tsp pure vanilla bean paste

To finish you will need:

  • butter
  • milk
  • raw sugar

In a large bowl toss the strawberries and rhubarb with the sugar, flour, lemon juice and vanilla.  Spread on the prepared pastry to within 2″ of the edge.  Fold the edges, pleating at about 2″ intervals.  BE REALLY CAREFUL HERE ….. warning is from experience.  If you don’t carefully create these pleats, (sealing as you go) enough to hold the fruit there will be a breakout, and that mess is not pretty!  

Galette 2

Brush the edges of the pastry with milk and sprinkle with raw sugar.

Dot the filling with butter.  Bake the galette in the centre of the oven for 1 hot, or until the fruit is bubbling and the pastry is golden brown.  Allow to cool before cutting.

Galette

THIS is what happened when I didn’t seal the edges of my pleats together …. really, you should have seen me trying to get the half baked effort off the sheet pan and into something that would hold the juices better, BEFORE it all ran away.  Still tasted delicious, just somewhat messier, but a galette is meant to be free form anyway, right???


NOTE – If you are using fresh rhubarb, remember that the leaves are toxic!  Be sure to trim them to remove any leaf.

CREAMY THAI PEANUT PRAWN & NOODLES

Noodles 3

Creamy, tangy and full of crunch this Peanut Noodle Dish is really a one pot wonder.  One of the few peanut sauces I’ve liked, that didn’t require cooking!

My BFF Jean made a version like this when we met up in Osoyoos for wine tasting, and it was just perfect.  She made it into a one pot meal by using quick cooking Ramen noodles, which cooked in a large pot of boiling water, adding veg and shrimp at the appropriate times to get it all cooked.  Drain it in a colander and pour the sauce over – presto, deliciousness!!!
Ingredients:
These are really just suggestions.  Tonight I used broccoli and sweet coloured peppers.
  • 2 servings of rice noodles
  • 1 pound shrimp, peeled and deveined
  • vegetables, such as :
  • 1 carrot, peeled and shredded
  • ½ pound snow peas, ends trimmed and shredded
  • broccoli
  • cauliflower
  • sweet coloured peppers
  • onions
  • garlic

Peanut Sauce:

  • 2 tablespoons grated ginger
  • 2 cloves garlic, grated
  • 1 cup creamy peanut butter
  • 1/2 cup cilantro, chopped fine
  • ¼ cup soy sauce
  • 2 tablespoons lime juice
  • 2 teaspoons brown sugar
  • 1 teaspoon chili flakes (optional)
  • 1/2 cup of chicken stock
  • Toppings:
  • chopped cilantro
  • chopped peanuts
  • toasted sesame seeds
  • lime wedges
  • sriracha sauce (optional)

DIRECTIONS

  • Mix ginger, garlic, peanut butter, soy sauce, lime juice, brown sugar, chicken stock and chili flakes in a bowl, puree and set aside.
  • Soak rice noodles in very hot water until just al dente, drain and set aside.
  • Remove the ingredients from heat and drain with a colander.
  • In saute pan, stir fry vegetables until just crisp tender.  Remove and stir fry prawns just until plump and tender.  Be careful not to overcook them – that can happen in the blink of an eye.

Noodles 1
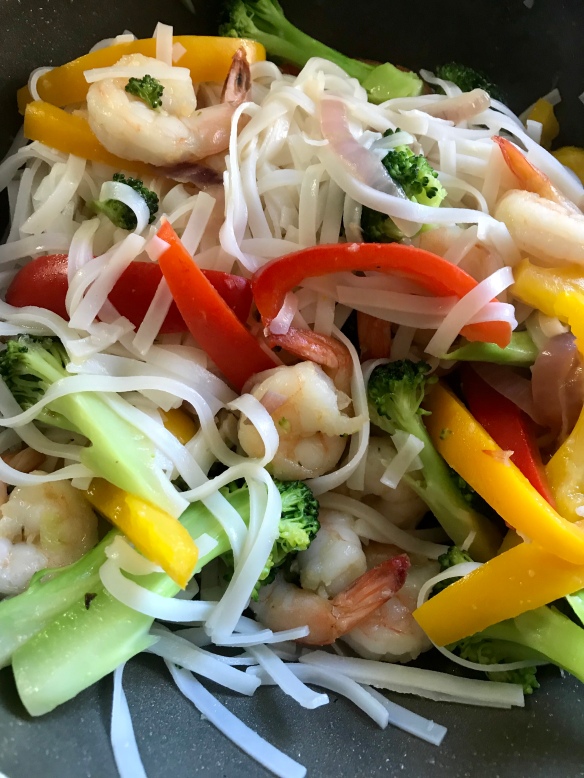
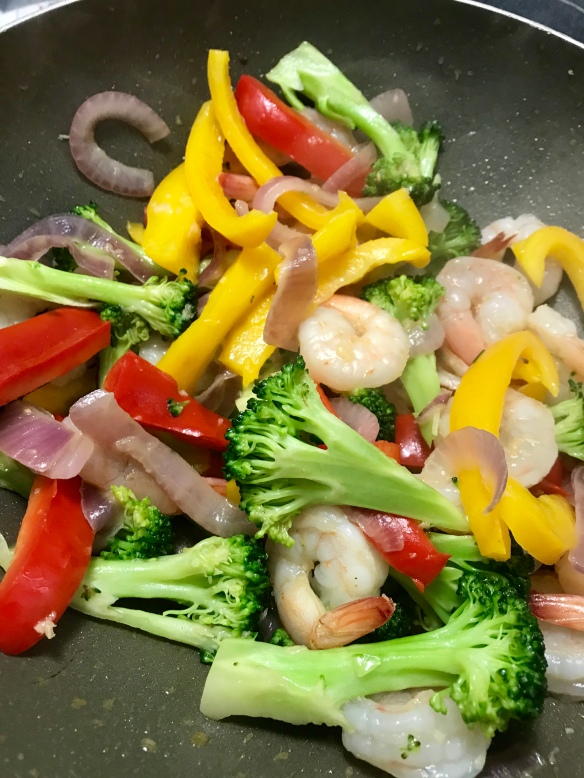
Return all ingredients to saute pan and stir to mix.  Add in enough noodles just to get the balance right.

Noodles 2

  • Pour the peanut sauce over the noodles and mix well.
  • Top with cilantro, peanut, sesame seeds and lime wedges to serve.
You can use any noodle if you don’t want the rice noodles, just cook according to package directions.

Summer Mexican Cobb Salad

Mexican Cobb Salad

Chipotle Chicken and Cilantro Vinaigrette give this one dish dinner a real taste of Mexico.

Combine the taste of cilantro dressing with fresh and lively salad crunch, and top it with grilled spicy chipotle chicken – you’ll have the best summer salad … this one will be on repeat.

CHIPOTLE CHICKEN MARINADE

  • 3-4 chicken breasts, or 8 boneless, skinless thighs
  • 2 chipotles in adobo sauce, minced
  • 1 tsp garlic powder
  • 1 tsp cumin
  • 1/2 tsp Mexican oregano
  • 1/2 tsp black pepper
  • 1/2 tsp sea salt
  • 2 tbsp vegetable oil
  • 2 tbsp fresh lime juice

Blend all ingredients until smooth, and pour over chicken.  Marinate for at least 1 hour, and up to overnight.

Grill until cooked through, and set aside.  Do not slice until chicken has rested at least 15 minutes.

CILANTRO VINAIGRETTE

  • 1 huge bunch cilantro – chopped up
  • 1/2 cup olive oil
  • 2 tbsp white wine vinegar
  • 1 loved garlic, minced
  • 1 tsp sea salt
  • 1/2 tsp red pepper flakes
  • 1 tsp dijon mustard

Put all ingredients in blender and process until smooth.

This vinaigrette is delicious!  Use it on a salad, or as a topping for your steak ….. dip your prawns into it …. the list is endless.

SALAD

Summer Salad

include any number of ingredients to create texture, bright, crispy crunchy fresh vegetables as well as creamy avocado, tasty fruit and toasted nuts


  • salad greens
  • spinach
  • cucumber
  • sweet peppers
  • snap peas
  • corn, grilled and sliced off the cobb
  • avocado
  • sliced strawberries
  • cooked bacon
  • toasted nuts

Toss salad ingredients together, and drizzle with cilantro vinaigrette.

Top with sliced chicken and drizzle a little more vinaigrette over the chicken.


Crispy Crunchy Fish Tacos

Fish tacos 1

Crispy, crunchy, spicy & creamy – fish tacos don’t get any better!

Flaky white fish (cod today), coated in the crispiest, craggiest of batters, and topped with creamy avocado, spicy chipotle cream, fresh & crispy peanut cabbage coleslaw and cilantro.    Our favourite fish tacos in Mexico are found in Puerto Escondido at this amazing spot we just had to return to.  La Olito, you do it best!  No, I’m sure these are not exactly the same, but once you’ve had them you will also want to either hop a plane for Puerto Escondido or try my version.


BATTER

  • 3/4 cup all purpose flour
  • 3/4 cup rice flour
  • 2 tsp black pepper
  • 2 tbsp smoked paprika
  • sea salt
  • 3/4 cup beer (maybe more if necessary)
  • 1 egg

This works for about 1 pound white fish, (halibut, cod, snapper).  Cut into 2″ pieces  and dust with salt and pepper, then a light coating of flour.

Combine flour, paprika, pepper & salt and whisk to combine.   Transfer half the mixture to a bowl and set aside.  Add the beer & egg to remaining mixture and whisk until a smooth batter (it should be about the consistency of paint).  Add a bit more beer at a time until it does.  Set aside.

Heat oil in deep fryer or fry pan to 350.

Take fish that has been coated in the light flour and dip in the batter, then into the dry spiced flour mixture.  Cook pieces a few at a time so that you don’t bring the temperature of the oil down by crowding the fish.  Turn fish a few times so that the entire fish piece is crispy, crunchy and golden brown.

As fish is cooked, keep warm in a 200 degree oven until all the fish is cooked.

Fish tacos 2

Serve with:

Chipotle Aoili

To make chipotle aoili combine:

  • 1/3 cup sour cream (feel free to use plain yogurt)
  • 1 minced chipotle chili in adobo sauce
  • 1 tbsp lime juice
  • salt and pepper to taste

This is a generalization really …… everybody has different spice tastes, and all products have different levels of flavour.  Make this your own!

Peanut Coleslaw

roast 1/ cup peanuts lightly, chop and set aside

1-2 cups shredded cabbage (add carrot and red cabbage if you like)

  • 3 tbsp apple cider vinegar
  • 4 tbsp peanut oil
  • 1/2 tsp cumin
  • salt & pepper to taste

Mix dressing ingredients together and toss with cabbage and peanuts

Heat tortillas, and fill up with fish, top with coleslaw, crema, avocado and cilantro.


If you haven’t packed your bags for Mexico yet …. get out the napkins and try these fish tacos.