Focaccia, but make it GLUTEN FREE


I’ve tried a multitude of gluten free focaccia recipes, with a variety of success.  This one is exactly what I was looking for, even hard to believe it is gluten free!  This is also amazing as it doesn’t require any special equipment, or method, just a few minutes of prep and the time to let it sit.

  • 500 grams warm water (somewhere around 110 degrees is perfect)
  • 10 grams active yeast
  • 1/2 tsp sugar
  • See Step 1 below first!
  • 560 grams Caputo Fioreglut Flour – NO SUBSTITUTIONS PLEASE
  • 24 grams sugar
  • 8 grams kosher or sea salt
  • 24 grams good quality olive oil
  1. Stir warm water, sugar and yeast together.  Set aside until foamy, about 10 minutes or so.
  2. In a large bowl combine Caputo flour, sugar, salt and stir to combine.  Once your yeast is active and foamy, stir that into your flour mixture with the olive oil.  Stir only until well combined, you really do not need to knead!

In a large bowl drizzle about 10 grams of olive oil around the bowl, then drop in your focaccia mixture and top it with another 5 grams of oil.  All this oil will get absorbed into the dough and gluten free bread does require this to give you that classic focaccia flavour, and the sugar helps it to brown.

COVER WELL AND PLACE IN THE FRIDGE FOR A MINIMUM OF

8 HOURS AND UP TO 48

DO NOT SKIP THIS STEP, IT WILL GIVE YOU THE FLAVOUR

AND TEXTURE YOU WANT

Take the dough out of the fridge about 2 hours before you want to bake it, and oil a 9 x 12 baking dish or pan. Tip the dough out into the pan and gently stretch it to fill the container.  Don’t worry it it doesn’t quite reach, as it rises and warms up it should.  Cover and allow to rest in a draft free area for at least an hour, check to see if it has risen and filled the pan.Your dough might need anywhere from 1-2 hours to full rise and get fluffy.  After an hour, preheat your oven to 425  F. so that you are sure it is up to temperature before you bake the focaccia. 

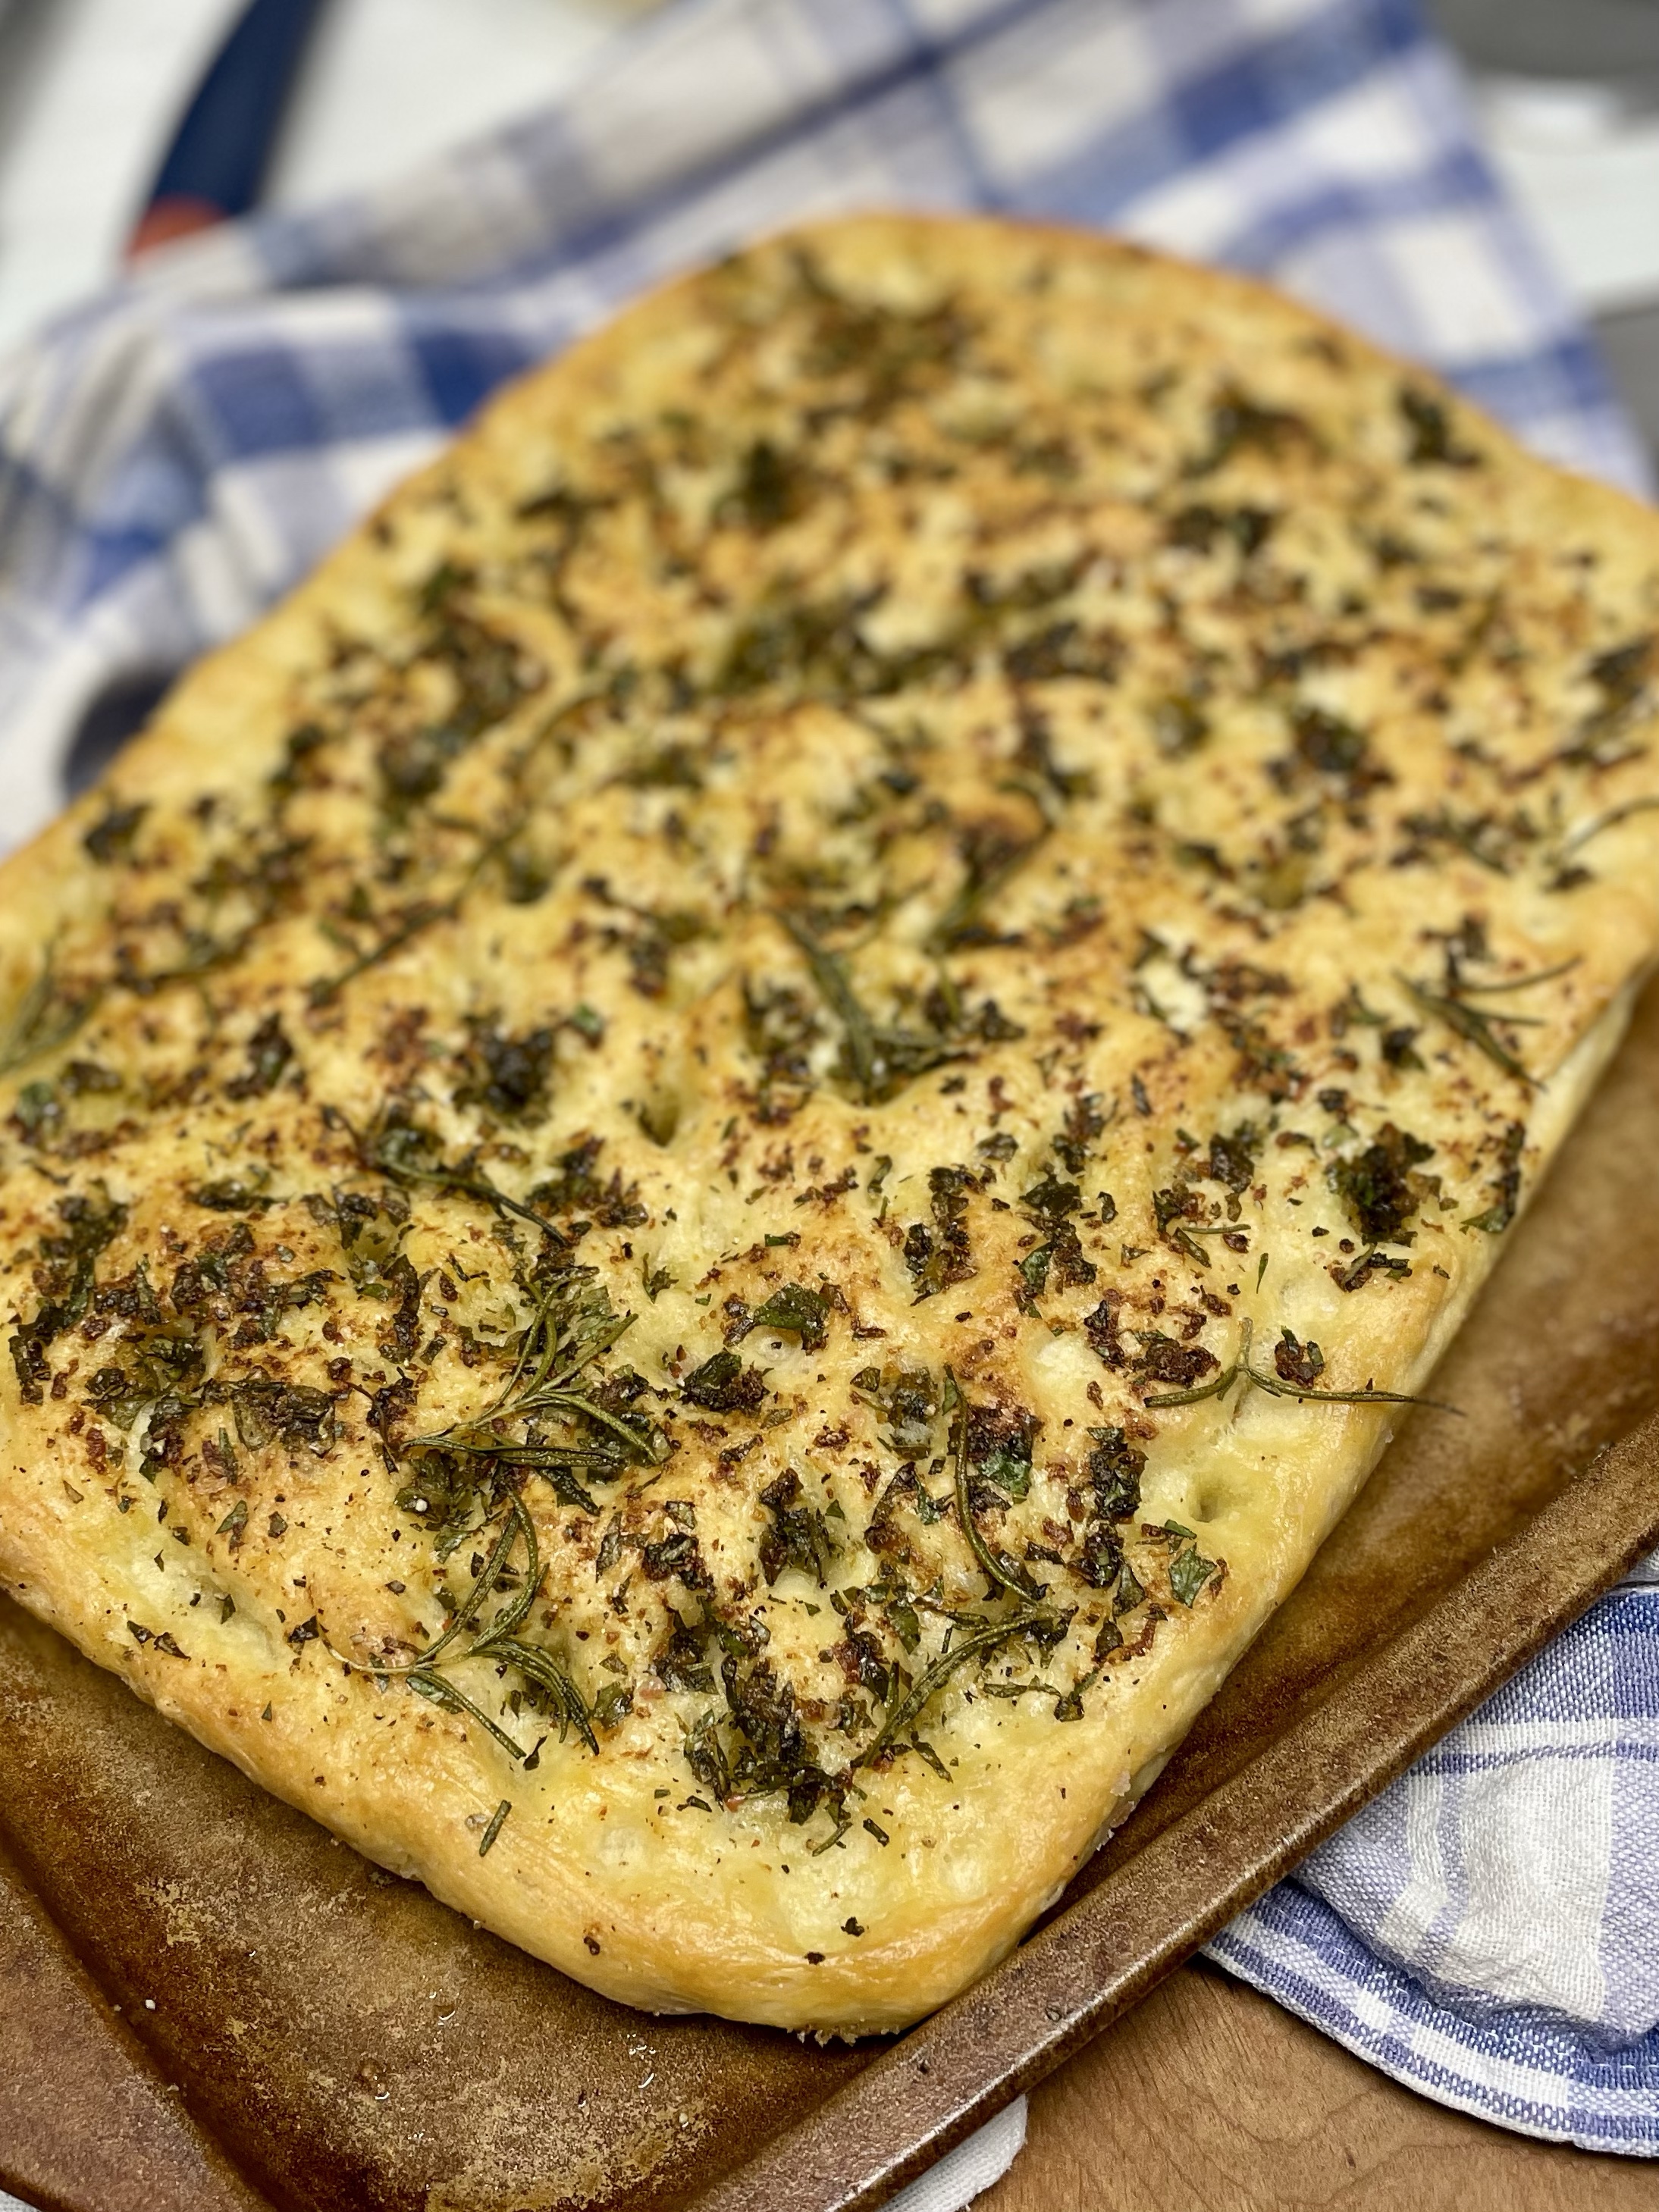
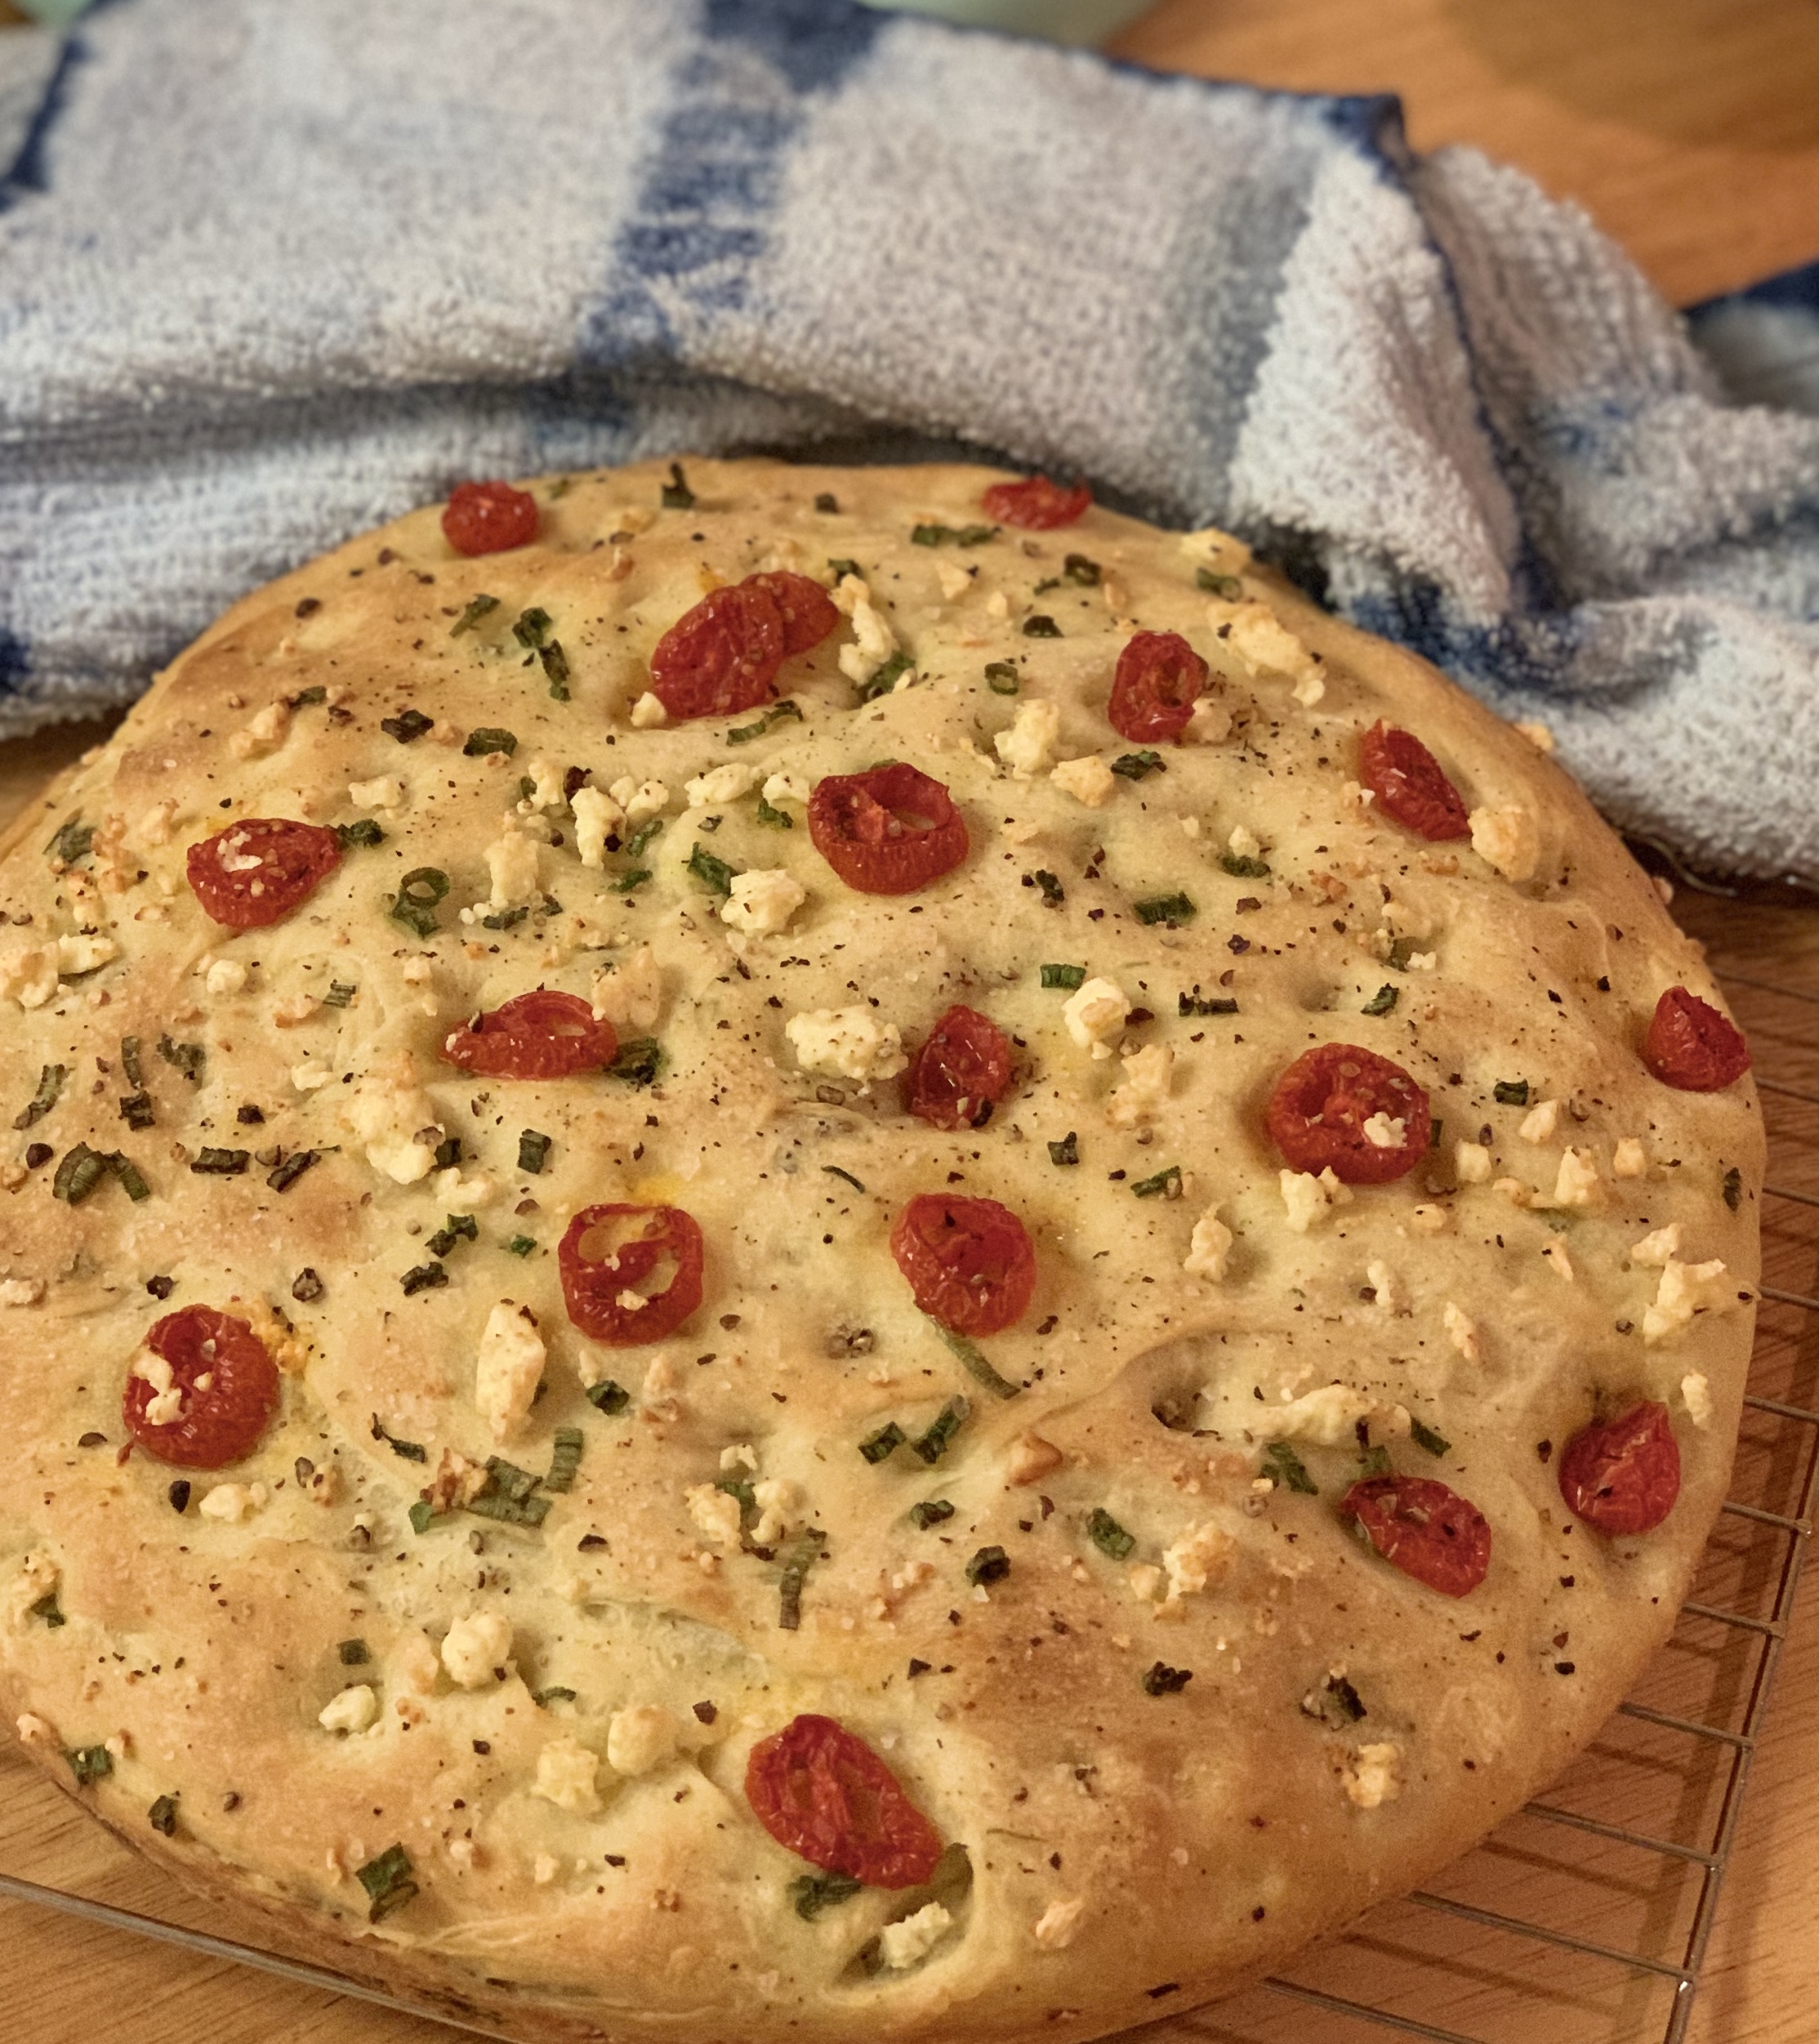
Toppings make the focaccia!  I love to dimple the top, drizzle olive oil over, sprinkle with garlic, rosemary and flaky salt, but I’ve also added sun dried tomatoes, olives, and created pretty designs with herbs and vegetables – you do whatever you feel like.

Bake for 25-30 minutes, checking at 25 minutes.  I usually like to do a quick check with a thermometer, the internal temperature should be about 200 degrees F. Rest in the pan for 5 minutes before taking it out, and will taste best if it sits for another 10 before cutting into it.

Only needed a small loaf today so this is half the recipe.
Felt like focaccia muffins, so we made these in a muffin tin – crispy edges!

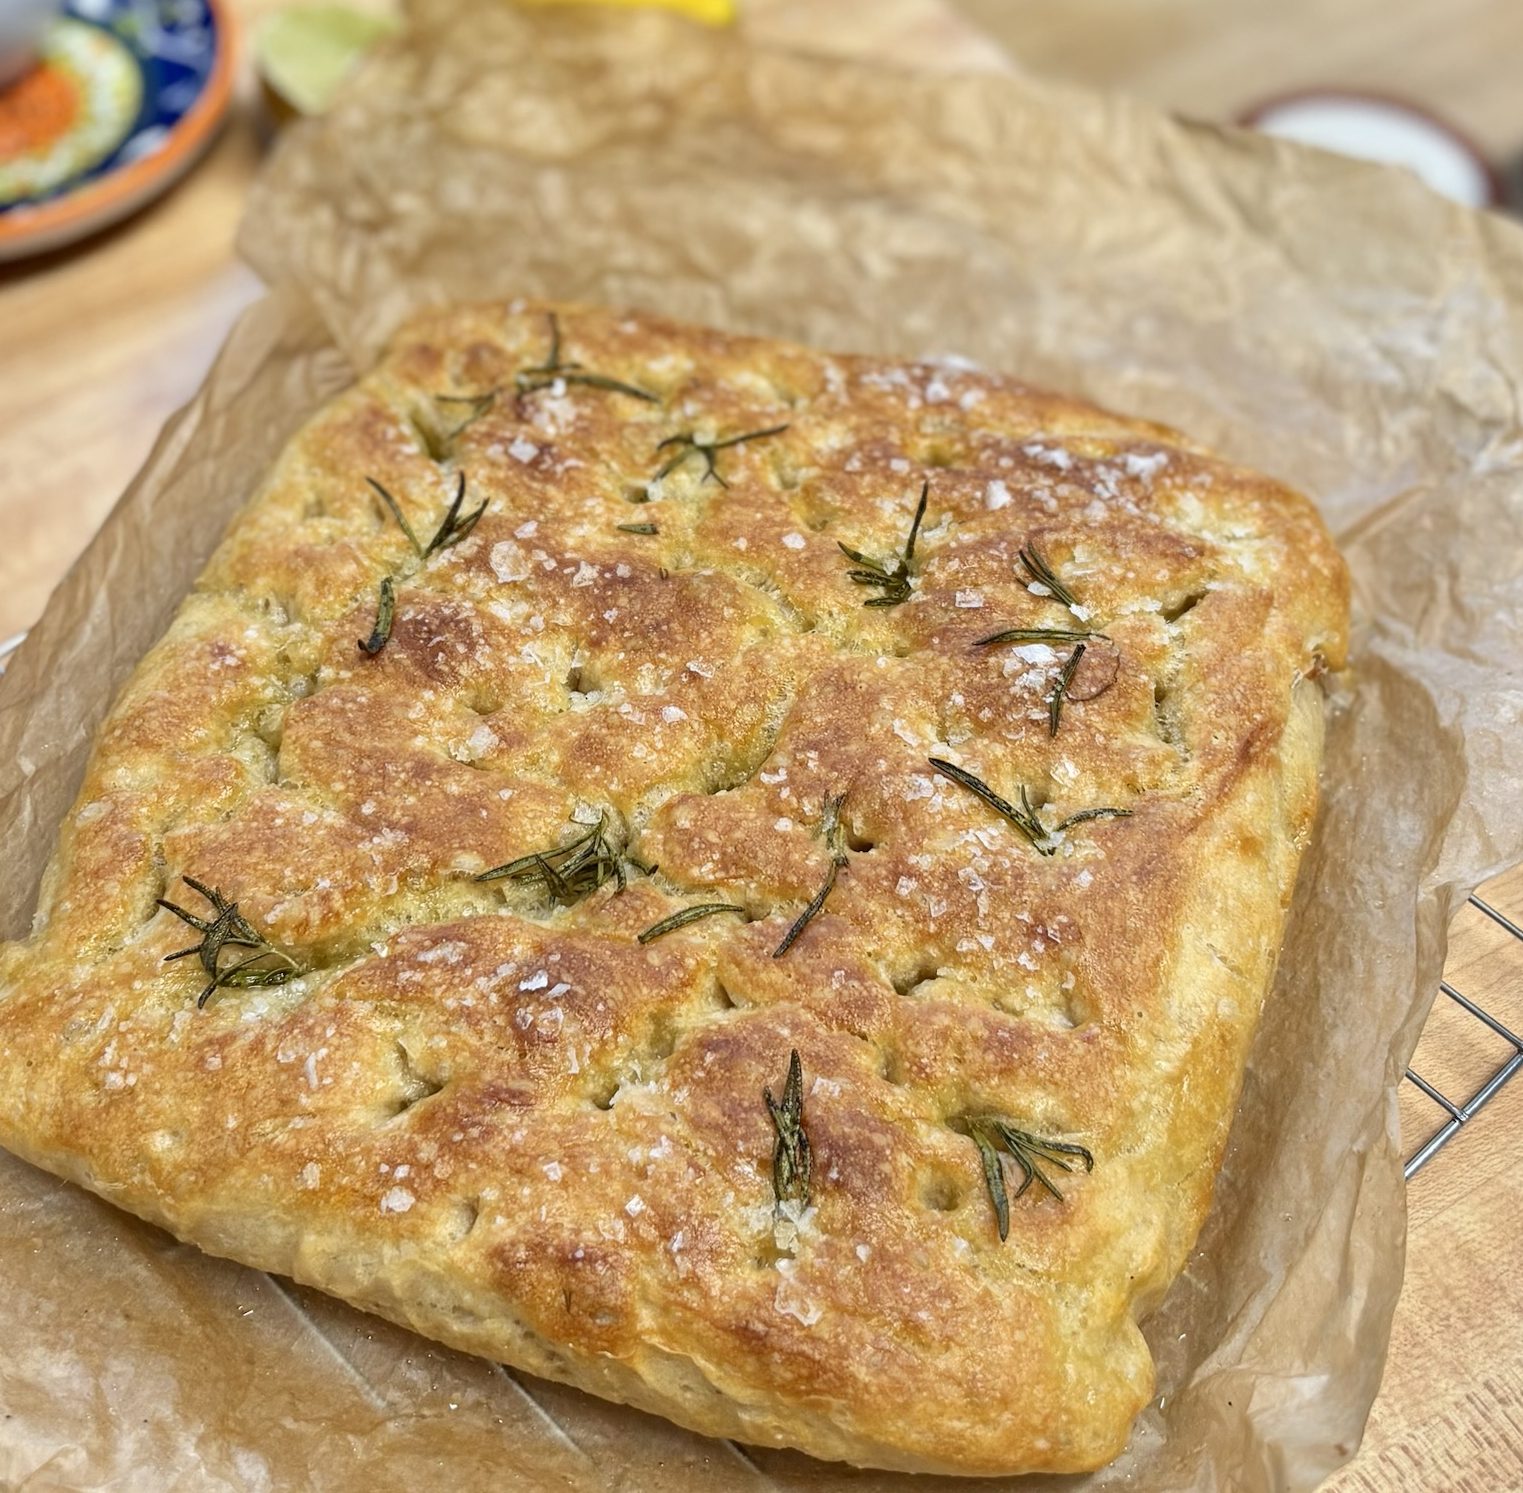
I’m not sure what it is with Caputo Fiorglut Flour, but it is the only one that I get this result with for focaccia. It isn’t easy to get for me (Vernon BC) so I order it online. Pricey yes, but the pleasure Stella gets when she has soft fluffy bread is worth it for all of us.

Bacon topped Jalapeno Poppers

It’s been a hot minute since I posted anything, but these beautiful jalapeno peppers got me excited! The peppers at Ringo En Orchard are going strong, it is nearly the end of a beautiful September, and they are still plentiful.

  • 10-12 largeish jalapeno peppers
  • 8 oz (1 large pack) cream cheese
  • 1/2 a small onion, finely grated
  • 1/2 tsp garlic powder
  • 1/2 tsp salt
  • 1/4 tsp pepper
  • 1 1/2 cup shredded cheddar cheese (I like to use extra old)
  • 1/4 cup finely sliced chives

TOPPING

  • 1/2 a pack of bacon, sliced finely, cooked, then crumbled
  • 1/3 cup finely crumbled tortilla chips

Combine softened cream cheese with the onion, garlic powder, salt, pepper, shredded cheese.

Slice jalapeno peppers in half, remove membrane and seeds (I like using gloves for this).

Scoop cheese mixture into jalapeno halves, sprinkle bacon and tortilla chips over top.

At this point, you can either freeze them in a single layer to serve up another time, (when frozen, place in freezer bag or airtight container), or heat and serve!

Bake at 400 for 20 minutes.

These are naturally gluten free if you make sure your bacon and tortilla chips are gluten free. It’s easy to turn these vegetarian by leaving out the bacon.

EGGPLANT & TOFU WITH BLACK PEPPER

My garden is overflowing with Japanese eggplant right now and I couldn’t be happier about that. I’ve got enough that I’ve had to move on from my usual go to of miso/soy grilled eggplant and try other preparations. This is a sure fire winner, a quick and easy one dish meal, and served with rice a very complete meal. Never fear, I still made a salad ….. I think by now Grant is disappointed when salad doesn’t show up for dinner.

These beauties are delicious 😋 I’m late to learning a love for eggplant but making up for it now!

  • 14-ounce package extra-firm tofu
  • Neutral oil for roasting (I use safflower)
  • 1 tablespoon cornstarch
  • 3/4 to 1 pound eggplant
  • Kosher salt
  • 3 to 4 tablespoons unsalted butter (the higher amount is slightly more rich)
  • 1 heaped cup thinly sliced shallots or 1 medium white or red onion, thinly sliced
  • 5 garlic cloves, peeled, crushed
  • 2 tablespoons finely chopped ginger
  • 1/2 cup low-sodium soy sauce
  • 1 tablespoon granulated or brown sugar
  • 1 tablespoon crushed or very coarsely ground black pepper, and more to taste
  • Rice, for serving
  • Chile-garlic sauce, crispy chili oil, or sriracha for serving

Heat oven to 425 degrees F. Drain tofu and place on a few layers of paper towel with more over it; set aside for 5 minutes, or until needed. Drizzle 3 tablespoons oil over your largest baking sheet and place it on the oven to get very hot while you get everything else ready. Trim eggplant and cut eggplant into 1-inch pieces. In a large bowl toss with 1 tablespoon oil and a few pinches of salt. Remove hot pan from oven and spread eggplant over half to 2/3 the pan. Cut tofu into 1-inch cubes. Toss gently in empty bowl with cornstarch and a couple pinches of salt until coated. Spread on empty part of baking sheet.

Roast tofu and eggplant in oven for 20 minutes to start. After 20 minutes, use your thinnest spatula to gently separate the tofu from the pan and flip to crisp and brown on the other side, about another 10 minutes. Do the same with the eggplant. At 30 minutes, the tofu should be crisp and browned and the eggplant should be roasted and tender. If needed, cook it for 5 more minutes.

I have a number of sources for amazing Asian cooking, Kenji Lopez Alt, Andrea Nguyen, Just One Cookbook, The Woks of Life, but in a surprising turn, this came from another of my all time favorite bloggers, Deb Perelman of Smitten Kitchen. I’ve never had a fail from any of her recipes, and if you want to truly be entertained, hop on over to her blog for the full write up, and more of her wit.

Salad Rolls with the BEST Peanut Dipping Sauce

We had Salad Bar (Sloan’s choice) for Sunday dinner, which meant creating these salad rolls from the leftovers was a breeze!  Stella and I often get stuck in on projects for lunch, but this was so quick and easy, utilizing the grilled chicken and prepared vegetables.

What sells this though, is the peanut sauce!  So good, Stella and I decided it better go on the blog right away so we remember the recipe, and how quickly it came together.

SALAD ROLL INGREDIENTS

  • rice paper wraps
  • cooked thin rice noodles
  • cooked chicken, grilled prawns, or whatever protein you fancy
  • slivered vegetables, whatever you like
  • bean sprouts
  • lettuce

Soften wraps in warmish water, don’t allow to get too soft or they will tear as you wrap.  They continue to soften as they sit.

Lay wrap down, and with lightly moistened fingers place your ingredients in the lower half of the wrap, fold edges in to trap filling and then roll as tightly as you can.  The sky is the limit with whatever you like to fill your salad rolls with.  We didn’t have any lettuce but if you do, laying a leaf down, and then placing the filling on the lettuce helps to prevent the wrap tearing and gives the salad rolls a nice crunch.

(you can google wrapping salad rolls – there are lots of those videos available)

The star here …. PEANUT SAUCE

  • 1/2 cup peanut butter (use natural for the most peanut flavour)
  • 1/3 cup soy sauce
  • 2 tbsp toasted sesame oil
  • 2 tbsp rice vinegar
  • 2 tbsp sambal oelek or chili paste
  • 1 tbsp hoisin sauce
  • 2 tbsp sugar (could sub honey if you prefer)
  • 1 knob of fresh ginger, peeled (to taste)
  • 1 garlic clove, peeled
  • Up to 1/4 cup of water, to thin as needed.

Whiz all this up in a blender, using water as you see fit and taste to see if it needs any adjustments.

The chili paste is where the little bit of spicy heat comes from.  We both like a little bit of heat, but not overwhelmingly spicy.  We found 2 tbsp was perfect but go according to your own tastes, and of course the type of chili paste you have.

I got the base of this recipe from Lindsay at Pinch of Yum, and we decided to get it on here so we don’t keep looking for one … thanks Lindsay!

Ready to eat, these salad rolls were so quick, we had them on the table easily.

Apple Pie Cookies – Gluten Free

It’s apple season and these cookies are a great way to get an apple pie fix in a hurry.  Quick and easy to make, they bake up in only 12-15 minutes and you can be eating them before your pie crust would have even chilled.

This image has an empty alt attribute; its file name is img_1615-1.jpg

INGREDIENTS

  • 1 1/2 cups (210 g) gluten free flour blend
  • 3/4 tsp xanthum gum (if your GF flour blend doesn’t have any)
  • 1/4 cup  (36 g) cornstarch
  • 1/2 tsp baking soda
  • 1/2 tsp kosher salt
  • 1 tsp cinnamon
  • 3/4 cup ( 150 g) granulated sugar
  • 1 (80 g) grated semi tart apple (peeled)
  • 10 tbsp (140 g) unsalted butter, melted and cooled
  • 1 large egg, beaten – at room temperature)
  • 1 tsp vanilla extract

INSTRUCTIONS

Preheat oven to 325 and line a baking sheet with parchment paper

In a large bowl mix together flour, xanthan gum (if using), cornstarch, baking soda, salt, cinnamon and sugar.  Whisk to combine.

Add grated apple and mix well, separating all the apple pieces.

Create a well in the center of the dry ingredients and add butter, egg & vanilla.  Mix to combine well.  The dough will be really thick, but soft.

Form balls about 1 1/2 tbsp and then press into a flatter shape, about 1/2 inch thick and place on baking sheet, about 2 inches apart.

Bake at 325 for 12-15 minutes

Remove from oven and allow to cool completely on baking sheet.

GLAZE

  • 3/4 cup (86 g) icing sugar
  • 1/2 tsp ground cinnamon
  • 1 tbsp milk

Mix all glaze ingredients well, adding a wee bit of milk as necessary to get the glaze thin enough to drizzle.

Drizzle glaze over cooled cookies and enjoy!

Make sure you have a cute apple grater to help – sorry, Stella isn’t available all the time!

We have found Gluten Free On A Shoestring to be an amazing source, all the recipes are easy to follow and we’ve enjoyed every single one #gfshoestring

Nicole (@gfshoestring) put white chocolate chips in her cookies, and while I am sure that would be amazing, it is not something I ever have on hand, and we didn’t think they even needed chocolate chips.

JAPCHAE

Set aside a bit of time to make this dish – today it took me 2 1/2 hours but it makes a lot, and keeps really well in the fridge for a couple of days. Just call it kitchen yoga and you are guaranteed to feel quite smug.

This Korean noodle dish is truly crave worthy. If anything, tastes even better the next day but don’t let that stop you from making and eating it for dinner the same day! It took a bit of effort to find potato starch noodles but it was worth the effort. They have a springy texture that is unlike any other noodle I’ve had.

  • 12 ounces (340g) of pork loin or steak – cut into very thin slivers
  • 3 garlic cloves, minced
  • 1 tbsp water
  • 1 1/2 tbsp chinese cooking wine (shaoxing)
  • 1 /2 tsp oyster sauce
  • 2 tsp sugar
  • 1/2 tsp baking soda
  • 1 1/2 tsp cornstarch
  • 1/2 tsp freshly ground white pepper
  • 1/2 tsp sesame oil

I’ve also learned a new technique through J.Kenji Lopez-Alt about velveting meat for stir frying, and trust me, it makes a huge difference!

First, give your meat a little bath – scrub it in running water and then squeeze to drain it really well.

Combine the meat with all the other ingredients in a bowl and massage it vigorously – I like my using my hands but feel free to use a spoon if you prefer. Set aside for 30 minutes, or in the fridge for 4 hours or so.

Blanch spinach or kale in boiling water, cool and chop a little.

Stir in:

  • 1 clove minced garlic
  • 1 tsp sesame oil
  • 1/2 tsp salt

10 ounces (280 gr) of sweet. potato starch noodles (Dangmyeon) – cooked acording to package

Sauce for noodles:

  • 1 tbsp sesame oil
  • 1 tbsp soy sauce
  • 2 tsp sugar

Once noodles are cooked, drained and rinsed, cut them into smaller pieces and stir with the sauce. Set aside.

  • 1 onion, thinly sliced
  • 1 red pepper, thinly sliced
  • 1 yellow pepper, thinly sliced
  • 3 garlic cloves, diced
  • 3 scallions, cut in 3 ” pieces
  • 1 pack of baby spinach or kale (as much as you like, really)
  • bean sprouts (as many as you like)

OPTIONAL:

  • raw carrot strands
  • slivered snap peas
  • pea shoots
  • cucumber, thinly sliced

Japchae sauce

  • 2 tsp sugar
  • 1/2 tsp freshly ground pepper
  • 2 1/2 TBSP soy sauce
  • 1 TBSP sesame oil
  • 1 TBSP gojuchang (korean spice paste)

Stir well in a large bowl. Taste and adjust for seasoning. I usually use low sodium soy sauce but using Gluten Free soy sauce, now that Stella is Celiac, we are all learning to cook without any wheat in our products, so initially I found this a bit salty, I adjusted with a little rice vinegar and touch of oil. (Basically, the vinaigrette I had made and in the fridge)

UPDATE – see below for a sauce suitable for all gluten free folks – it was so good!

Time to stir fry the veg!

In a wok or large fry pan heat vegetable oil and stir fry onion and red pepper until soft and set aside. Then stir fry any other vegetable you choose to add.

I like to have a mix of raw and stir fried veg……

Heat wok again and add some vegetable oil – stir fry the meat, and add in the bean sprouts and kale or spinach, fry just until softened. Add back the red pepper, onion, garlic mix as well as the cooked noodles. Toss well to warm everything through and then add to the bowl with the sauce, mixing well

Once you have everything prepared, toss it all with the sauce. My usual tactic is to put all the veg in the bowl and then gradually add the sweet potato noodles, that way I don’t overload the bowl with too many noodles. Just ask Mike, I’m guilty of cooking more noodles than needed – always.

Sprinkle with toasted sesame seeds and chives or green onions for a little color.

Sit back and enjoy! Pour yourself a glass of well deserved wine.

Todays version included sautéed mini bok choy. You could easily call this a clean out the fridge noodle dish, anything goes! This doesn’t have any meat in it at all, I felt like some Korean grilled chicken thighs – a bit of sweet, spicy and char makes it perfect. That is on the grill separately. If you leave it as is, you’ve got a great vegetarian dinner!

This was all the sautéed vegetables in tonights dish – each in the pan at separate times. I know, I’m fussy that way – go ahead and throw it all in at once if you like, and let me know if it makes any difference …. haha

Here are the raw veg – along with the cooked sweet potato noodles. – today was spiral carrots, bean sprouts, pea sprouts and slivered snap peas.

JAPCHAE SAUCE GLUTEN FREE VERSION

3 TBSP GF soy sauce

1 TBSP brown sugar

1/2 TBSP sesame oil

Whisk together until the sugar is dissolved. I added a bit of chili oil for a little kick, but honestly, this was fantastic, and we all loved it.

If you can find gojuchang free of malt barley, then you could just use the original sauce recipe.

Vegetable Pancakes

Stella was insistent that I get my recipe for vegetable pancakes on the blog right away so she could make them at home with Hayley!  Such a quick, easy and delicious way to have a meal on the table in minutes, these are great for lunch, dinner or snacking.  I usually make a pile and they warm up quickly in the toaster oven.  They are a bit of a mash up of Korean pajeon, Japanese Okonomiyaki and Chinese scallion pancakes (even a bit like my zucchini fritters!)

I will get a better photo, but Stella didn’t want me to wait, she loved them so much!
  • 1/2 cup all purpose flour (once Stella was diagnosed with celiac, we used Gluten Free Flour)
  • 1/2 cup potato starch or cornstarch
  • 1/2 tsp baking powder
  • 1/2 tsp Chinese 5 spice powder (optional but we liked it)
  • 1 tsp sea salt
  • 1 egg
  • 3/4 cup very cold water
  • 4-6 cups very thinly sliced or julienned vegetables

oil for frying

Whisk dry ingredients together, then stir in egg and water. Add in all your vegetables and stir just to combine. You only need enough batter to hold the vegetables together.

Preheat oven to 300 to keep the pancakes warm as you cook them.

Heat oil in frying pan, and drop in 1/4 cup amounts, flattening them out slightly. Cook for 3-5 minutes on each side until golden brown and crispy. You will have to do this in batches, so keep them warm in a 300 oven until you have them all fried. Don’t crowd the pan or they will steam rather than fry.

I first tried this recipe as Korean pancakes, adding some chopped kimchi as well as a bit of the juice, but ended up using it for many different vegetables.

Serve with dipping sauce:

  • 1/4 cup soya sauce
  • 1-2 tbsp rice vinegar
  • 1/2 tsp sesame oil (I like toasted)
  • 1/2 tsp sugar
  • 1/2 tsp hot sauce or chili crisp (such as sriracha)

Stir together and set aside for service. Taste and adjust for your personal preference.

Use whatever vegetables you have in your fridge! It really is a fridge clean out in the best possible way.
Make sure you don’t crowd the pan – it takes very little oil.
Flip when nice and crispy, and a golden brown.
These ones had fresh shrimp and lots of chives.
Another day, another batch

Quick Focaccia

img_8247

There is something about making breads that just feels like a win.  Focaccia always does that!  The very best focaccia recipes allow for the dough to rest anywhere from hours to days.  If you are like me, some days you are driving home from work thinking focaccia would really boost dinner TODAY.  Not 3 days from now.  This recipe is for those days.   If you’ve got a little over an hour, you’ve got enough time to pull this off – and trust me, it’s easy.  No intensive kneading or stand mixer necessary!

  • 2 Tbso olive oil
  • 2 Tbsp fresh herbs – I used basil, parsley, rosemary, oregano and thyme. minced

Mix well and if it looks a little herb heavy, add a bit more olive oil. Set aside.

  • 3/4 cup warm water (the perfect temperature for blooming yeast is between 105-115)
  • 2 1/4 tsp dry active yeast (1 pack)
  • 1/2 tsp sugar
  • 2 cups all purpose flour
  • 1 tsp salt
  • 1 Tbsp olive oil

Top with flaky sea salt and more fresh rosemary.

INSTRUCTIONS

  • Proof yeast and sugar in 3/4 cup warm water – 105-115 degrees F until foamy and active.
  • In a bowl, combine flour, salt.
  • Add in yeast mixture & olive oil, and mix to get it all together.  You may need to add a couple tablespoons more warm water.  You want this to be slightly sticky.
  • Cover and allow dough to rise for around 30 minutes.  The time isn’t as important as that you need to let the dough to pretty much double in size.
  • Add 1 -2 tbsp  olive oil into small baking vessel – either  9 x 7 inch sheet pan, or this also works well in an 8 x 8 square baking pan. You want a fair bit of oil here, rub it all around the sides of the pan as well.
  • Add dough and stretch to fit pan, if dough springs back, let it sit, covered, for 5 minutes and try again.  The rest helps the gluten to relax.
  • Once dough has been stretched enough to fit the baking sheet, allow to rest (covered) for 30 minutes.  Honestly, do whatever time you have – I find this to be fairly forgiving.
  • Dampen your fingers and dimple the dough like you are playing a piano.
  • Drizzle herbed olive oil over dimpled dough and allow it to fill in the dimples, I like to be generous with the herb oil mixture.
  • Sprinkle on some flaky sea salt and more fresh rosemary that isn’t all minced up.
  • Bake for 15 – 20 minutes or until golden brown.
  • Once out of the oven, allow to rest on a cooling rack to keep the bottom crusty as well.

So many ways you can serve this;

  • Use it as an appetizer with a charcuterie board
  • Fresh out of the oven with simple oil and vinegar
  • Try it with your best olive oil and my dukka recipe, (If you’ve never tried dukka you are in for a treat!)
  • Completes a soup or salad meal
It’s October and this is what my herb garden still looks like!
Ready to go, and this herby oil smells so fresh – today I added in some roasted garlic.
Ready for the oven – love the way those little dimples fill up, I think those pockets of oil help crisp up the top.
You just know how good your house smells – it’s ready to dunk in your soup.

Aloo Garlic Stuffed Naan

The best naan I’ve made …. to date anyway!

I can’t pretend to be humble when it comes to my cooking, but these naan impressed me more than I usually impress myself! The dough is very pillowy soft and tender, they were so delicious I pulled six out of the oven and they were inhaled.

This is the kind of thing you do when you have a little time on your hands, not necessarily because they are so much work, but it is important to give the dough time to rise and develop that light texture you want in a naan.

NAAN

  • 1 tsp dry active yeast
  • 2 tsp sugar (separated)
  • 3/4 cup lukewarm water (around 100* )
  • 2 cups all purpose flour
  • 1 tsp fine sea salt
  • 1/8 tsp baking powder
  • 1/2 tsp garlic powder
  • 1 tsp dry herbs
  • 2 tbsp olive oil
  • 3 tbsp plain yogurt

In a large glass, dissolve 1 tsp sugar in the warm water and sprinkle in the yeast. Let sit for 10 minutes until it is foamy.

In a large bowl stir together the flour, salt, remaining 1 tsp sugar, baking powder, garlic powder and herbs.

Once yeast is nice and foamy stir in the olive oil and yogurt. Mix well and then stir into flour mixture with a fork. Using your hand, mix and knead in the bowl just until everything is incorporated. As soon as it is together, soft, and slightly sticky, cover it all and let it rest until doubled in size. This could be anywhere from 2-4 hours depending on how warm your kitchen is.

FILLING

  • 1 cup cooked & chopped up potato (could be leftover mashed potatoes too!)
  • Saute 1/2 -1 cup of minced onions in ghee, until nice and soft (amount of onion depends on your love of onions!)
  • Remove from heat and stir in one crushed garlic clove and 1/2 tsp dried coriander.
  • Season to taste with salt and pepper.
  • Set aside until cooled down.

(Ghee is clarified butter and most grocery stores carry it now, but you could easily substitute olive oil or butter)

Once the dough has doubled, gently punch it down and divide into 6, rolling those into balls.

Flatten each ball with your hands until they are 6-7 inches across. Divide the potato stuffing amongst the flattened dough pieces, and then gather the outer edges like you are forming a little pocket or purse.. Once you have completely encased the potato mixture press down gently until flattened and once again about 6-7 inches across.

Brush the tops with beaten egg, sprinkle with a little salt & pepper, chili flakes and sesame seeds.

Bake at 400 until golden brown – about 20 minutes.

Remove from oven and rub with a little melted butter and sprinkle with minced cilantro.

Ready to flatten, you can see the bits of herb and they already smell great.
This dough was the easiest naan dough I have ever worked with – so tender and easy to flatten.
Once you have them all stuffed and flattened back out, sprinkle with beaten egg and toppings. Confession time? Somehow I got on a roll and before I knew it I had brushed the tops with melted ghee, not the egg wash I had planned on. Hmm. Still turned out so do whatever floats your boat.
Using your finger tips, flatten around the outer edge to create a bit of a border. Some of them puffed right up like a pita, and others didn’t, and either way they were delicious!
Ready for the oven
Soft potato and onion filling made these the best ever!
Next time I’m going to leave out the garlic, and try using a different stuffing …. ham and cheese maybe? They’d be great for lunches.

This naan dough originally came from an Indian Cookbook I have – Aarti Sequeira “Aarti Paarti”. I’ve loved watching her on Food Network. She added fennel and nigella seeds, and didn’t stuff them. I had something different in mind so I used this dough, and then watched endless YouTube videos on stuffing naan to come up with my own version. Have fun, play around and let me know if you come up with any other stuffings.

In making naan, I often stand over my cast iron pan, frustrated by trying to get nice char marks and yet still allowing the bread dough to be fully cooked inside without burning the outside. This often leaves me less than satisfied! This totally hands off approach yielded the softest naan and the breads were fully cooked while still having wee bits of crunchy dough around the edges and on the tops of the ones that puffed up like a pita.

Chipotle Vinaigrette

Is there anything better than a vinaigrette that you want to use on everything? I doubt it. We’ve used it to dress up grilled vegetables, served it drizzled over a Mexican steak bowl, and of course just as dressing for a simple salad. The added bonus is that this is the easiest dressing to make.

Use it in a variety of ways – today it was drizzled over a Mexican Steak Bowl, and it was perfect with the combination of sweet, smoky and spicy.
  • 1/2 cup avocado oil
  • 1/4 cup freshly squeezed lime juice
  • 1 chipotle pepper from a can of chipotle in adobo sauce
  • 2 tbsp honey
  • 1 garlic clove
  • 1/2 tsp cumin
  • 1/2 tsp sea salt
  • freshly ground black pepper to taste

The directions are embarrassingly easy ….. simply toss it all in a blender and let it whizz until everything is creamy and smooth. The combination of chipotle, honey and lime is brilliant.

Grilled steak and vegetables, served over a bed of Mexi style rice and garnished with a juicy fresh tomato and cilantro salad. This dressing is amazing.

This recipe came from the the Love and Lemons website, and you can be sure anything from Jeanine Donofrio is going to be delicious.