Unknown's avatar

About Chatty Kathy

Living in the beautiful Okanagan Valley in BC, we have an abundance of fresh food to cook with, and believe me, I do! We have 5 daughters, 3 grand daughters, and lots of honorary daughters ...I love cooking for family and friends and they all keep me busy in the kitchen. Here is hoping that this blog will allow my entire family to access those recipes they ask for, and maybe even enjoy a few travel photos!

Oven Roasted Tomato Sauce

img_9447

At this time of year the tomatoes are plentiful, and I do not like to see any go to waste …. also don’t have quite enough time to can it all!  This is my go to, for whatever amount of tomatoes I have ripe at the time.

Fill a roasting dish with tomatoes, (roughly chopped, skin on), garlic, onion, sweet peppers and entire stalks of fresh herbs.  (I also sneak a few carrots in there) Drizzle over some good quality olive oil, salt and pepper.  Roast at 350 for 2-4 hours, very flexible.  This also works in the crockpot.

img_9404

Allow to roast until reduced by about half.  Remove the stalks of fresh herbs, they have done their job …..

img_9450

Puree with immersion blender or food processor (if you use processor make SURE you have left room for steam to escape or this can be a nasty experience).  Stir in 1 small tin of tomato paste and season to taste with salt and pepper.

img_9451

Depending on the acidity of your tomatoes, you might like to stir in a bit of sugar, but taste first.img_9396

It is easy to just put the cooled sauce in a marked freezer bag, and put it in the freezer to enjoy all winter long.

Pizza Pockets & Hand Pies

fullsizerender-6

Following is the recipe for a basic, soft and easy to work with dough.  I used this recipe for making pizza pockets for my granddaughter Sloan’s first week of Grade 1, and then turned leftover dough into meat hand pies for 93 year old Auntie Elsie, who is kind of tired of cooking these days. Leftover dough you say???  Well I didn’t think 8-10 small pizzas would give me enough dough so I doubled the recipe … which yielded 25 pizza pockets, 10 hand meat pies and 1 pizza for our dinner.  Significant yield!!!

Pizza Crust: (makes 8-10 small pizzettas)
Ingredients:

  • 750 g white flour (use Tipo ’00 flour if you can or a strong bread flour)
  • 200 g semolina flour
  • 2 ½ cups lukewarm water
  • 2 tsp. sugar
  • 1 Tbsp. (or 1 x 8 oz packages) yeast
  • 2 tsp. sea salt
  • 3 Tbsp. olive oil

Directions:

  1. Place your flour(s) and sea salt in a large bowl and whisk together. Create a well in the center.
  2. In a large measuring cup, mix together your lukewarm water and sugar until the sugar dissolves. Sprinkle in the yeast and let it sit for approximately 5 minutes, until the yeast starts to ferment.
  3. Pour the water/sugar/yeast mixture into the well along with the olive oil and stir together with a fork or large spoon until it is well mixed. Once it becomes too difficult to mix together with your fork or spoon, sprinkle extra flour on the dough and your hands and mix with your hands until the dough comes together in a ball.
  4. Place the dough on a well-floured flat surface and knead, pushing the dough using the palms of your hands, for approximately 10 minutes, until the dough looks smooth and stretchy. You may need to add extra flour as you go, being careful not to add too much to keep the dough from being too stiff.
  5. Place the ball of dough in a large bowl coated with olive oil, dust the top of the dough with flour, and cover with a clean dish towel and place in a warm draft-free area for about an hour, until the dough has doubled in size. Punch the dough down.  At this point you can either refrigerate the dough overnight (or up to 2 days, covered with plastic wrap and occasionally punched down) or divide the dough into 4-6 portions (depending on how big you want your pizzas).  I highly recommend making your dough in advance and letting it sit in the fridge as the longer ‘proof’ really makes a difference.   Ensure that your pizza dough comes to room temperature before cooking (bring it out of the refrigerator 1-2 hours before you are ready to cook).
  6. Once ready to cook, heat your oven to the highest heat setting (500F for most ovens) and place your pizza stone in the oven for at least 20 minutes.
  7. Portion the dough into 8-10 balls and place on a well-floured surface. Using your hands, with your knuckles, (dusted with flour, along with the counter to prevent the dough from sticking) form your pizza crust 15-20 minutes before cooking your pizza on a flat surface dusted with semolina flour until it is nice and thin. Keep stretching it with your hands to make a flat pizza base (it doesn’t have to be round or perfect!).
  8. Remove the pizza stone from the oven, lay your rolled dough on the stone, and add your ingredients ….

If you are using this dough for pizza pockets or hand pies, after step 5 skip to step 7 and form circles of dough.

img_9494

For pizza pockets, layer on pizza sauce, your chosen ingredients and cheese, closing the pockets with a fork.  Make sure to prick the top surface with the fork so steam can escape.

img_9496

img_9498

img_9504

img_9503

For the meat pies I used an ice cream scoop to get a consistent amount of the meat mixture – centered on the dough, and then brought up the edges to crimp over the middle of the circle.  Brush with beaten egg and poke with a fork.

Bake pizza pockets or meat pies at 400 until golden brown, about 20 minutes.

FILLING FOR MEAT PIE

1 onion, minced finely

1 garlic clove, grated

2 carrots

2 stalks celery

1/2 cup each frozen corn and peas

1 small zucchini, diced

1 lb ground beef

1 tbsp each dried oregano and basil

Saute the onion and garlic until the onion is lightly carmelized, add the carrots and celery, season with salt and pepper, and cook until vegetables are almost cooked through, then add zucchini and saute for another few minutes.  Remove from heat and place in bowl.  Add frozen corn and peas.  Return pan to heat and stir in ground beef – cooking until lightly browned, seasoning with salt and pepper.

Add beef to vegetable mixture and season with dried herbs, adding more salt and pepper if needed.  At this point, if you feel like it needs a bit more flavour, add 1 tbsp of tomato paste.  Stir well and set in fridge to cool down.  When cool, continue on with forming your hand pies.

These pies are only limited by your imagination – use whatever you feel like to fill the pies, making sure to taste the mixture before filling the dough rounds.  Made in a smaller size they make a great appetizer too.

Smoked beans in electric smoker

Hey, your smoker is going with either your pork or chicken anyway, why not put that extra rack to use?  This recipe came from one of the ladies at my office, Karen Benn, and she adapted it to her smoker.  It is such a hit that the beans were gone before either the pork or chicken …. I know that seems weird, but it’s true!  For vegetarians, leave out the bacon and you have an amazing bean dish even without that bacon ….

beans

Pull out a large fry pan and saute until carmelized:

2 cups chopped white onions

1 pack bacon (partially frozen so you can easily slice it thinly)

Take your time with this step,the richer the color you get on your onions the more flavour your beans will take on.

In a large disposable foil tin, stir in 4 cans of beans.  This is really your own preference, feel free to use any combination of kidney, canelli, black or baked beans.

In a separate bowl stir together:

1/2 cup ketchup

1/2 cup white vinegar

1 1/2 cups brown sugar

1 tsp garlic powder

1 tsp dry mustard

Combine beans, carmelized onion and bacon mixture and the seasoning blend.  Stir well, tightly cover with foil (using a sharp knife poke holes in the lid) and smoke in your electric smoker at 275 for about 3 hours.  Yes, they will be runny when they come out, but allow to sit for a few minutes and you won’t believe how quickly they disappear.


smoked beans

Smoked Chicken in electric smoker

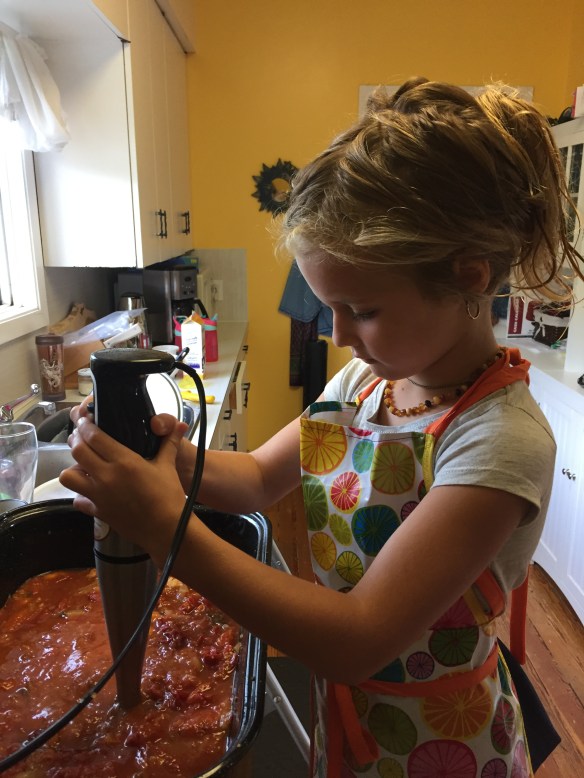
Pulled pork is incredible, and all the rage everywhere …. I understand that, and love it.  However, a few of my faithful friends and family that love me cooking for them, and I love cooking for them …. aren’t into pork.  So, my response is always to do a smoked chicken at the same time.  Usually all the pork eaters gobble down the pulled pork as their main meal, and then they just can’t keep their fingers from snacking and grabbing at bits of the smoked chicken.  Not only is it incredibly moist and delicous, that remaining carcass makes delicious soup stock!  I think the secret is in the brine.  Always an extra step, but if you are cooking for the love of it, you won’t mind this step at all.

This recipe works well for a 4-6 lb chicken.  I always recommend cutting the chicken in half, it allows for better brining and smoking.  Get your butcher to do it if you like!

Chicken brine

Brine:

2 cups chicken broth (homemade if possible)

1/2 cup kosher salt

1/4 cup local honey

2 tbsp raw sugar

2 tsp black peppercorns

4 long sprigs fresh rosemary

4 cloves garlic, smashed lightly to open up the aroma

2 dried chipotle chiles

2-3 bay leaves

Start by bringing 4 cups water to a boil in a pot, stir in the salt first, and dissolve that.  Remove from heat and stir in the rest of the ingredients.  If that doesn’t cool it down enough, add enough ice cubes to completely cool the liquid.  You do not want to put a cold chicken in warm liquid.  Make sure your chicken is completely covered with liquid (adding more cold water if necessary) and put in the fridge for 12 hours.

Remove from brine, rinse well and pat dry.

Mix together:

  • 1½ tbsp of garlic powder
  • 1½ tbsp oregano
  • 2 tsp thyme
  • 1 tbsp basil
  • 1 tbsp chile powder
  • 1 tbsp paprika
  • 1 tsp ground black pepper
  • 2 tsp salt


Feel free to play around with these spices and herbs, come up with your own blend!

Give the chicken a generous massage with this rub – treat it well ….. I usually like to wear disposable gloves for this – I find it helps the rub to adhere to the meat better than my hands …

Chicken ready for trhe smoker

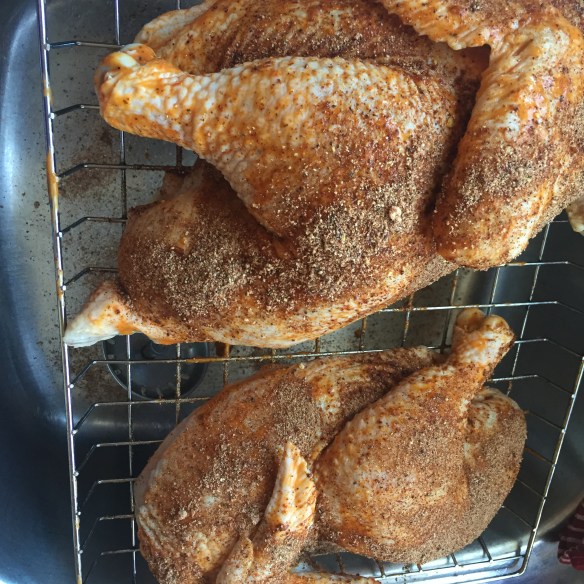
At this point, put the chicken on your smoker rack, in the fridge (I put it on a cookie sheet so any remaining drips don’t end up in my fridge)  Allowing the chicken to completely dry out in the fridge, while soaking up these spices makes for a crispier skin.  Honestly, if you are doing this in an electric smoker you may find that the skin still doesn’t get crispy but you can always finish it up on the bbq or the broiler if you desire.

Place in electric smoker, which has been preheated to 250, and smoke for 3 hours.  *Usually I’ve had my pork in there for 4 hours already …*  Check the temperature – you ultimately want to end at 165 degrees, and do not go beyond that.  Usually this takes about 4 hours at 250.  When you reach that temperature, remove from smoker and tightly wrap in foil, allowing to rest for an hour.  At that point it will usually shread easily from the bones.  Make sure to reserve those bones for soup stock!

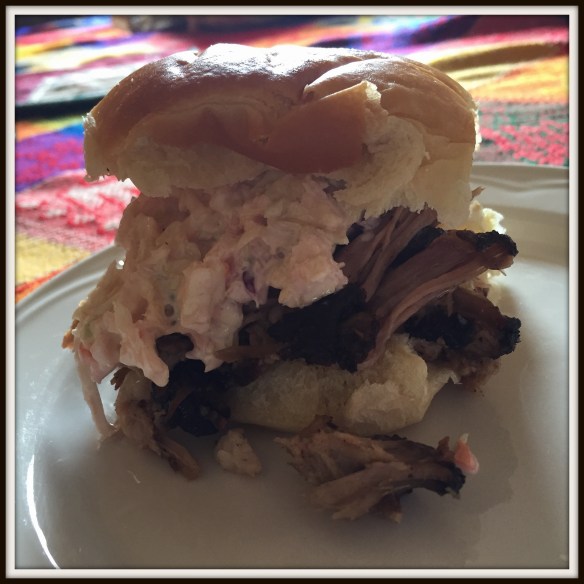
Serve with the usual pulled meat accompaniements …. creamy coleslaw, extra barbecue sauce and really fresh buns.

Pulled Chicken


Peach Sorbet

Some days the creamy smooth texture of homemade ice cream, made with peaches ripe and still warm from the sun is exactly what I’d like …. other times the bright and fresh taste of peach sorbet is ideal.  It is so refreshing that it is like an icy peach.

Fresh peaches

Peaches right off the tree can’t be beat!

At this time of year, I like to have simple syrup made and cold in the fridge so it is ready to go whenever the fruit is bursting with flavour.  It’s called simple syrup for a reason – just bring equal parts water and white sugar to a boil, allow sugar to dissolve completely and remove from the heat.  Stir well and keep in the fridge.

My kitchenaid mixer gets a lot of use, and the ice cream maker bowl attachment was a brilliant purchase.

Puree about 2 pounds of fresh peaches (you want to end up with about 5 cups of peach puree.  Stir in the juice of 1 lemon and a dash of salt.  Allow to completely chill in the fridge before pulling out your ice cream maker.

Combine peach & lemon puree, 1 1/2 cups simple syrup and stir in 1 tsp vanilla paste.

With the bowl of your ice cream maker turning already, slowly pour in the mixture and allow your mixer to do the work – usually it takes about 20 minutes, but this can vary depending on the temperature of your peach puree, and the temperature in the kitchen.  Once the mixture looks smooth and thickened, put it into a clean container in the freezer to firm up.


IMG_9227


Jean’s Cole Slaw

This simple coleslaw is great as a side for a variety of summer meals, but as a topping on either pulled pork or pulled chicken it really shines.

Pulled Pork


2/3  cup mayonnaise

1/4 cup dijon mustard

1 tsp celery seed

1 tsp sugar

juice of 1/2 lemon

salt & pepper to taste


Blend well, and keep tasting – should have a nice balance of sweet and tangy.

Pulled Pork in the Smoker

During the winter months I resort to using either my oven or my slow cooker for pulled pork …. mainly because we don’t have an outdoor space where we can use our electric smoker and still have it be under cover.  Whenever the opportunity is available though, this is the way to go.  When I am operating the smoker I like to make good use of that smoke and utilize the space, so I often do a pork roast as well as a chicken.  After trial and error, this pulled pork is the best!  Pile soft buns with the meat, some creamy cole slaw and a few pickled onions – serve with potato salad and green salad and this meal is a winner.

Pulled Pork


BRINE:

  • 8 ounces (3/4 cup) molasses
  • 12 ounces pickling salt
  • 2 dried chipotle chiles
  • 2 quarts bottled water

6-8 pound pork shoulder (or Boston Butt as it is known in some areas)

It is best to weigh the salt.  Pickling salt, by ounce, is not as “salty” as a table salt by either weight or measuring cup.

RUB:

  • 1 tsp whole cumin seed
  • 1 tsp whole fennel seed
  • 1 tsp whole coriander
  • 1 tbsp Mexican chile powder
  • 1 tsp black pepper
  • 1 tbsp onion powder
  • 1 tbsp garlic powder
  • 1 tbsp paprika

Using a spice grinder (or mortar & pestle) finely grind the cumin, fennel and coriander seeds.  Add the rest of the spice powders and blend well.

Heat ½ of the water, add molasses and salt.  Simmer just until the salt has dissolved and stir in the rest of the water along with the chipotle chiles.  When mixture has cooled, put in a container suitable to go into your fridge,  add in the pork and make sure it is submerged in the liquid, adding more water if necessary in order to cover.

Brine at least 12 hours.  Remove from liquid, rinse well and pat dry.

Using kitchen gloves (rub adheres best if you do) vigorously rub the pork with the spices.

Smoker ready pork and chicken

Heat your smoker to 250, and place pork on a rack.  Start testing the pork for temperature after 7 hours.  Once it has reached 190 (yes, I know that seems high) it is done.  Here is the key part – tightly bundle the whole thing in a tin foil pack, not allowing any steam to escape and let it sit for at least an hour.  This will allow the moisture within the pork to redistribute and make for the most tender, flavourful pork ever!

A simple coleslaw recipe works best for piling on top of the pork – try Jean’s coleslaw on this site, and add a few pickled onions (also on this site).


Lemon, Shrimp & Spinach Pasta

This makes a very quick dinner, fresh and delicious.

IMG_8095.JPG


Ingredients
For the lemon oil:
1/2 cup warm extra-virgin olive oil
1 lemon, zested (in wide strips)

For the pasta:
1 pound linguine pasta
2 tablespoons olive oil
2 shallots, diced
3 garlic cloves, minced

1 cup sliced zucchini
16 ounces frozen shrimp
1/4 cup lemon juice (about 2 lemons)
1 lemon, zested
1 teaspoon salt
1/2 teaspoon freshly ground black pepper
3 ounces spinach (about 3 packed cups)
1/4 cup chopped fresh flat-leaf parsley

Optional:  1/2 – 1 tsp chile flakes & 1 tbsp butter


For the lemon oil:
Combine the olive oil and the lemon zest in a small bowl and reserve.
For the pasta:
Bring a large pot of salted water to a boil over high heat. Add the pasta and cook until tender but still firm to the bite, stirring occasionally, about 8 to 10 minutes. Drain pasta, reserving 1 cup of the cooking liquid.
Meanwhile, in a large, heavy skillet warm the olive oil over medium heat. Add the shallots and garlic and cook for 2 minutes. Add zucchini and saute until just tender.  Add the shrimp and cook until pink, about 5 minutes. Add the cooked linguine, lemon juice, lemon zest, chile flakes, butter, salt, and pepper. Toss to combine. Turn off the heat and add the spinach.  Using a mesh sieve, strain the lemon zest out of the reserved lemon olive oil and add the oil to the pasta. The zest can be discarded. Add some of the cooking water to desired consistency. Add the chopped parsley to the pasta and toss to combine. Serve immediately. (dusted with parmesan if you like)

Basic Dinner Rolls

Dinner Rolls

Making fresh yeast dough dinner buns might take a little time, but it is so worth it!  The house smells great, the effort is minimal and the pay off at dinner time is an added bonus.

  • Recipe yields about 12 dinner rolls, easily doubles if you are feeding a group or want leftovers!
  • 2 to 2-1/4 cups all-purpose flour
  • tablespoons sugar
  • packet quick or rapid rise yeast
  • 1/2 teaspoon salt
  • 1/2 cup milk 
  • 1/4 cup water
  • tablespoons butter 

Combine 3/4 cup flour, sugar, dry yeast and salt in a large mixer bowl and stir until blended. Combine milk, water and butter in a small saucepan (or microwave safe bowl).  Heat until very warm but not hot to the touch  (120° to 130°F.  Butter won’t melt completely). Add to flour mixture.

Beat 2 minutes at medium speed of electric mixer, scraping bowl occasionally. Add 1/4 cup flour; beat 2 minutes at high speed. Stir in just enough remaining flour so that the dough will form into a ball.

Knead  on lightly floured surface until smooth and elastic and springs back when lightly pressed with 2 fingers, about 6 to 8 minutes. Cover with a towel; let rest for 10 minutes.

Cut dough into 12 equal pieces; shape into balls using your hands. Place in greased  8-inch round or square pan.  Cover with towel; let rise in warm place  until doubled in size, about 30 minutes .

Bake in preheated 375ºF oven for 20 minutes or until golden brown. Remove from pan by running a knife around the edges and invert onto wire rack; brush with additional melted butter, if desired. Serve warm.

Asian Marinade for Chicken or Pork

Asian Marinade for Chicken or Pork


I love the balance of flavours in this marinade, it just has the right amount of sweet, heat, sour and salt …. and caramelizes perfectly on the grill.  I find it works really well on pork chops or chicken thighs but I’m sure it would be great on just about anything.

1/4 cup vegetable oil

2 tbsp brown sugar

2 tbsp rice vinegar

1 tbsp minced ginger

1 tbsp Sriracha sauce

1 tbsp chile garlic paste

2 tsp sesame oil

3 cloves garlic, minced

zest & juice of 1 orange

juice of 1/2 lime

Make enough marinade for 8 pork chops or 12 chicken thighs.

Garnish:  lime, roughly chopped cilantro and green onions.

Place all marinade ingredients in food processor and give it a good whiz.  Pour half of it in a ziplock bag with meat and reserve the rest.  Give the meat a massage and allow to marinade for 30 minutes at the least and up to 8 hours.

Put reserved marinade in a small sauce pan and cook over moderate heat until reduced and thickened.

Heat grill, and grill meat, brushing with the reduced marinade.